-
Build It Yourself, Furniture Makeovers, Home Decor, Neat & Tidy, Organization & Storage, The Country House
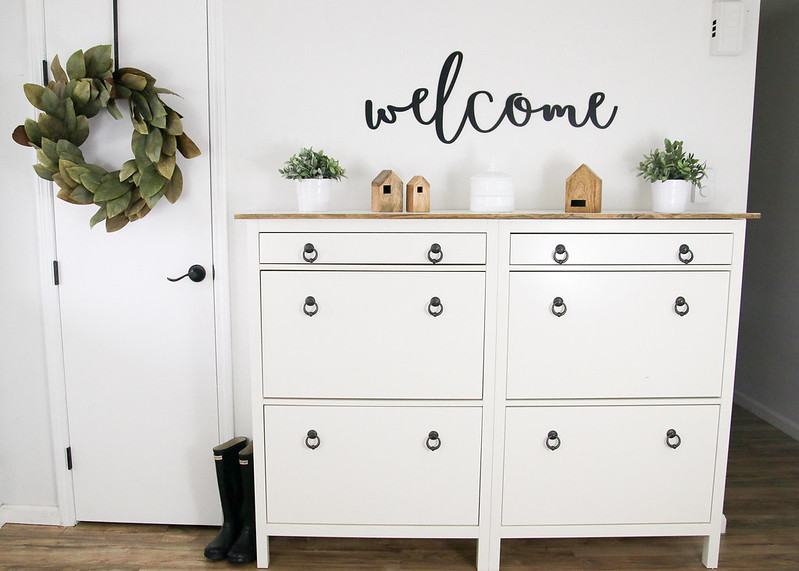
Create Extra Storage In The Entryway
Since we’ve moved to The Country House, something that we’ve struggled with is storage space. Especially, after we turned our master closet into a sweet little nursery. Living in only 1300 square feet with 5 people makes finding or adding storage solutions many times difficult. However, we’ve been able to create an entryway with extra storage by whipping up a cool Ikea shoe storage hack!
Disclosure: This post may contain affiliate links, which means we may receive a commission if you click the link and purchase. Clicking a link won’t cost you any extra money and helps keep this site running! Please check out our disclosure policy for more details.
Once we knew that our master closet was going to be transformed, we had to come up with a game plan for all of the stuff already inside.
We sorted and donated the things we didn’t love. Our clothing took up residence in a small hallway closet. But that left us with no place for our shoes, hats, belts, scarves, etc. We did try to hang a shoe rack over the inside of the closet door. However, the shoes hit the hanging clothes and fell off the rack constantly. It was just a huge mess!
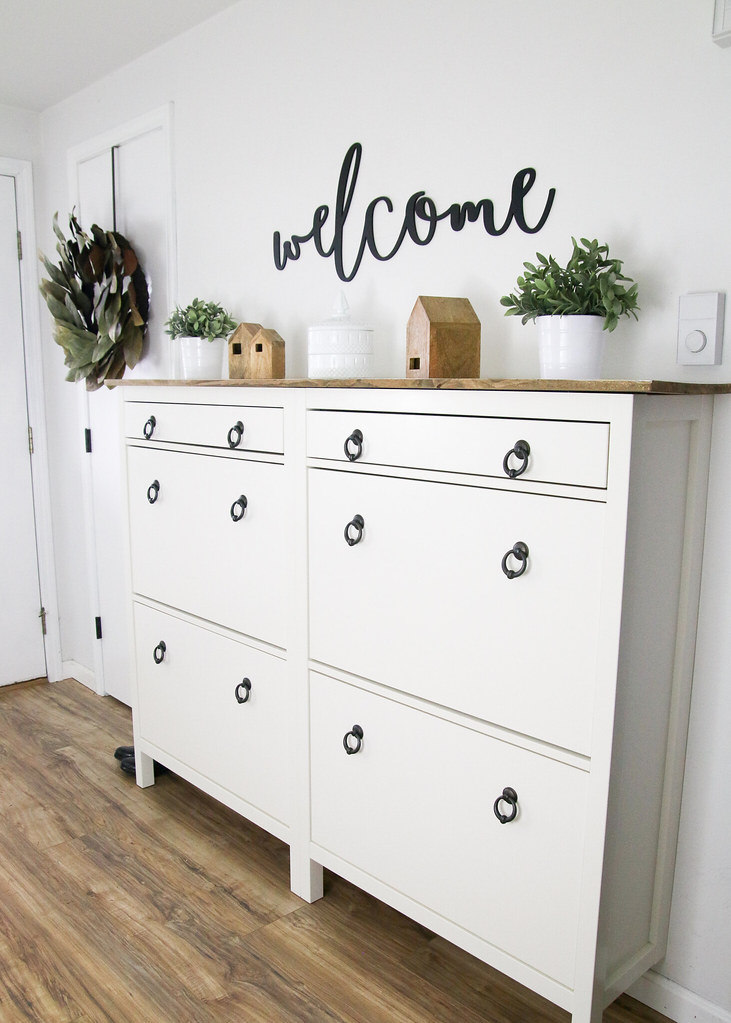
After some brainstorming and online storage system browsing, we decided to buy two Ikea shoe storage cabinets and add them to our entry area. The original set up of each cabinet left several inches of space between the center of the cabinets. They ended up extending beyond the hallway wall just a bit, which looked pretty wonky.

So, we decided to remove the original tops, slide the cabinets together, and attach a new stained/painted top to make them look more like one unit. We also replaced the old knobs for some ring pulls that have a more unique look.

Welcome Sign | Nesting Houses | Ring Pull
Each cabinet is supposed to hold a minimum of 12 pairs of shoes, but depending on the size and style, you can definitely fit more. I’m a size 7.5-8 and have over 20 pairs inside of one cabinet!
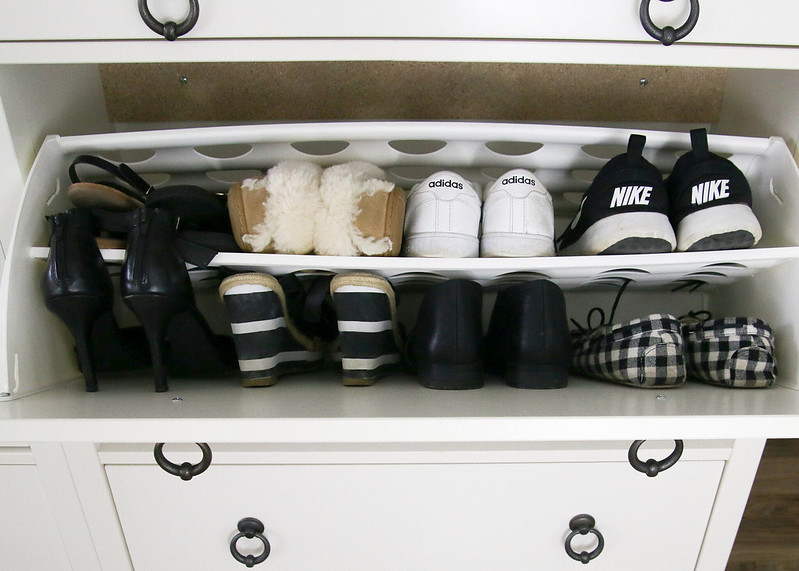
I love the extra drawers at the top of the cabinets too! Perfect for cold weather accessories.

You truly realize how much stuff you have when you don’t have a place to put it. Adding this shoe cabinet storage to our entryway has helped us with a major storage struggle. The depth of the cabinets is perfect for our small space and doesn’t impose too much on the room. We are so happy with how this project/hack turned out!
-
$100 Room Challenge Week 3 – DIY Barn Wood Headboard
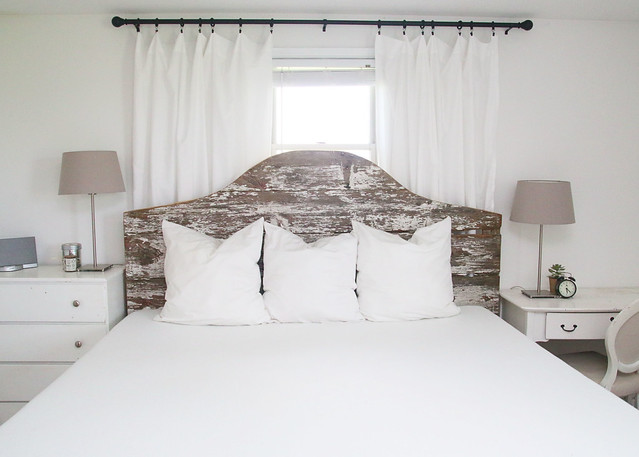
About 1.5 months ago, we finally purchased the king sized bed that we had been wanting. Woohoo! Do you know how awesome it is to have so much space for sleeping? If you don’t, I will tell you that it is absolutely amazing!!! Anyway, since we already have the bed and we are working on our bedroom for the $100 Room Challenge, we decided to make a DIY Barn Wood Headboard for week 3.
See the before pics and our plan for the master bedroom.
This post contains affiliate links. Click here to read my full disclosure.
This piece of barn wood is actually a door from an old building that was at my grandparents’ house. After my grandparents passed away, my parents moved in and were nice enough to give it to us when they redid the building. It has just been sitting around waiting for the right time/use to come along.
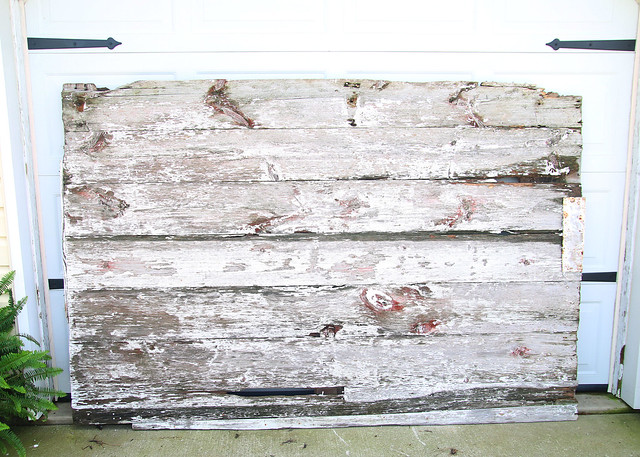
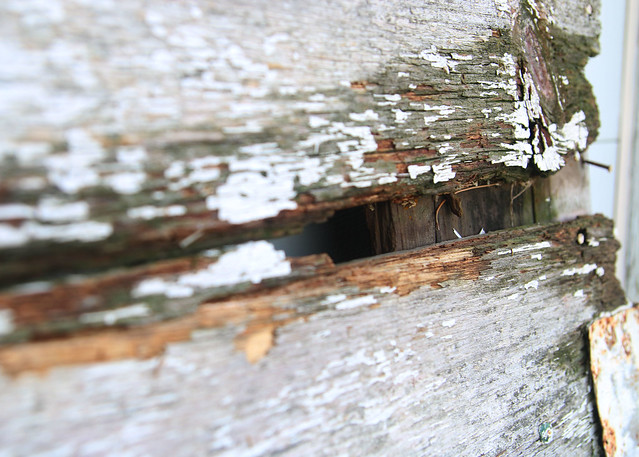
See how distressed it is, with the chippy paint and cracked wood? But that just gives it that much more character!
This project was a two person job. While my hubby, Chris, cleaned up the barn wood, I free handed a template for the top of the headboard. Then, I just taped it on and traced it with a sharpie. After that, Chris cut it out using a jigsaw and sanded while I made lunch. He also added a few coats of Polycrylic to seal everything in, just in case the existing paint had lead in it.

Finally, we lugged it inside and put it in place. Doesn’t it look good?

We noticed that after adding the Polycrylic, the wood actually darkened. I’m not sure if I will eventually add some white wash to the headboard to lighten it just a bit, but for now, we are sticking with it as is.
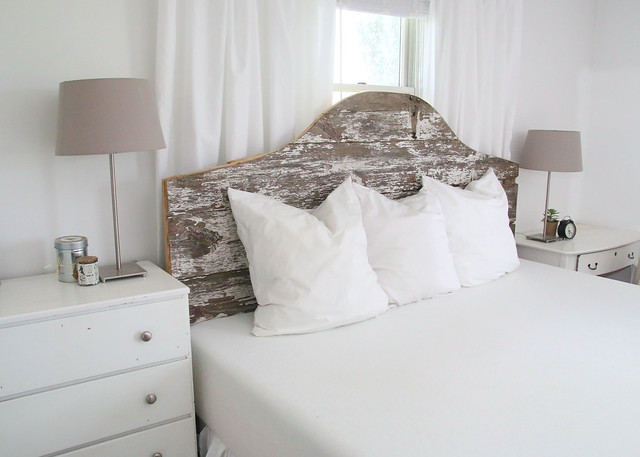
With just this one project, our master bedroom looks so much better! Not only are we sleeping better because of our new mattress and foundation, but this headboard really adds some farmhouse feels to the space. And that is just the look we are going for!
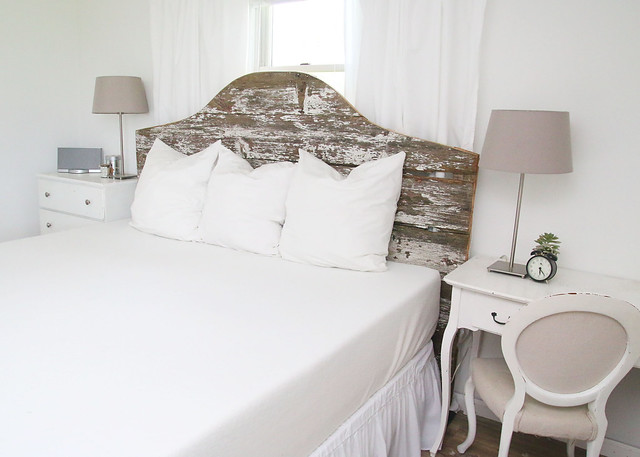
Oh, and I almost forgot! I finally put on the dust ruffle we purchased when we got the bed. #slacker
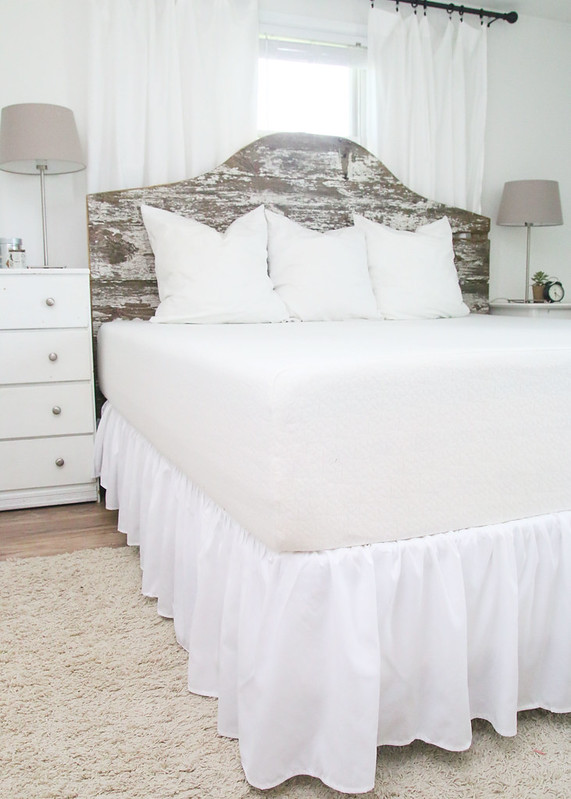
Don’t you think our DIY barn wood headboard turned out great?
This headboard adds the perfect amount of romance to the room with the soft curve but also keeps things from getting too girly with the rustic, chippy paint.
Did you miss a week of the $100 Room Challenge? Catch up now!
Week 1| Week 2 | Week 3 | Week 4 |See how the other participants are progressing by clicking the links below!
-
$100 Room Challenge: Week 3 – Bathroom Progress
We are in the midst of week 3 of the $100 Room Challenge and we still have so much to do! Earlier this week, I shared our plans for the room, as well as the paint colors we chose. Getting the painting done made a huge impact on the brightness in the room. We’ve made a little more bathroom progress since then, but our list still has quite a few projects on it and we are running out of time! Eek!
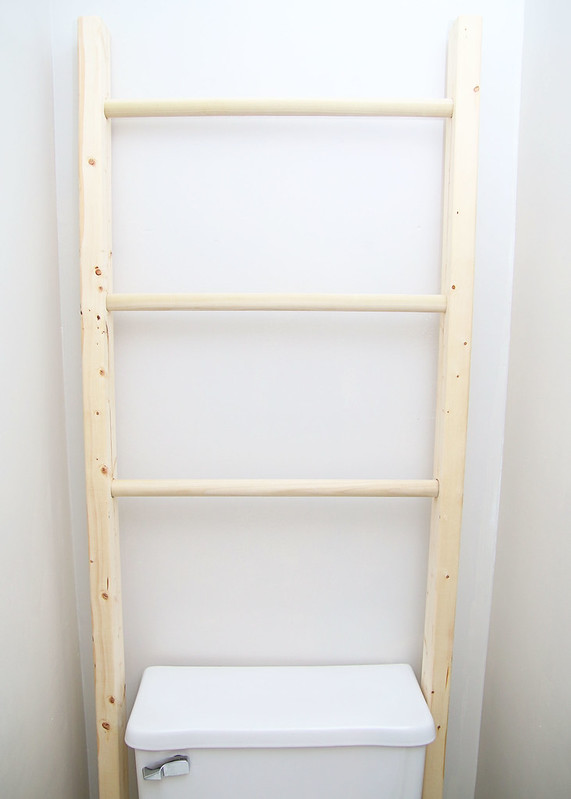
This week, we were able to build a ladder that goes around/above our toilet. It was so easy to put together and cost us less than $5 for the wood! You may be wondering why I wanted to add a ladder to the bathroom. I’m hoping that it will bring in some color once it is stained and be a place for added storage by hanging baskets on it.
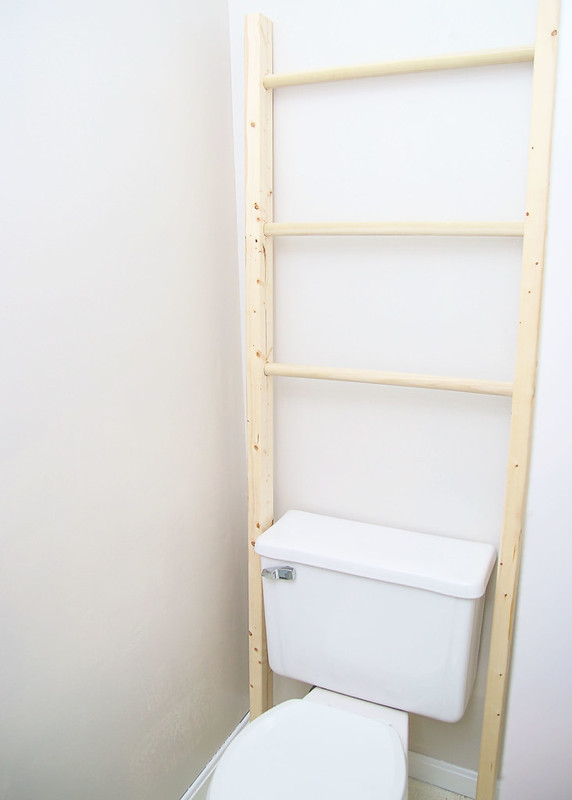
To build this puppy, we started out with 2 – 2″x3″ pine boards cut to 6′ in length and 3 – 1 1/8″ dowels cut to 24″. This dowel width allowed for the ladder to easily fit around the sides of our toilet tank. Then, my hubs used a 1 1/8″ paddle drill bit to create holes in the long boards and we just pushed the dowels in through the holes until they came out to the edge. So simple!

I know that is not a lot of progress for this week and this coming weekend I’m heading to The Bahamas! Woohoo! Meanwhile, my loving husband will be sticking it out at home with the kids and doing the electrical work for the bathroom. (Outlets, lighting, etc.) Then, when I get back, it will be a race to finish up the rest of the room!
Let’s check on the to-do list and see how much we have left!
Paint the wallsPaint the doors/trim/vanity cabinetSpray paint door hardwareBuild a ladder to put around/above the toilet.- Get wire baskets for storage
- Add a can light above the toilet area
- Make a frame for the existing mirror
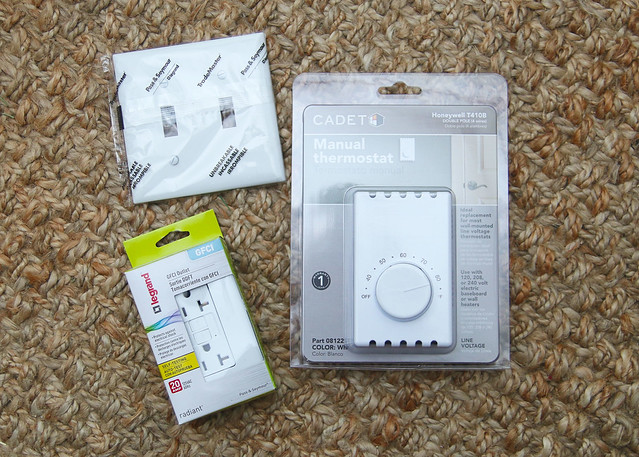
- Replace light switches/plates/GFCI outlet/thermostat
- Add hooks for towels
- Decorate with items already owned
Yikes! The list is still pretty hefty. Pray for a miracle that we will be able to pull this off in time! Oh, and check out the other participants to see how their room makeovers are coming along.
Did you miss last week’s post? Follow along with our progress by clicking the links to each week below!
Week 1 | Week 2 | Week 3 | Week 4
-
Create & Share Challenge: Holiday Wreath Display
The holidays are almost upon us! Can you believe how fast 2016 went? Me neither. For my last attempt at holiday decor (I’ve shared my Christmas tree and entryway decor) I wanted to share this holiday wreath display that is currently hanging in our dining area.
This post is brought to you by Elizabeth Joan Designs in collaboration with Cutting Edge Stencils. Although I did receive a product from Cutting Edge Stencils, all opinions are my own. Click here to view my full disclosure.
This month, I’m joining up for my second Create & Share Challenge, hosted by Casa Watkins and Pocketful of Posies! Thanks, Ladies! There are 9 other amazing projects, so make sure to check them out at the bottom of this post! (View my first Create & Share Challenge project.)
So wait… what is this challenge? Well, participants are tasked with using their personal decor style to create a project centering around one main item. And this month, we are working with holiday stencils from Cutting Edge Stencils! For this project, I made a fun and neutral holiday wreath display and it was so easy to create!

This post contains affiliate links. Click here to view my full disclosure.
To make this holiday wreath display, you will need:
- Holiday Cheer Christmas Stencil from Cutting Edge Stencils
- Painter’s Tape
- 48″ X 26.5″ Plywood
- Trim Pieces cut to 26.5″ and 45″
- Wood Stain
- Old Rag
- Paint Brush
- 2 Paint Colors (I used Waverly Chalk Acrylic Paint in White and Silver Lining.)
- Small Paint Roller
- Screwdriver and Screws
- Hammer and Nails
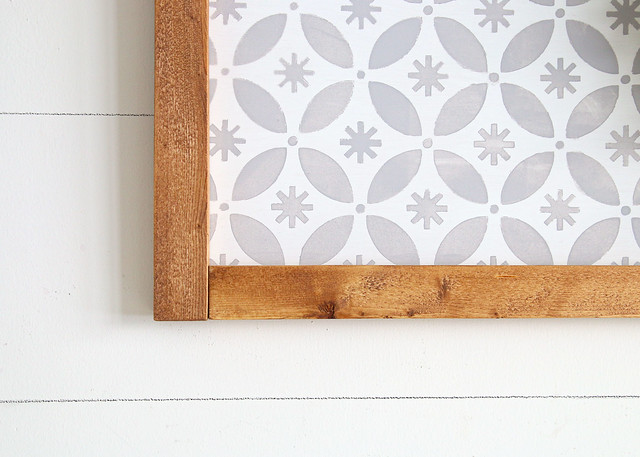
To start, I used an old rag to apply Minwax stain (Early American) to the trim pieces.

While the trim pieces were drying, I painted one side of the plywood with white paint.

When the white paint was dry, it was time to stencil! I don’t think I’ve ever used a larger stencil like this before and I could not believe how simple the process was. I simply used painter’s tape to attach the stencil to the middle of my board and used a smaller paint roller to apply the gray paint. Once I was finished with one section, I carefully pulled up the stencil and repositioned it in a new spot with part of it overlaying a previously painted section.

Next, I assembled the trim pieces to make a frame. I used screws to attach the ends together. (Oops, I forgot to get a photo of that!)
Then, I laid the plywood on top of the frame and nailed around the back edges.

You can see below that the corners of the trim were not mitered. I just put the straight edges together with the shorter pieces on the outside.
Easy peasy!
If you want to hang your creation, you can attach sawtooth picture hangers or D-rings to the back. Didn’t this turn out lovely?

To finish, add your favorite wreath! I chose a pretty boxwood wreath and attached it with a ribbon and thumb tack at the top. This holiday wreath display is currently hanging in our dining area and we love how it looks! You may have noticed that the dining area is starting to look a bit different. (See the before photos in our Country House Tour.) We’ve been working on it bit by bit and I will have a full update of the entire space after the holidays!
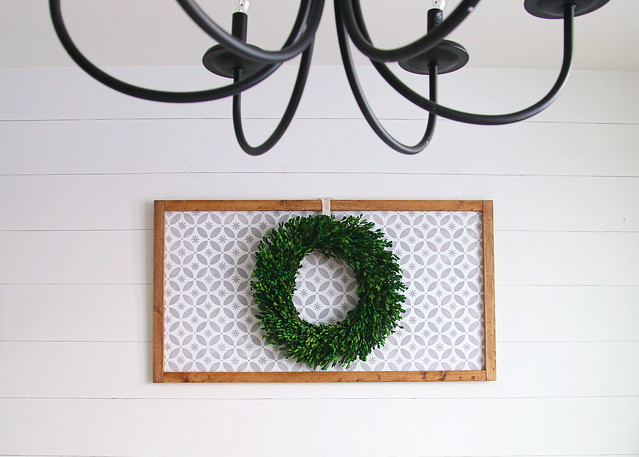
One of my favorite things about this holiday wreath display is that is can be used well beyond the holiday season and into the new year!
Thanks so much for stopping by to visit Elizabeth Joan Designs and don’t forget to check out the other awesome stenciled holiday creations below!

- Kim Six Fix – Stenciled Spray Snow Flakes
- Green With Decor – How to Stencil A Pillow For Christmas
- Vintage Romance Style – The True Meaning of Noel Sign
- Southern Couture – Wooden Reindeer Stencil
- One Mile Homestyle – Stenciled Holiday Coloring Page Place Mats
- DIY Beautify – Stenciled Wall Hanging Christmas Decor
- Elizabeth Joan Designs – Stenciled Wall Hanging
- Farmhouse 40 – DIY Reindeer Antlers Bulletin Board
- Iris Nacole – Stenciled Christmas Tree Stand Box
- Pocketful of Posies – The Easiest Christmas Cookie Decorating Hack Ever