-
Here’s Your Sign
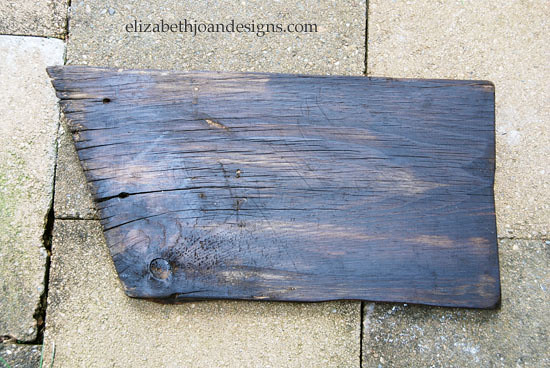
Four years ago, my parents moved into the house that had belonged to my grandparents. A woods in the back and several interesting old farm buildings, along with the house, make up this beautiful property they are on.
After moving in, there was one building that was particularly aged and needed a little updating; the machine shed. This old building was there when my grandparents bought the house and my grandfather used this barn for storing his tractors. Last summer, the ancient wood siding was torn off and replaced.
I think my parents may check out our blog quite frequently and know what kinda of DIY projects Erin and I are up to. Lucky for us, they decided to save some of the siding and doors back for us.
Of the boards I have, I found the shape of this piece extremely interesting and decided to create a sign out of it for our kitchen. By the way, Erin said she didn’t think this wasn’t interesting at all. Although, she did find the final product to be up to her standards.

Once I had chosen the location for my sign, I realized it needed to be a little smaller. Using the miter saw, I cut a smidgen off the bottom and side.

To keep the weathered looked consistent, I sanded and hammered the blunt edges I had just cut.

The sign was stained with Minwax Special Walnut. The porous wood soaked up more of the stain than I anticipated. Oops! Should have known!
To remove a bit of the dark coloring, I sanded the entire piece down.
Next, I painted the letters on using the same technique Erin used {here}. I don’t always have a real steady hand when painting, but I was okay with the hand written look.
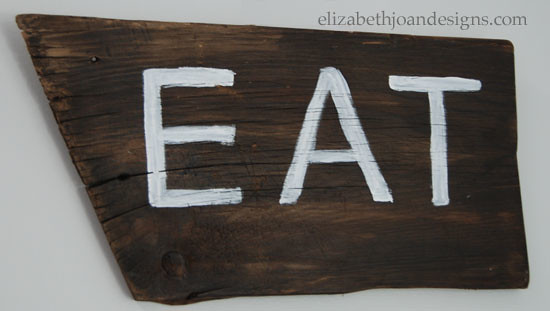
Then, the letters were sanded down to let some of the wood show through. Finally, using a hot glue gun, I tacked down a piece of jute to the back and hung the sign from the wall.

It’s so nice to have something in our home with special meaning. Every time I look at it I will think of my parents and grandparents. Oh, and to eat.

-
A Shady Project
I have been seeing tons DIY roman shade tutorials all over the internet, so I knew I just had to give it a try. Here’s my version of A Shady Project. Haha. I’m so punny!
Our kitchen window did not have any type of window treatment and looked a little bare. A roman shade, made out of mini blinds, was the perfect budget friendly thing to spruce it up. I know. Our kitchen window needs more than a shade. Because of all the moisture built up in it, it needs to be replaced. But this wonderful shade was right around our price range, unlike a brand new window. This was also an awesome way to add a pattern into our kitchen area.
$3.00 mini blinds, Liquid Stitch, scissors, and gray and white striped fabric were the supplies I used.


It is, in fact, just as easy as it looks to make. I basically just removed the slats by cutting the cord that looks like a ladder. Not the thick one. Then, I glued 5 remaining slates to my fabric about 9 inches apart to create the folds of the shade. Finally, I hung it in our window. It only took about 20 minutes! I referred to several tutorials on {Pinterest} and I found similar steps for each one.

Now, does anyone have any great projects I can attempt with these leftover mini blind slats?

-
Tips for Mixing Your Own Paint Color

We have so many buckets of paint just sitting in our basement waiting to be chosen for the perfect project. Most of our home is painted in some form of gray. Although we do have other colors, I think we have about 50 shades of gray in our basement and I am not talking about the book. The paint I used for our {Half Bathroom Remodel}, I mixed myself. Here are a few Tips for Mixing Your Own Paint Color.
1. Be Prepared
I always lay a drop cloth or newspaper down before I start, to keep my floors paint free.Keep these items handy:
Leftover paint- of course
Paper towels- for cleaning drips and spills.
Stir Sticks- use a larger stick if you are mixing in 5 gallon bucket
Pen and Index Card- for record keeping.
Paint Brush- to test the color on your wall or project.
Old Measuring Cup- (optional)
2. Stir, Stir, Stir
Before combining colors, thoroughly mix your leftover paints. Some of our paint we have had around for a while and it has separated. I like to get all the pigments fused back together before using.3. Some Paint Is Unusable
Freezing through several winters can be hard on your leftover paint. After stiring, if it doesn’t seem to mix up well, do not use. If there are any funky smells upon opening your can of paint or you notice mold or mildew do not use. If your paint was made before 1978 it may contain lead and any paint made before 1991, may contain mercury and you will want to avoid using any these for obvious reasons. Do not use.4. Mix Same Type of Paint Together
We all know, oil and water do not mix, so don’t try to mix them. Combine only your oil based paint with oil based, and water based paints with water based. If you accidentally mix the two together, you will end up with a clumpy substance that resembles cottage cheese. Do not use.It also works best if you do not try to associate interior with exterior paint. Do not use.
5. Blending Different Sheens
Just remember, the more high gloss paint in your concoction the glossier your finish will be and the more flat paint you add, the less glossy it will be. If your heart is set on a certain finish, then fuse only that sheen together.6. Mixing The Right Amount
Keep in mind the amount of paint you will need for your project. Mix your paint in an empty 5 gallon bucket, for a large room or combine your paint in an old paint can or even a paint tray for smaller projects.8. Keep Records
Weather I am trying to duplicate the color or achieve the same sheen, I keep a record of how much paint I am adding of each color. I also love going back and seeing what went into each “homemade” color. This step is completely optional but I always find it very helpful.
9. Elementary Art
Remember when you were in school and learned how to mix colors according to the color wheel? Now is a great time to utilize that knowledge. ie: red and blue mixed together is purple.*Making a color darker is much easier than lighting it.
10. Storing Unused Paint
Between coats, you can cover your brush and tray with plastic wrap, and store in fridge, so it doesn’t dry out. Once you have finished painting, store any extra paint for touch ups, in an old paint can or a plastic container with an airtight lid.
11. Have Fun!
It’s not brain surgery people, you’re just mixing paint. So it’s okay to have a little fun. This is something you can’t really screw up. Or can you? I personally like to name my final color. Meridith Grey, (Grey’s Anatomy anyone?) is the name of a color I mixed and used for my kitchen cabinets. My loving sister named the paint applied to my bathroom walls, Blayne (Blue, Gray, Green.)
When I feel like changing things up, I mix my nail polish colors together using a lot of these same tips, to create a new one. Not all of these tips will be needed for nail polish and you will be working on a much small scale. I mix my colors together on a smaller plastic plate and rinse the nail paint brush when I am finished.

So, just sit back, relax, and mix away.
-
Half Bathroom Remodel Part 2: The Final Reveal
Pop the cork on the champagne! Pull out the streamers and balloons! The big Half Bathroom Remodel Part 2: The Final Reveal is finally here! Since we started our remodel way back in January, to finally be done with the bathroom is definitely a reason to celebrate. Woohoo!

To see where it all began check out {Half Bathroom Remodel Part 1}.We have recently added some shelving above our commode, to give our washroom some added storage. For the shelves, we picked a 1″ high x 1′ deep x 6′ long piece of pine from The Home Depot. While we were there, we had them cut it into 3 equal pieces. Once we were home, I slapped a couple coats of white paint on each board.
To attach the shelves to the wall I used some brackets leftover from another project. They can be picked up at your local hardware store for around a buck a piece. For these shelves, I like how chunky these brackets are.

My diy {baskets} and {apothecary jars} provide cute, functional storage in our bathroom. I also added a picture frame with the words You Are Beautiful in it. Who doesn’t like a good ego bust in the mornings?
During this remodel, I had my first adventure in basic electrical work. When I flip the switch, the light comes on, so I called it a success. And I didn’t get shocked! Yay! I do not have a picture of the before light, but I assure you, this one is a huge improvement.
The mirror was a great find by my awesome sister, who picked it up for free. I happily traded her an old window I wasn’t using for it.
We love our new bathroom! I am impressed that we were able to do it all ourselves. It was hard work and took us several months but so worth it.

