-
Clipboard Art Display
Two kids in preschool = lots of artwork. Did we have to get a second refrigerator to display all of those papers? Well, no, but I am glad you asked. We let the kids decide on their favorites and we hang them up on clipboards. Our wall can showcase six projects at once. For all of you that don’t like doing math in your head, that means three projects for each child. Don’t worry, I let my husband do all of my math for me.
This display has been up in our house for a while, pre-blog even. I get so many compliments on it, I decided to share it.

First, I took six regular clipboards, primed and painted them black. If I were to do this again, I think I would probably use chalkboard paint. Because, who doesn’t love chalkboard paint?
Then, I used a black sharpie to get the very top edge that I couldn’t reach with a paint brush.

Finally, I hung them up on the wall. I know you’re smart, so I won’t insult you any further by explaining how to use a hammer and nails.

These clipboards make it so easy to rotate the works of art. This way, the current favorites are always on display. The rest of the pictures get filed away, to be pulled out at future graduation parties and on days when I want to be in denial about my boys growing up too quickly.
-
Knit Vases
Warm up your holiday decor with these cute knit vases!

I have a few unfinished knitting projects our grandmother was working on before she went into the nursing home. Grandma did teach me to knit. As you know, practice makes perfect and well, I didn’t practice. So instead of trying to finish her work, I decided to combine these pieces with a few of her old canning jars to make some cozy holiday vases.

First, using a rotary cutter, I cut out sections to fit around the jars.

Then, the knit fabric was wrapped around the jars and secured with safety pins. I knew the backs of mine would not be seen, so I sort of haphazardly placed my pins. If yours will be seen, you may want to hide thems a little more or use a hot glue gun instead.

Finally, I filled my vases and was done. It only took about five minutes from start to finish!
I love that I was able to find a use for these special hand knit pieces that would otherwise have just sat in a box in my basement. If you do not have your grandmother’s unfinished knitting projects and want to make these vases, there is no need to worry. You can achieve this same snugly decor look with an old sweater.
-
Dollar Store Scarf Wreath
I had just checked out at the dollar store, and as I was walking toward the door, I noticed some interesting scarves that kinda look like a rope of garlic. I was having a hard time picturing someone wearing one as a scarf but I had so many other ideas for these chains of fabric . My favorite idea was to make a holiday wreath.
To make the wreath, I used two dollar store rope like scarves (only one is pictured), one embroidery hoop, and my hot glue gun (not pictured).

First, I separated the embroidery hoop.

Next, I wrapped one scarf tightly around the center portion of the hoop. Only the ends of the scarf were attached to the ring with a hot glue gun.

Then, I covered the rest of the ring with the scarf. There was a little leftover that I trimmed off with scissors.
Finally, I hung the wreath with a strip of red wool.
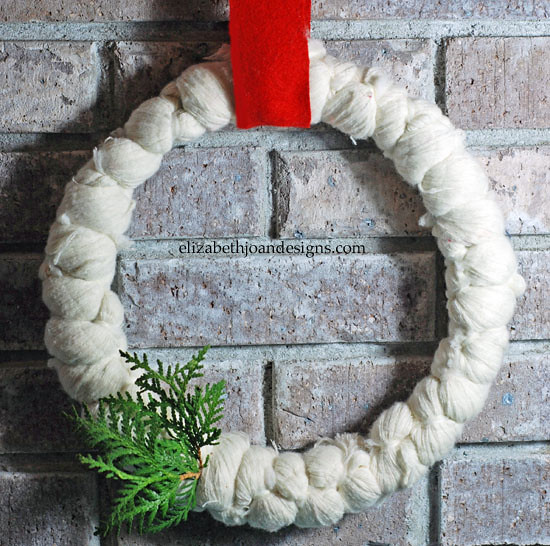
It’s always fun to decorate for the holiday season and this wreath has a simple look that would go with just about anything.
-
Come On Baby, Light My Fire
What do you do on a freezing cold night when you need to get your fire going to help keep your feeble children warm? You drive to the local store, of course, and pick up one of those pricey fire starter logs, right?!
Wrong. The correct answer is to grab one of your inexpensive DIY pinecone fire starters that you have stocked up in storage. Wait, you don’t have those either? Well, now is the time to learn how to make them and save yourself a couple of dollars in the process. Plus, these fire starters are so much prettier.

You need:
– Pinecones (I have a ton that our Dad collected and sent home with me the other day. Thanks, Dad!)
– Tea light candles (From the dollar store)
– Cupcake wrappers (Mine are from the Target dollar spot)To start, bake the pinecones in the oven @ 200 for about 40 minutes to kill off all of the creepy crawlies that are living in them. If you bought pinecones from the store, you can probably skip this step.

Keep the oven on. Take the tea lights out of the their little metal cups (if they have them) and put them in the middle of the cupcake wrappers, in a muffin tin. Place in the oven for a several minutes to melt the candles.

Once they are melted, take them out of the oven and move the wicks over to one side with tweezers, or pliers, or your fingers. Whatever works. This will make them easier to light.

Lastly, before the wax dries, plop a pinecone down on top of each melted candle. Let them harden for a bit and your fire starters are ready to use!

These would be a great and inexpensive gift to give this holiday season. Keep the wrapper on for a festive feel (and some extra fuel) or remove them for a simpler look. You could also add some essential oils to the melted tea lights to make them smell yummy. I think we are going to save some of ours for backpacking/camping season.

The best part is that I think I’ve converted Emily to using these, instead of her typical method of just lighting a piece of paper on fire and chucking it at a pile of wood, in the hopes that something magical will happen.