-
Halloween Mantel and Decor
Halloween is always a fun holiday to decorate for. Spooky skeletons, creepy spiders and black roses. What’s not to love?
For my mantel, I put down a layer of Spanish moss that I has snagged at the dollar store. I love the eerie look it gives the entire mantel. The skull, roses, spiders and ravens are also dollar store purchases.

I recently became the proud new owner of a mountain of yarn. Amongst the pile, was this black yarn that reminded me of spiders and I thought it would be perfect for Halloween decorating. Wrapping it around a white vase gave a look that resembles a parade of marching spiders.

My “Happy Halloween” sign was so easy to make. If you would like to duplicate my sign, here are the supplies you’ll need.
Burlap
Scissors
Twine
Stencils
Paint brush
Black acrylic paint
Pencil
Sewing machine/ Hot glue gun

First, cut 14 burlap rectangles 6″ wide x 12″ high.
Next, fold over the top 1″ and sew. Leave a pocket big enough to thread the twine through.

Then, paint one letter on each rectangle and let dry.

Jetspencil, thread the twine through each piece.
Now you have a cute greeting!

Holiday decor would be nothing without a little kitchen decorating. I found these fun little owls at the dollar store. Not sure if you can tell, but I love, love, love the dollar store! Awesome finds for a buck!
The bats were printed out, traced onto black card stock and cut out. You can find Erin’s bat design here, in this post. They are a great way to embellish a blank wall, a mirror or kitchen cabinets.

Well, there you have it. Simple, spooky, budget friendly decor. How do you decorate your home for Halloween?
-
Lazy Upholstering
A few years ago, I inherited this small bench from my parents and had big plans to make it over.

However, having a baby, making a cross country move and project procrastination led me to cram this little guy into storage
and it was never seen again. A few weeks ago, while trying to come up with some seating options for my daughter’s upcoming birthday party, I resurrected him and decided it was finally his time to get a transformation.After a little searching online, I found {this bench from West Elm} which was inspiration for the leg color and fabric. Since I already had some gray and white chevron fabric, I just needed some paint. My husband was sent out to buy some black semi-gloss paint and this is what he returned with.

Yup, that is black satin paint. But I decided to roll with it and got to work.
First, I removed the 4 screws that attached the seat cushion to the base.

Next, the entire base got a few coats of the black satin paint. (I sanded everything in between each coat to give it a super smooth finish and help the paint adhere.)

While the paint was drying, I started working on the “upholstery.” I just used quotes there because I didn’t really do anything special, besides cover the current seat cushion, tan pleather-y fabric and all, with my chevron stuff. Is that technically upholstering it? Or just covering up something ugly? I don’t know and I was just too lazy to do anything more complex, hence the title of this post.
Using a manual staple gun, I secured the fabric to the underside of the bench seat. ({This tutorial on upholstering benches} was what I followed to figure out how to attach my fabric and attempt to make the corners look presentable.)

Then I placed the seat cushion back on top of the base and screwed it all together. Done and done. Not too shabby, right?

My favorite part of this project was that it was so easy to work on and finish. Plus, besides just being a bench, it is also a great place for unicorns and whale sharks to frolic. Or so I hear. Oh yeah, pants are optional too.

(Did you see the chevron and unicorn sneak peek photo we posted on Instagram and Facebook earlier today? If not, you can follow on Instagram {erinejd} or {click here} to find us on Facebook.)
-
Scoop Chair
I did it again! (As if there were any doubts.) I hunted down a fun piece of furniture on the side of the road to redo. This time my victim was a mid-century scoop chair. With only a few bumps and scratches, repainting this chair was easy peasy.

1. First, using a screw driver, I removed the legs.

2. Next, I applied two coats of Rust-oleum Specialty Plastic white spray paint on the seat.
I was a little hesitant to paint the seat because I kinda liked the original color, but the seat was so scuffed up it needed to be painted.

I chose white instead of blue because, well let’s just face it, everything in my house is pretty much black, white and gray.
As I was painting, the seat started to get this interesting cloud look to it, but I have no need for cloud chair, so I continued spraying.
3. Then, using Blue Hawk Rust Resistant spray paint in black, I coated the legs.
4. Finally, after a little drying time, I reassembled the chair.

Yay! I Love how it turned out! That was as easy as 1, 2, 3… 4.

Linked up with East Coast Creative #cwts2014
-
Here’s Your Sign
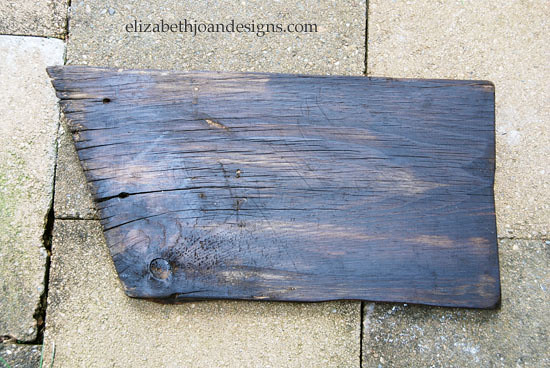
Four years ago, my parents moved into the house that had belonged to my grandparents. A woods in the back and several interesting old farm buildings, along with the house, make up this beautiful property they are on.
After moving in, there was one building that was particularly aged and needed a little updating; the machine shed. This old building was there when my grandparents bought the house and my grandfather used this barn for storing his tractors. Last summer, the ancient wood siding was torn off and replaced.
I think my parents may check out our blog quite frequently and know what kinda of DIY projects Erin and I are up to. Lucky for us, they decided to save some of the siding and doors back for us.
Of the boards I have, I found the shape of this piece extremely interesting and decided to create a sign out of it for our kitchen. By the way, Erin said she didn’t think this wasn’t interesting at all. Although, she did find the final product to be up to her standards.

Once I had chosen the location for my sign, I realized it needed to be a little smaller. Using the miter saw, I cut a smidgen off the bottom and side.

To keep the weathered looked consistent, I sanded and hammered the blunt edges I had just cut.

The sign was stained with Minwax Special Walnut. The porous wood soaked up more of the stain than I anticipated. Oops! Should have known!
To remove a bit of the dark coloring, I sanded the entire piece down.
Next, I painted the letters on using the same technique Erin used {here}. I don’t always have a real steady hand when painting, but I was okay with the hand written look.
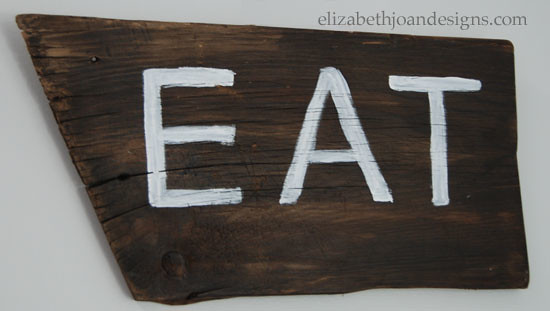
Then, the letters were sanded down to let some of the wood show through. Finally, using a hot glue gun, I tacked down a piece of jute to the back and hung the sign from the wall.

It’s so nice to have something in our home with special meaning. Every time I look at it I will think of my parents and grandparents. Oh, and to eat.