-
Pinecone Scale Pumpkin
I’m so happy that it is finally fall! The weather around here has started to cool down and I can’t wait for the leaves to change. We’ve finally begun to incorporate some fall decor into our home and I wanted to share a fun little project perfect for fall. Keep reading to find out how to make a Pinecone Scale Pumpkin.

Disclosure: This post may contain affiliate links, which means we may receive a commission if you click the link and purchase. Clicking a link won’t cost you any extra money and helps keep this site running! Please check out our disclosure policy for more details.
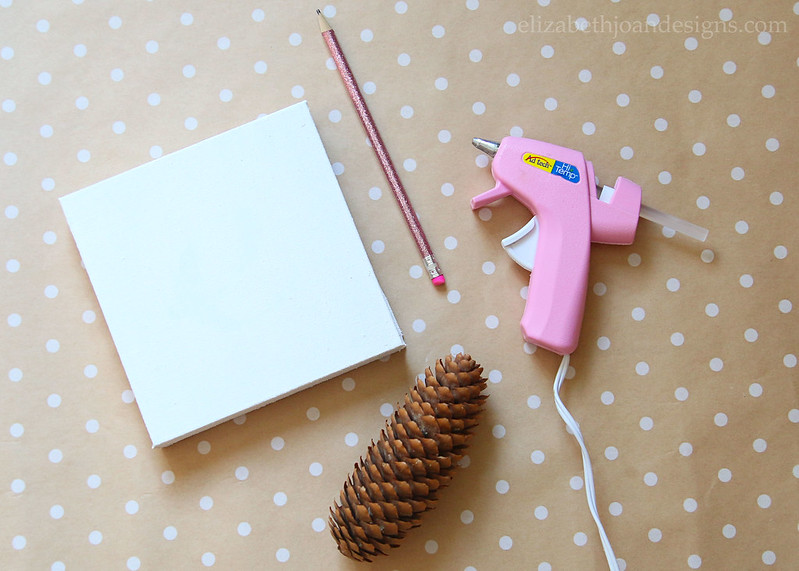
This little project is super cheap to whip up and you probably already have most of the supplies on hand. To make this sweet, seasonal art piece, here’s what you will need:
- Canvas (or any material that would make a good background)
- Pinecone
- Pencil
- Hot Glue Gun (with extra glue sticks)
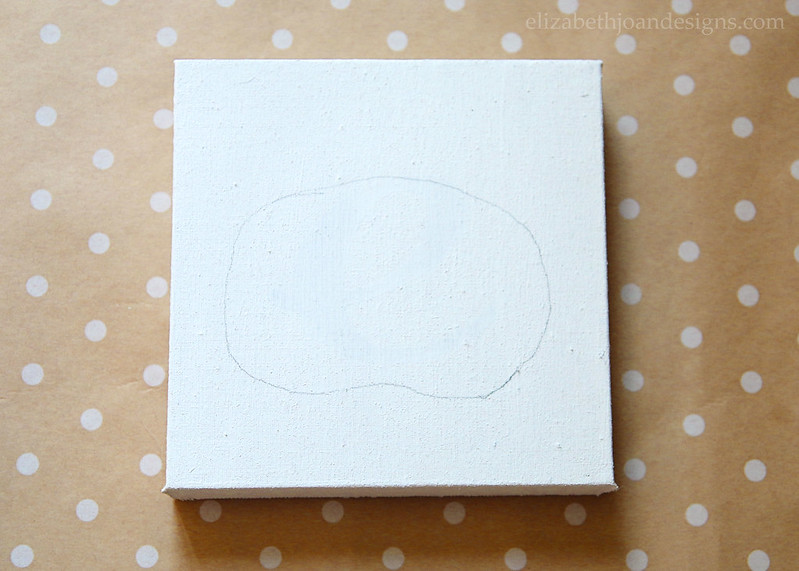
Note about the background: I chose a small 5×5 canvas for this project, but you can use any sort of backdrop for this project. Painted or stained wood, metal, cardboard, etc. Just remember that the size of your background will dictate the amount of time put into the project. I made a larger pinecone scale pumpkin on a painted wood piece (see it at the end of this post) and it took about 30 minutes to complete.
|INSTRUCTIONS|
Step 1 – Draw a pumpkin shape onto your canvas. It doesn’t have to be perfect because pumpkins come in all shapes and sizes!
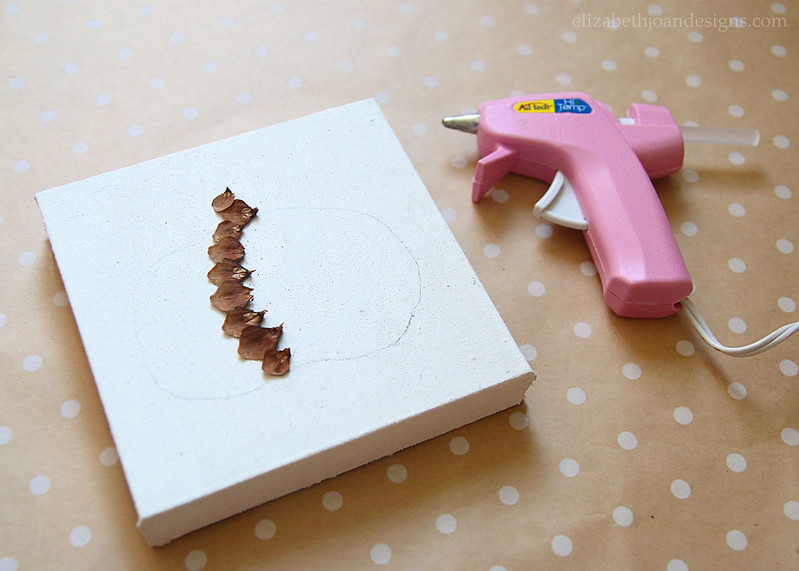
Step 2 – Remove the scales from the pinecone, starting from the bottom. It isn’t too hard to remove them with your own fingers, but if you run into any tough spots, a pair of pliers would probably help loosen them up.

Step 3 – Glue the pinecone scales onto the canvas. There wasn’t really any rhyme or reason to my gluing process. I started by adding a stem to the top and then kind of filled the pumpkin in, adding pieces to cover up any white space inside.
Isn’t this little guy so cute?!

These pinecone scale pumpkins add the perfect amount of texture to almost any vignette. I hope this gives you a little inspiration for your fall decorating and crafting!

-
Faux Olive Tree Topiary
I’m so excited that our tiny, little nursery is almost done! There are just a few small things that need to be finished for photos, but it is a fully functional space for our littlest man. Since I need to get my booty in gear on a couple of things, I thought in the meantime that I would share how I made this faux olive tree topiary for the room!

This post contains affiliate links. Click here to read my full disclosure.
When planning out what we wanted for this room, we knew that things would be light and bright. But I also was adamant about adding a little greenery of some sort. I just think that plants, whether faux or real, make spaces feel more alive. Yes, I know that may seem like an oxymoron with faux plants. But if you find (or make) some that look real, then it really does liven things up!
For this project, you will need a few supplies (listed below).
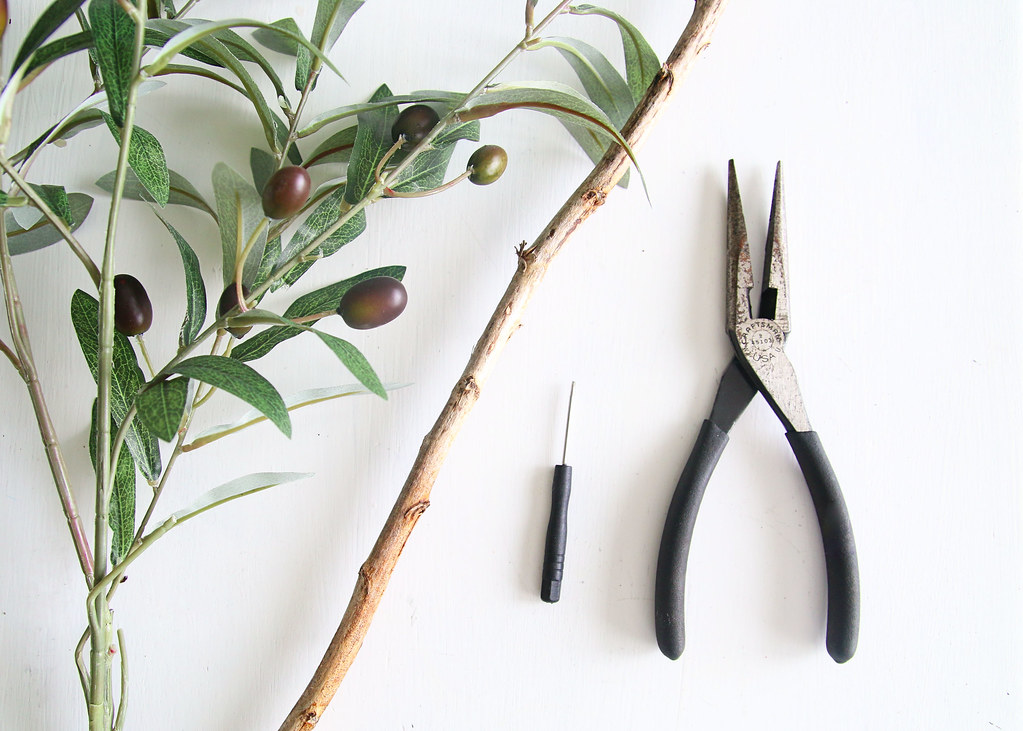
faux olive bush | small stick, approx. 16 – 20 inches | wire cutters | awl
planter/pot | floral foam | moss |hot glue gun (optional)
To start, cut all of the little branches off of the faux olive bush. Next, use an awl or small screwdriver to create random holes around on end of the stick. (You can use a drill with a small bit if you are fancy. *wink*)
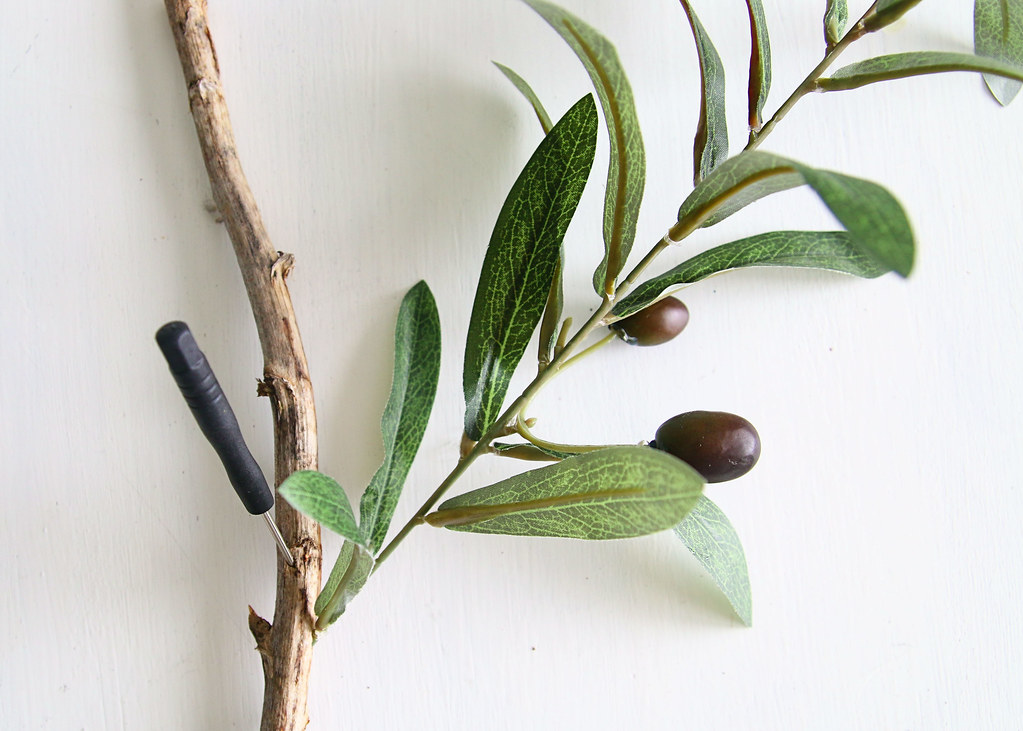
Place the ends of the branches into each hole and add more pieces until the topiary reaches desired fullness. There isn’t a real science to this. I just kept adding pieces in until it looked fairly balanced. Note: If the branches aren’t staying in, use hot glue to secure them.

To “plant” the faux olive tree topiary, cut the floral foam to fit snuggly in the planter/pot. Push the bottom of the stick into the foam (glue if necessary) and cover the top with moss.

And that’s it! What do you think? I’ve kind of gone back and forth on which planter I want to use, but I think this small one works best. Which means that I may have to make a larger topiary for the bigger olive bucket!

This topiary was really inexpensive and easy to make. I think I paid less than $10 for the entire tree, thanks to a coupon from Hobby Lobby. However, if you aren’t up for a project, then I’ve rounded up a few budget-friendly options for you here, here, and here.
Stay tuned for the nursery reveal coming soon!
-
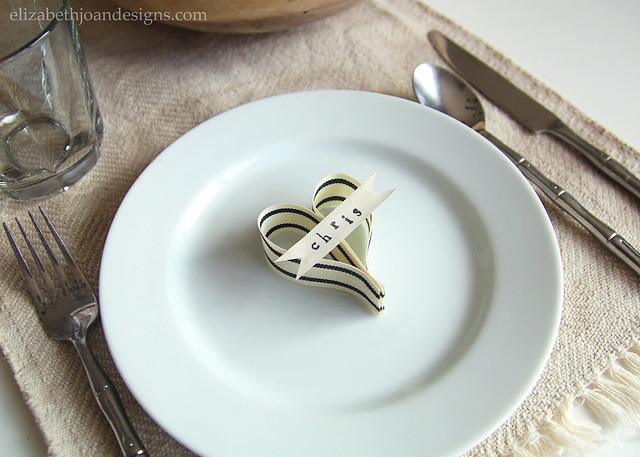
Simple Ribbon Heart Place Card
Originally published on Feb. 1, 2016. I’ve put a lot of projects on this blog over the past couple of years, many of which are pretty detailed and take quite a bit time. But I absolutely love an easy project and today’s is just that. This simple ribbon heart place card requires minimal supplies and is super quick to whip up.

This post contains affiliate links. Click here for my full disclosure policy.
Here’s what you need:
- Ribbon
- Scissors
- Hot Glue Gun
- Paper
- Alphabet Stamps
- Stamp Pad
(I found these pretty, neutral ribbons a few weeks ago at World Market and knew I had to have them in my stash.)

To start, cut two equally sized pieces of ribbon. Mine were about 5 1/2 inches each.


Then, run a small bead of glue along one side of one ribbon and attach the other ribbon to it to create a heart shape.

To make the name tag, cut a small banner shape from a piece of paper and use the alphabet stamps and stamp pad to write the name.

Finally, add a dab of glue to the middle of the heart and attach the paper banner. Aren’t these cute?
These would be perfect for a party or even for a Valentine’s Day dinner. And, you could always change the wording on the paper to fit whatever occasion you choose. So many possibilities!
_______________________________________________________________ You may also like:
Moss Letter 
10 Minute Curtain Tie Backs 
Picture Frame House Numbers 
Airplane Picture Clip -
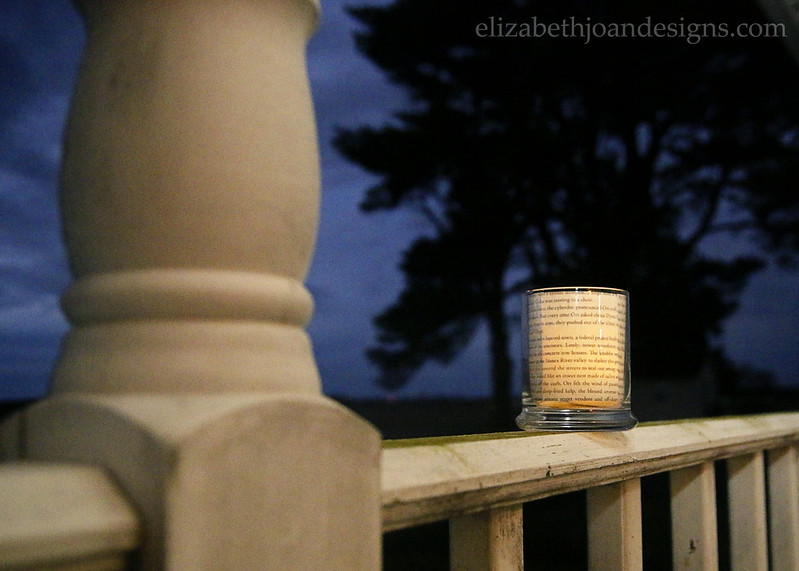
Book Page Candle Holder
This month, I’m joining up for my first Create & Share Challenge, hosted by Casa Watkins and Pocketful of Posies!
So wait… what is this challenge?
Well, participants are tasked with using their personal decor style to create a project centering around one main item. And this month, we are working with candles! For this project, I chose to share the Book Page Candle Holder that I whipped up a few months ago.
This post contains affiliate links for your convenience. Click here to read my full disclosure.
I love candles of all kinds and it is so much fun to decorate with them. Especially when they look pretty and match your existing decor. So many yummy scents, but also tons of styles and colors. Taper, pillar, tealight, oil, soy, square, round. The possibilities are endless. There are even battery powered candles, which is what I chose to work with for this project.
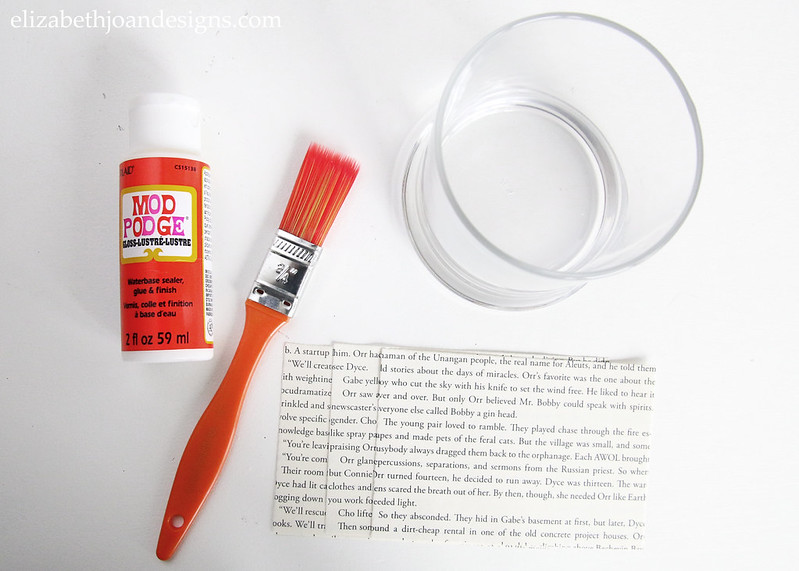
To make these super simple book page candle holders, you will need:
- Clear Glass Candle Holder
- Book Pages
- Mod Podge (or clear tape or glue)
- Paint/Craft Brush
- Scissors
- Battery Powered Candle
I started out by cutting out the book pages and trimming around the text so there were fewer blank spaces. (If you don’t want to cut apart a real book, you can find printable pages online.) Then, after measuring my candle holders, I cut the pages to the correlating height.
I used 3 page pieces for one candle holder, but you may prefer to use more or less.

Using a paint brush, I applied the Mod Podge to the end of two pieces of paper and overlapped the other pieces on top. If you don’t have Mod Podge, you can glue or tape the pieces together. (I already had Mod Podge out, so I just used that.)

Then, I added the book page insert to the inside of candle holder, making a round shape and overlapping the end pieces. Easy Peasy. Feel free to adhere the ends together for a cleaner look.
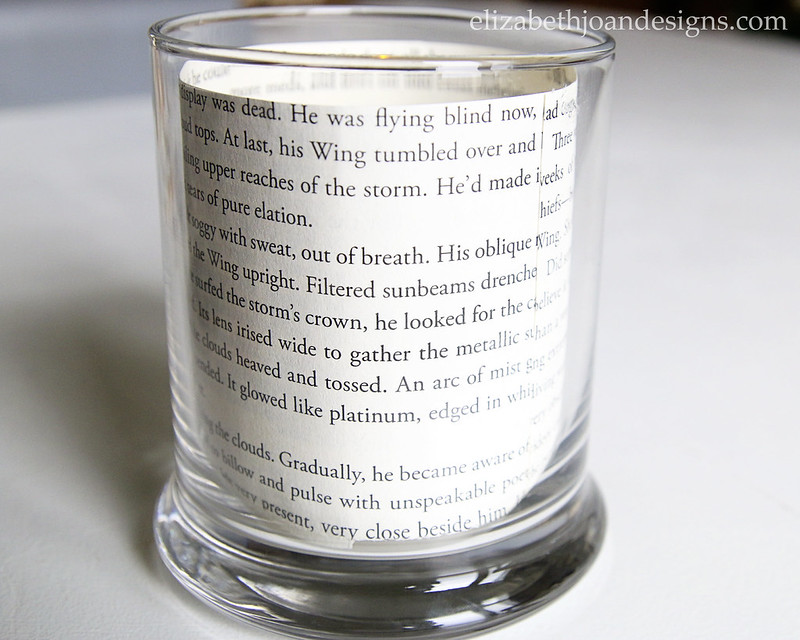
All that is left is to drop in a little battery powered candle and you are finished. (Please do not use a candle with an open flame. Your book pages may catch fire!)

I love the clean look of these book page candle holders.
They are so simple to whip up and you can add a new look to your decor without commitment if you decide to change things up later. I even experimented with adding some wrapping paper in place of the book pages, which gives you so many more options.

These would look great as a table centerpiece with candle holders of varying heights or lighting a walkway to the front door. Also, since they use battery-powered candles, they are kid and pet safe.

Now, check out the DIY Candle Projects my friends did! These ladies are so talented/creative and came up with some really amazing projects!

DIY Easy Candelabra and Color Blocked Candles – Craft and Tell
DIY Colorful Wooden Candleholder– Casa Watkins Living
Bat Halloween Candles – Pocketful of Posies
DIY Matchstick Holder – Iris Nacole
DIY Squash Fall Candles – Seeking Lavender Lane
Buffalo Snow Frosted Candle Holders – The Kim Six Fix
DIY Glittered Candles – Flourish and Knot
Book Page Candle Holder – Elizabeth Joan Designs