-
Painting Upholstery
Have you ever found a project and thought to yourself “I can do that?” And then you tried it out and it was a complete failure? No? Me neither.
Just kidding. The great thing is when you do a project and it turns out pretty awesome, even though somewhere along the way you may have wanted to set it on fire. What’s that you say? You haven’t wanted to do that either? Well, then you are lucky. Anyway, this is a story about awesome things that almost got set on fire. Enter the painted barcalounger…

This post contains affiliate links for your convenience.
Isn’t she purdy?I actually started out with two of these puppies. You may remember this photo from awhile back. (Don’t bother looking for the post. It disappeared into oblivion when we lost all of our blog posts {mentioned here}. That is a lesson on backing things up!)
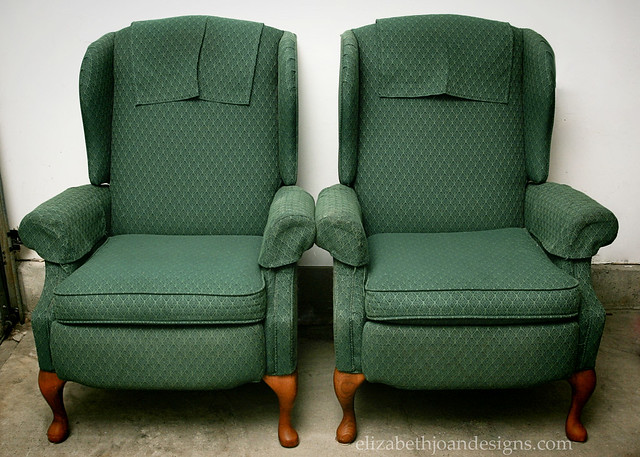
We scored both of the chairs on Craigslist for FREE. Yes, you read that right. And they were is great condition. No funky smell. No nasty stains. Only a small amount of dust and hair clung on for its life as I vacuumed them off.
A while ago, while perusing {Pinterest}, I found a photo of a beautiful upholstered wing-back chair {by Kristy Swain of Hyphen Interiors} that had been painted with latex and acrylic paints, of all things, and immediately knew I wanted to work that kind of magic on my own set of twins. Plus it is a much more inexpensive option than reupholstering.
I decided to see if anyone else had painted their upholstery and there were a ton of tutorials out there, so I figured that this was totally a project I could pull off. I gathered my supplies.
These included:
– One quart of Glidden Satin Latex Paint in Granite Gray
– {Ceramcoat Textile Medium}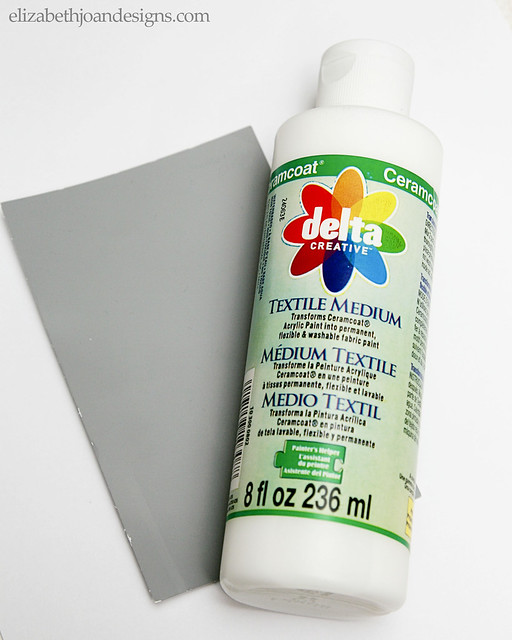
– a spray bottle filled with water
– a disposable cup to mix the paint in
– a paint brush
– white semi-gloss paint for the legs (already owned)These supplies were based mostly on Kristy’s process, minus the acrylic paint, after I read about several successes using only latex.
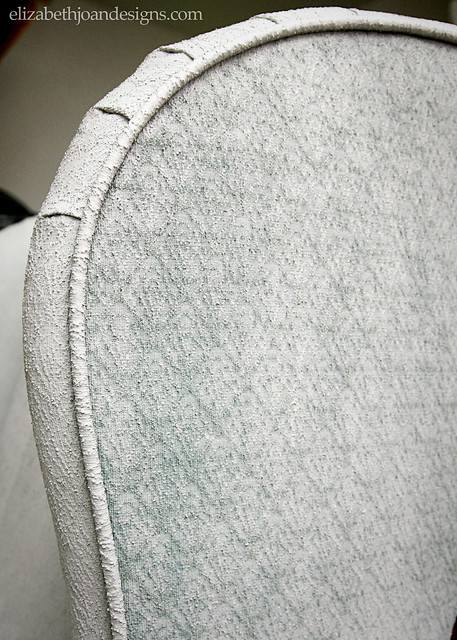
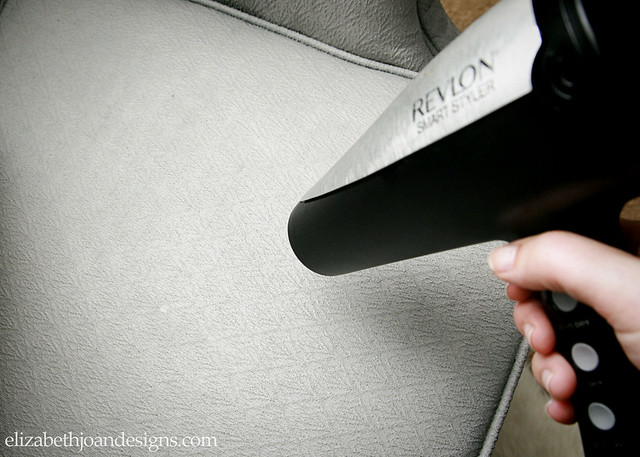
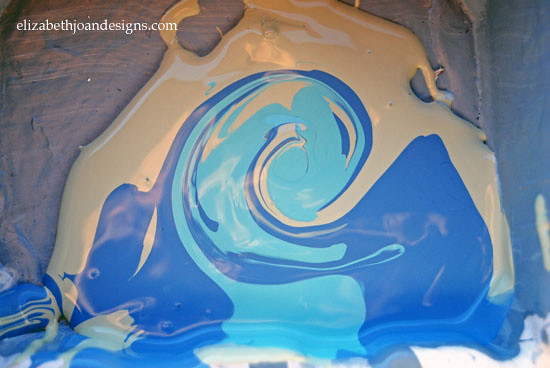
Then it was time to get to work. I started by removing the head and arm rest covers (do those things have a real name?) and pulled the seat cushion off as well so that I could paint it independently. Next, I mixed my paint with the textile medium and some water in a 1:1:1 ratio. With the spray bottle, I spritzed the water onto the fabric of the back rest and used my paint brush to spread the mixture onto the fabric. You can see below that the first coat looks like it is going on decently, considering I was painting a light color onto a darker fabric.
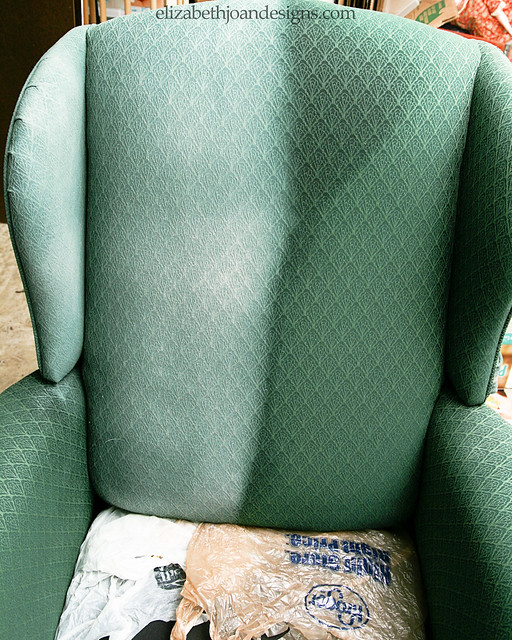
I spritzed and painted until the entire chair was covered, making sure to get in all of the nooks and crannies with my brush. Then it was time for a break so that everything could dry and I could make lunch.
One salad and five gluten free pretzels later, I headed back to check on the drying process and that’s when I started to freak out. It looked like there was the slightest bit of dust on the chair, but not any sort of noticeable difference in color. I didn’t even take a photo because there was nothing to photograph. The chair literally looked the same, like the right side of the photo above.
I mixed up some more paint, medium, and water, this time changing things up a bit and using a 1:1:1/2 ratio and hoping that this would allow for a bit more coverage. Spritz and paint and wait. Again, when I came back, it only looked as if someone had sprinkled a light dusting of baby powder on top of the chair. Grrrrrr. It was time for someone to light the fire, because this chair was going to burn. I could only imagine how many more coats I was going to have to do to make any sort of impact. 10? 20? 100? So I waited. And waited. A couple a of days actually.
I knew I couldn’t give up on this chair, so after some whining to my husband and sister, I again mixed up my paint, medium and water, but opted not to use the spray bottle with water. That, my friends, was the secret to my success, because the next coat was definitely showing some decent coverage. Just a little green showing through.
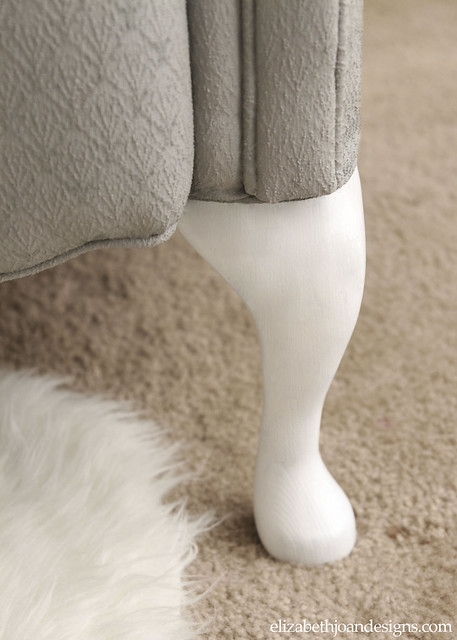
This chair is so lucky that I had a little perseverance and with a little more, it’s twin sister will get the same treatment so that we will have two GRAY barcaloungers.

1. I would describe the texture of the chair as being similar to waterproofed outdoor fabric. It is a bit plastic-y, but still squishy and very comfortable to sit in.
2. My theory is that the final texture of the chair has a lot to do with the beginning texture. My fabric was fairly stiff and rough to start out with, so a more plush fabric may produce a softer finish. No guarantees on this though.
3. I used four 8 oz. bottles of fabric medium and one quart of latex paint, which equaled four grueling coats of paint. This amount would have been less had I done fewer coats with my newly figured out mixture. (1:1:1/2 ratio of paint, medium, and water with no spray water bottle added.)
4. Use a coupon. I could have spent around $12 less if I would have utilized coupons from my local craft store. Doh! You can even load a lot of them onto your phone with the right apps!
5. The kind of chair I chose to use may not have been the best candidate for this project. Barcaloungers move and lounge (duh!) and have foot rests, so a stationary chair may be a better choice because it will have less surface area to cover. This will definitely be something I take into consideration in my future upholstery painting projects.
Moral of the story: If at first you don’t succeed, try, try again. We would love for you to share your upholstery painting stories with us if you end up trying this out!
-
Tips for Mixing Your Own Paint Color

We have so many buckets of paint just sitting in our basement waiting to be chosen for the perfect project. Most of our home is painted in some form of gray. Although we do have other colors, I think we have about 50 shades of gray in our basement and I am not talking about the book. The paint I used for our {Half Bathroom Remodel}, I mixed myself. Here are a few Tips for Mixing Your Own Paint Color.
1. Be Prepared
I always lay a drop cloth or newspaper down before I start, to keep my floors paint free.Keep these items handy:
Leftover paint- of course
Paper towels- for cleaning drips and spills.
Stir Sticks- use a larger stick if you are mixing in 5 gallon bucket
Pen and Index Card- for record keeping.
Paint Brush- to test the color on your wall or project.
Old Measuring Cup- (optional)
2. Stir, Stir, Stir
Before combining colors, thoroughly mix your leftover paints. Some of our paint we have had around for a while and it has separated. I like to get all the pigments fused back together before using.3. Some Paint Is Unusable
Freezing through several winters can be hard on your leftover paint. After stiring, if it doesn’t seem to mix up well, do not use. If there are any funky smells upon opening your can of paint or you notice mold or mildew do not use. If your paint was made before 1978 it may contain lead and any paint made before 1991, may contain mercury and you will want to avoid using any these for obvious reasons. Do not use.4. Mix Same Type of Paint Together
We all know, oil and water do not mix, so don’t try to mix them. Combine only your oil based paint with oil based, and water based paints with water based. If you accidentally mix the two together, you will end up with a clumpy substance that resembles cottage cheese. Do not use.It also works best if you do not try to associate interior with exterior paint. Do not use.
5. Blending Different Sheens
Just remember, the more high gloss paint in your concoction the glossier your finish will be and the more flat paint you add, the less glossy it will be. If your heart is set on a certain finish, then fuse only that sheen together.6. Mixing The Right Amount
Keep in mind the amount of paint you will need for your project. Mix your paint in an empty 5 gallon bucket, for a large room or combine your paint in an old paint can or even a paint tray for smaller projects.8. Keep Records
Weather I am trying to duplicate the color or achieve the same sheen, I keep a record of how much paint I am adding of each color. I also love going back and seeing what went into each “homemade” color. This step is completely optional but I always find it very helpful.
9. Elementary Art
Remember when you were in school and learned how to mix colors according to the color wheel? Now is a great time to utilize that knowledge. ie: red and blue mixed together is purple.*Making a color darker is much easier than lighting it.
10. Storing Unused Paint
Between coats, you can cover your brush and tray with plastic wrap, and store in fridge, so it doesn’t dry out. Once you have finished painting, store any extra paint for touch ups, in an old paint can or a plastic container with an airtight lid.
11. Have Fun!
It’s not brain surgery people, you’re just mixing paint. So it’s okay to have a little fun. This is something you can’t really screw up. Or can you? I personally like to name my final color. Meridith Grey, (Grey’s Anatomy anyone?) is the name of a color I mixed and used for my kitchen cabinets. My loving sister named the paint applied to my bathroom walls, Blayne (Blue, Gray, Green.)
When I feel like changing things up, I mix my nail polish colors together using a lot of these same tips, to create a new one. Not all of these tips will be needed for nail polish and you will be working on a much small scale. I mix my colors together on a smaller plastic plate and rinse the nail paint brush when I am finished.

So, just sit back, relax, and mix away.

-
Easy DIY Apothecary Jars
As I continue to work on the finishing touches to my {Half Bathroom Remodel}, I developed a NEED for two apothecary jars for storing Q-tips and Cotton balls. My budget for such a specific storage option was right around $0.00, so I had to get creative.
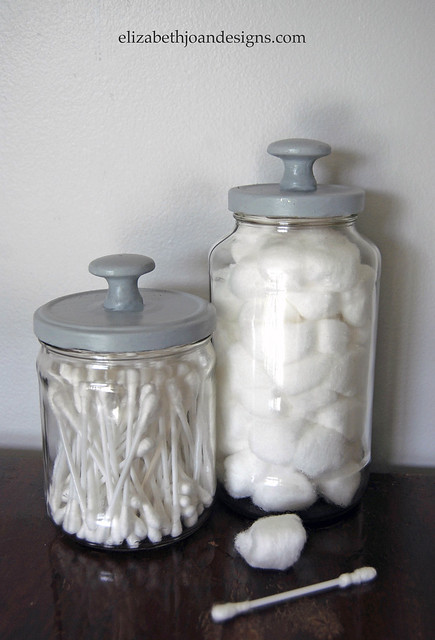
Looking around my house, I didn’t find much. I remembered my sister had given me some different glass containers last Halloween to use as decorative specimen jars. After digging around my basement, through the bin of Halloween costumes and decor, I came across a gorilla costume. I put it on and scared my kids, just a little. Then, I was back to looking for those glass pieces.Well, I only found one and it wasn’t going to work for this, which made that a giant waste of my time and this story a giant waste of yours. I am sorry for that. Then I went in the garage, looked in the recycling and under a lot of other recyclable materials and found glass a salsa jar and a pasta sauce jar. I felt like a pirate finding buried treasure. I knew these were going to be perfect.

First, I gave them a bubbly bath to help eliminate the odors they were sharing with me. Next, after they were dry, I painted the lids and two knobs I had left over from another project. Using paint I had on hand, multiple coats were added to eliminate the streaks.
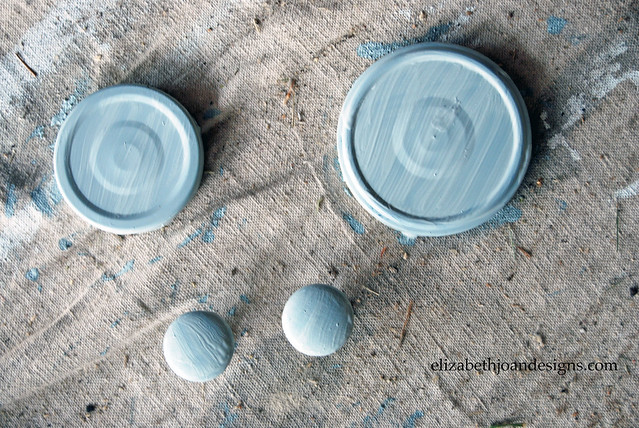
Then, my three year old and I screwed the knobs on tight to the top, center of the lids.
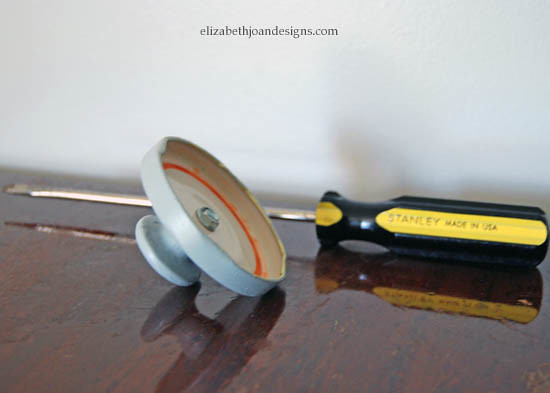
After that, he thought it would be fun to use the screwdriver to scrape the paint off my freshly painted lids, and it was. My apologies, for not taking a photo of this.
Finally, I re-painted the lids and knobs to cover all of our scratch marks.
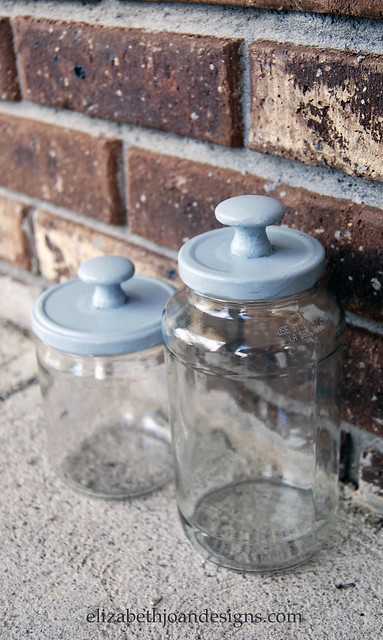
There you have it folks, diy apothecary jars that cost nuttin’. These simple jars make a great storage addition to any room. -
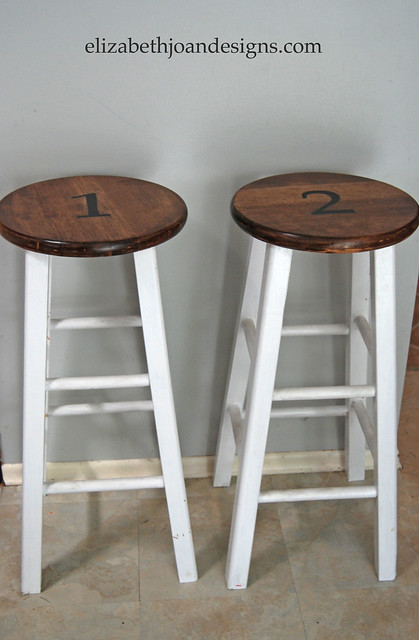
Numbered Counter Stools
These stools are another curb find. I attempted to sell them at 2 different garage sales and there were no takers. After our last sale, I brought them into the house and my son loved being able to sit at the counter to “help” make dinner. Their original look didn’t match anything in our home, so I opted to give them a makeover to match our {dining table.} I also decided to jump aboard the numeral infatuation train my sister is conducting.
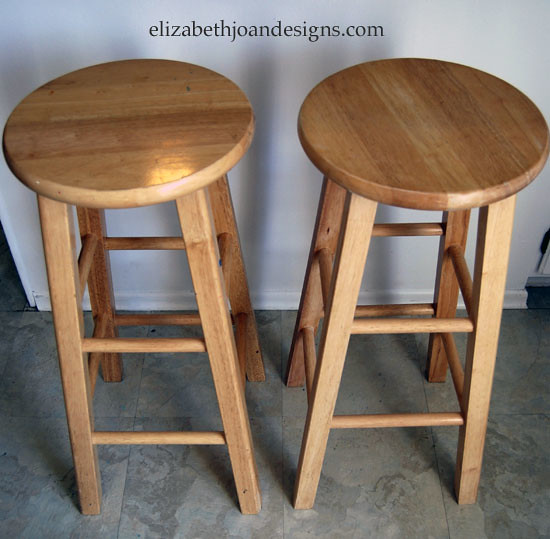
First, I sanded them and I sanded some more. Once I thought I might be done sanding, I sanded them one last time. Next, I primed the legs.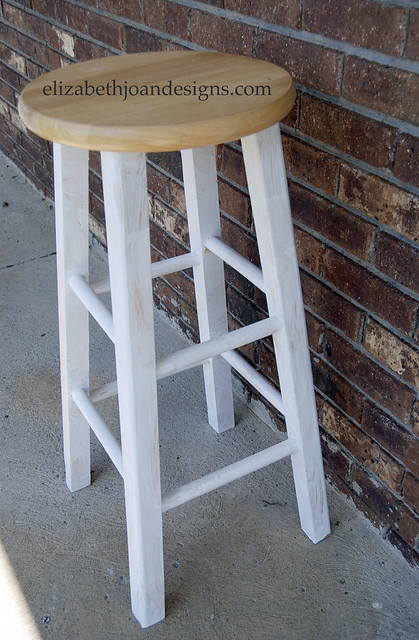
Then, I gave them two coats of latex paint. To keep the legs bright white, I draped the base of the stools with a plastic drop cloth.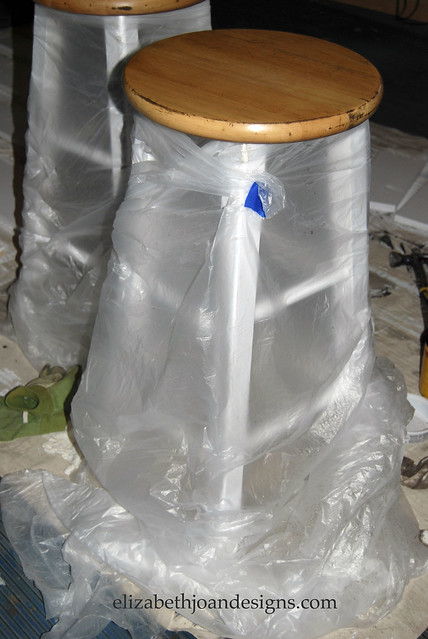
After that, I stained the seat with Minwax Special Walnut.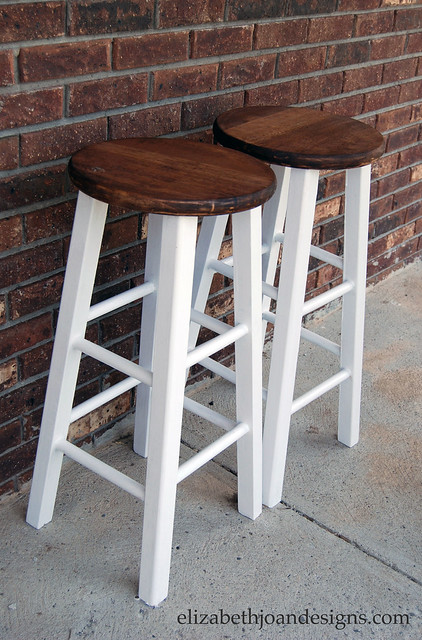
Using the same technique Erin used in her {Numbered Wooden Crates,} I painted a 1 and a 2. Finally, I slapped 4 coats of Minwax Water Based Polycrylic on the seats. Yeah! Now they go with the rest of the kitchen!