-
Reusable Snack Bag
I previously mentioned in my {Packing A Carry On} post that I had a reusable snack bag that I took with me on my flight to Atlanta. Even though I may not be down with the lingo, I’m going to try and share a sewing tutorial on how to create these fun little clutches. They are cheap to make, pretty easy to whip up, and washable too. Plus, you won’t be THAT person. You know, the one who everyone is staring at as they crinkle and crunch a plastic snack bag. I hate being that person.


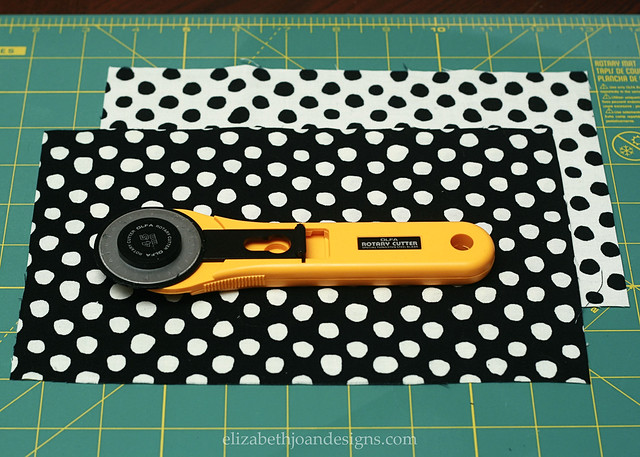
Here is what you will need to make your own 4″ X 5 1/2″ bag.
1 Piece of fabric (outside)
1 Piece of fabric (lining)
5″ of velcro
Cutting mat & rotary cutter (or scissors)
Sewing machine
To start, cut both pieces of fabric into 9 1/2″ X 6″ sections. This will obviously be easier if you us a rotary cutter and cutting mat, but fabric scissors will also work. You could also try to use your teeth or a steak knife, but neither of these are recommended. *wink*
Next, pin one piece of the velcro to each of the fabric pieces on the ends of the right sides and sew them on. (Photo below.) Naturally, I realized at the last minute that I didn’t have a heavy needle for circumstances like these, so I improvised with adhesive velcro instead. Doh! I don’t imagine it will withstand the washing machine, but it has held up so far with multiple uses. But you can disregard all of this, because YOU are going to SEW your velcro on and have no problems. Good job!
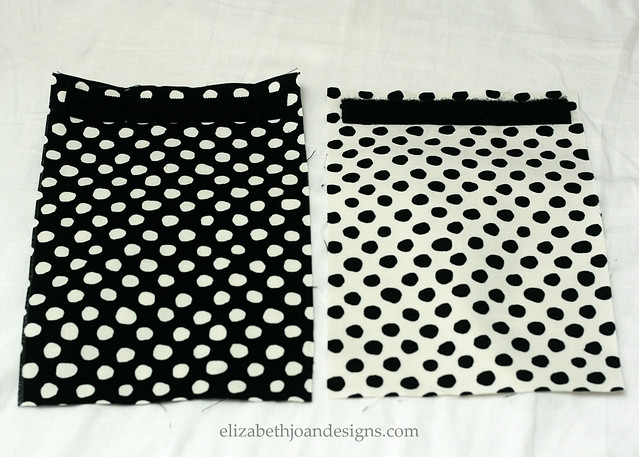
Once the velcro is attached, place the right sides of the two pieces of fabric together with the velco on the inside at opposite ends and pin them together, like in the image below.
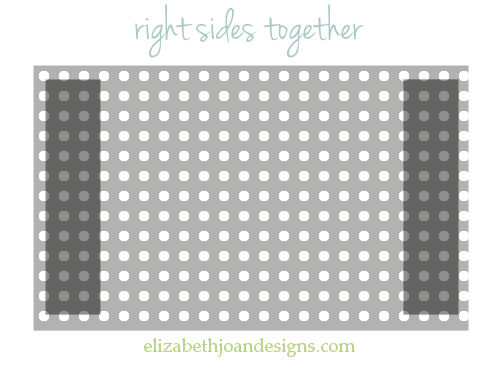
Then, sew along both ends and about 1 1/4″ down both sides of the end where the lining piece’s velcro is attached.

(The white fabric with black polka dots was used as my lining, so I sewed down the sides of the end where my velcro was attached to the white piece.)
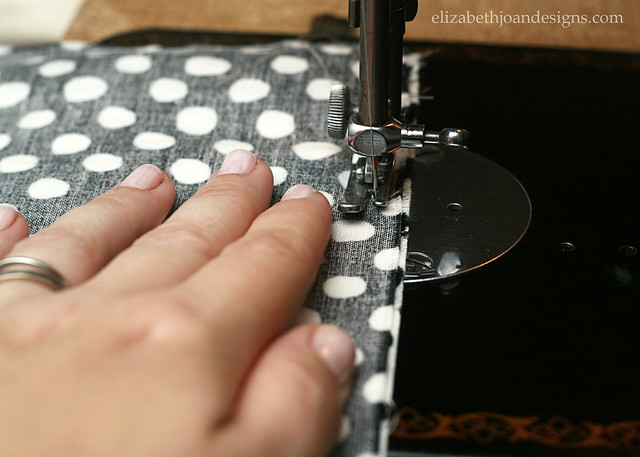
After that, turn the fabric right side out and fold it so that the lining is on the outside and the flap is left free. Pin the sides.

Finally, sew along each side and turn it right side out when you are finished. The bag is then ready for use. If you made it this far with these instructions and you still remember your own name, you deserve a medal. If you now understand how to make this bag, I deserve a medal. Hopefully someone is getting a medal.
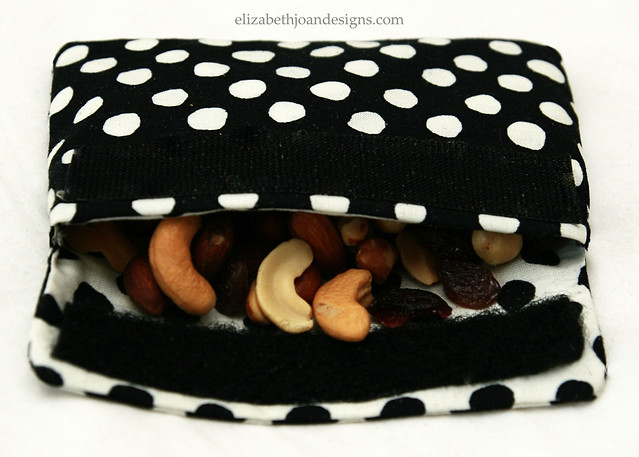
I originally, made this with the intention of using it as a snack bag, but have since thought of other great uses as well. Make up bag, jewelry holder, floppy iPhone case, etc. Let us know if you give this a try!

-
Packing a Carry On
I just came home from visiting one of my best friends in Atlanta and I wanted to share what I packed in my carry on tote for my flight. Who doesn’t like to see the inside of someone else’s bag?

I’m a planner, so it seems like every time I’m getting ready to do something, I’m writing lists and going over my options. Having all of the items I might need at arm’s reach is really reassuring when I’m cruising at 35,000 feet off of the ground. (My flight was a short, domestic one, so packing needs for other types of flights may vary.)
The Tote
1. I don’t have any fancy pants kind of bag that I use. I believe that I bought this big ol’ purse at Target a few years ago and it has been used for a little bit of everything. Diaper bag. Beach bag. Laundry bag. Just kidding on that last one, but you get the point. Find something that is reasonably sized and has pockets and multiple compartments inside to store all of your loot.
Essentials
2. Wallet & ID – This is a given, but it doesn’t hurt to mention it. My wallet holds all of my important items, like my license, credit cards, extra cash and change. Don’t forget your passport if you are traveling internationally.
3. Keys – Wouldn’t want to be locked out of the car or house when coming home from a trip!
4. Hand Sanitizer – I’m not the world’s biggest germaphobe, but I do know that airplanes and sickness can go hand in hand. A little cleanliness never hurts. (This was originally packed with the rest of my liquids in another carry on bag with my clothes, toiletries, etc.)
Comfort
5. Scarf – An extra layer that can be used as a makeshift blanket or pillow in a pinch.
6. Sunglasses – I rarely go anywhere without them. They are perfect for those times when your seat mate thinks that having the window shade open during the middle of the brightest afternoon ever is a great way to get a tan. Also, they can double as an eye mask of sorts when you want to take a snooze.
7. Wipes – Perfect for cleaning off tray tables, mopping up spills and freshening up.
8. Wisps (Toothbrush and Paste in one) – Quickly gets rid of “sweater mouth” caused by the re-circulated plane air.
9. Lip Balm – Again, to help combat the dry air on the plane.
10. Extra Hair Ties – Can you ever really have too many?
11. Pain Medication – Just in case of a headache.
Nourishment
12. Water Bottle – To fill up after I go through security and keep me hydrated during the flight.
13. Clementines – Sweet snack. (For domestic flights only.)
14. Gum – Helps with all of that ear popping.
15. Almonds in Snack Bag – Washable and reusable dry snack storage. Tutorial coming soon!
Entertainment
16. Magazine – I love to read something light during takeoff and landing when I can’t use electronics.
17. Notebook & Pencil/Pen – Great for doodling or making more lists. I prefer the latter of the two.
18. Ear buds – Used with my iPhone.
19. iPhone and Charger – Music, movies, games, the Internet and my boarding pass all on one tiny, little device.
So, that’s what is in my tote. Is there anything extra that you would have included? Excluded? Let us know in the comments below!
-
September 2013 Printables
I absolutely love this time of year. The weather is slowly getting cooler, school and routines are back to normal, and pumpkin spice lattes are right around the corner. There are so many fun things to do and neat changes associated with fall and September definitely embodies many of these.
For this month’s printables, I chose a warmer color palate using pink, peach and chartreuse to give it that feel of summer slowly fading away into the colors of fall.

Use the calendar to jot down important dates and help keep everything scheduled.

The “Birthdays & Anniversaries” page can be filled in to help you remember all of those important celebrations.

Click the images below for the free PDF link. Please download the file and open with Adobe Reader to ensure proper print sizing. When printing, make sure that Page Scaling is set to “Fit Printable Area” and Borderless Printing is selected.


-
5 Things for the 1st Day of School
This year, it seems like the summer went by in a flash, right? It’s getting close to the start of the school year, if your kids haven’t started already. Every year, I have a little list of things I love to do for my daughter, Pinky, to make that first day a little more memorable.

#1. Have something fun for breakfast.
I love serving up a special breakfast on the 1st day of school. Usually, I let my daughter pick something fun that she loves and this year she chose doughnuts. We rarely have doughnuts, since we are all eating fairly gluten free, but there are a few special days of the year that I am OK with unique treats like these. Lucky for me, I was able to just buy one from the drive-thru and I didn’t have to make anything. But, you could totally make a yummy and healthy breakfast at home. I’m thinking fruit and eggs. Or oatmeal. Or bacon. That’s healthy, right?

#2. Be excited.Kids are very intuitive and if you are anxious or worried about them heading back to the classroom (or going for the first time,) they will totally pick up on it. Even if you know that they may have some obstacles to deal with, whether they be social, academic, etc., try to be positively excited about the new experiences to come and they will most likely follow suit.
#3. Record their favorites.
Kids are constantly changing and growing (Duh!), so it is a great idea to get the details of all of their current favorites down on paper. I whipped up this quick questionnaire for my daughter to fill out the 1st day of school, so we could keep a record of her favorites. I love that she will be able to see how her likes have changed over the years, as well as her handwriting.
You can also print it out, for your own use, by clicking on the image below. Please download the file to ensure proper print sizing. When printing, make sure that Page Scaling is set to “Fit Printable Area” and Borderless Printing is selected.

#4. Take a picture.
This is something that many people already do. I have photos that my parents took of me on my first day of school and I love looking through them and seeing how I’ve grown and changed. Plus, I always get a laugh when I see the clothes that I wore. The 80’s were an interesting time.
We’ve been snapping a photo every year of our daughter since she started kindergarten and will continue to do so for our son too. It’s crazy how quickly they grow up!

You don’t need to do anything fancy and can use a dslr or a point and shoot camera. Heck, even a phone camera will do. The point is to get a photo that represents your child. Props are optional. We like to have Pinky hold a sign that says the grade she is in, but any picture will work, as long as you take one. There are so many great ideas out there.

#5. Tell them you love them.This is probably self explanatory, but kids need our love and support. Never let them walk away without telling them how much you love them!
And remember, even though this list claims to be for the 1st day of school, whether it be in a public, private, or home school setting, it is completely flexible. If your work schedule or other events keep you from being able to do one or any of the previous mentioned items on the 1st day, do it another day. There is not a specific time line in the rule book that says you must take a photo, make a special breakfast, or fill out a favorites questionnaire on the actual 1st day of school. Give yourself a break and work it into your own schedule, whenever that may be. (Our daughter’s 1st day was technically cancelled due to fog.) It doesn’t have to be perfect to be wonderful. We hope your kids have an awesome school year!!!