-
October 2013 Printables
I may have previously mentioned how much I absolutely love autumn. But I especially love October. And Halloween. So, it may come as no surprise that I thoroughly enjoyed creating the printables for the month of October.
This month features the usual calendar along with gray striped printable paper…

And two different party invitations for all of your fun Halloween events. One is for the little monsters and the other is a tad bit more grown up, yet still batty.

All of our printables are currently FREE for download. However, this is subject to change to in the future, so snag them at no cost while you still can. Enjoy!
Click the images below for the free PDF link. Please download the file and open with Adobe Reader to ensure proper print sizing. When printing, make sure that Page Scaling is set to “Fit Printable Area” and Borderless Printing is selected.


-
We Dig It September 2013
Each month we will be sharing some of our favorite finds from around the web. Enjoy!
1. We are loving track doors {like this one}.

2. How cool are these {wrench hooks}???
3. {Giant floor pillows} are definitely on the to-do list.
4. Fall decorating is fun, especially with neutral white pumpkins, like in this {beautifully styled hutch}.

5. This {tween bedroom makeover} would make any girl swoon.
6. Aren’t these {hanging beds} awesome!!
7. Here is a great tutorial on {how to print on paper napkins}.

-
Printable Paper
I absolutely love browsing the craft store’s supply of printed card stock. There are always so many fun patterns and colors to choose from, plus you can use the printable paper for a gazillion different projects.
The other day, I wanted a specific design of card stock for something I was working on, but didn’t have time to run to the craft store. Boo. You see, the closest store is about 30 minutes away, so a trip there and back would have eaten more than an hour of my time up. Luckily, I’m resourceful and in less than 5 minutes I had whipped up exactly what I need in Photoshop and was able to print my own designed card stock. Of course, I thought that maybe other people may be able to benefit from my resourcefulness, so I created a small collection of printable papers to share.
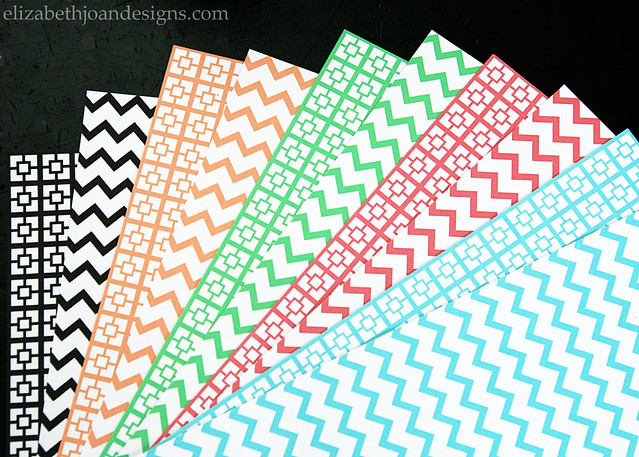
The colors are black, orange, green, pink and light blue. For some reason, they are appearing a little bolder in the photo above than they actually are. Hmmm…
Just download and print onto white card stock.
Download this printable from THE GALLERY.
There are so many things you can use these for.
You can create a new look for your cell phone. (I purchased {this cell phone case
} from Amazon.) Trace around the case on the paper and cut it out a little smaller than your lines. Then you can place the paper inside your case and change them out whenever you are looking for a new look or feeling a little fickle.

Or cut the paper to make a last minute thank you card.

The possibilities are endless. Let us know what you are going to make with your new printable papers!
-
Budget Friendly Glass Hurricane
When I saw these pretty {glass hurricanes} a couple of years ago from Williams Sonoma (priced for a pretty penny), I knew that I could find something similar for a lower price. At the time, I jumped on {Pinterest} and did a quick search. Luckily, I found {this tutorial} from the blog Decorating Cents to make a hurricane inspired by the same Williams Sonoma version for a lot cheaper using dollar store supplies. I ran to the closest store and grabbed everything I needed to start putting them together. Since this was such an easy (and cheap) project, I shared it with a few friends at the time and one of them even ended up using her budget friendly glass hurricane as her wedding centerpieces.

After a last minute project fail this week, I was scrambling to come up with something to share and thought back to those glass hurricanes. I headed to the dollar store and unfortunately, my store no longer had the exact same supplies I had previously used. (Imagine a small tear running down my cheek at this point.) So, I had to improvise.
Here is the new and improved tutorial and the best part is that it only costs two bucks, less than what I paid before, assuming you already have glue at home. Cha-ching!
You will need:
1 glass vase
1 glass candlestick holder
Gorilla Glue (or Epoxy)
The instructions are so easy. Just glue your glass candlestick holder to the bottom of your glass vase and let it cure per the gluing instructions.

Presto! One super cheap, yet elegant glass hurricane.

Can it really get much easier than that? Pop in your favorite scented candle and you are done. I think these would also look great with a monogram etched on them or as a way to display treats or candy at a party. How will you embellish your glass hurricanes?