-
Pet Food Canister
While I was browsing the web the other night, I came across these awesome {pet food canisters} from Ballard Designs. They are super stylish and much cooler than a dog food bag to store Fido’s food in. I especially love that they have a lid to keep everything dry and fresh. I do not love the price tag. Ouch! $55-$59? For that price it would make more sense for us to leave the food in the bag or make our own version. Of course, I chose the latter of the two.

My first thought was to go see if I could snag one of those white food grade buckets from the grocery store, but unfortunately, I found out when I got there they no longer give/sell them to customers. So, I stopped at the thrift store on the way home and, luckily, found this popcorn tin for a buck fifty. Woot! I knew that it would work perfectly to make my Ballard Designs inspired pet food canister.


Next, after a little deliberation, I nixed the chevron pattern of my inspiration, even though I love it, and opted for stripes because they are so much easier to work with. Using painter’s tape, I taped off sections down the sides of the tin.


-
Ruler Drum Shade
If you follow us on {Facebook}, you may recall earlier this week that I posted a teaser photo of a project I was working on using 43 rulers. And for the 2 people who actually care, I’m here to share with you the fate of those foot-long wooden measuring sticks. Behold, the ruler drum shade, aka, the thing that hides a boring, ugly light fixture.


Do you know what I can’t stand? Boring, ugly light fixtures. Yup. Especially, this particular one (pictured below) in our dining room. Why we would need to illuminate other areas outside of the dining room with this trio of directional spot lights is beyond me. I want to see my food and not the corner of the floor!

Unfortunately, we can’t change out the fixtures because we are currently renting. However, since they are directional, we can point them down over the dining table and cover them up with a removable shade.

I actually only used 37 of the 43 rulers, but it was good to have a few extras around in case of mess ups. I also used a 14” embroidery hoop, gray acrylic paint, foam craft brushes, wood glue, binder clips, string and some little white ceiling hooks. Only about half of these items actually appear in my supplies photo. Oops.

To start out, I mixed a 1 ½ to 2 ratio of water and paint in a cup. I wanted to give the rulers a gray washed look and still be able to see the numbers and marks. Using a foam craft brush, I applied a thin coat over the front and back of each ruler. I also separated and painted both pieces of the embroidery hoop with my water and paint mixture.


Once everything was dry, I grabbed some wood glue and attached my rulers around the outside of the embroidery hoops; one hoop on the bottom and the other on the top. The spacing was completely guesstimated and the last ruler I added had to go on the inside of the bottom hoop to avoid the screw on the outside. My binder clips held everything in place while the glue dried.

Next, I screwed 3 hooks into the ceiling around the light fixture, tied 3 equal pieces of string to the top of the shade, and looped the strings around the hooks, making sure the shade stayed even and level. (This involved a lot of climbing up and down to check things out.)

Then, I admired my new dining room shade. Here’s an interesting view from below. Nevermind the mismatched bulbs.

From this angle, it kind of looks like the boogeyman when the lights are on. See the two eyes and wide smile? Eat your veggies, children, or the monster in the ceiling will get you.

We love not having to look up and see the weird spot lights all of the time, and I’m so glad that I gray washed everything because it gave it a cool vintage look. What do you think?

Oh, and just in case you are wondering, here is the cost breakdown of the shade itself.
- 37 Rulers ($.25 each from Walmart): $9.25
- 14” Embroidery hoop (from garage sale): $0.25
- Gray acrylic paint (from Walmart): $0.97
- Foam craft brushes, wood glue, binder clips, string and ceiling hooks (all already owned): Free
Total cost: $10.47 plus tax
-
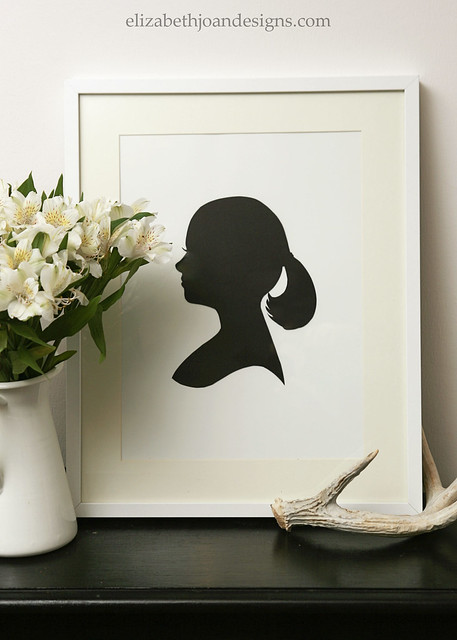
Simple Silhouette
Warning: Extremely easy tutorial ahead. I know that some people enjoy working really hard for long periods of time with little to no progress (yeah, right), but I’m not one of them.
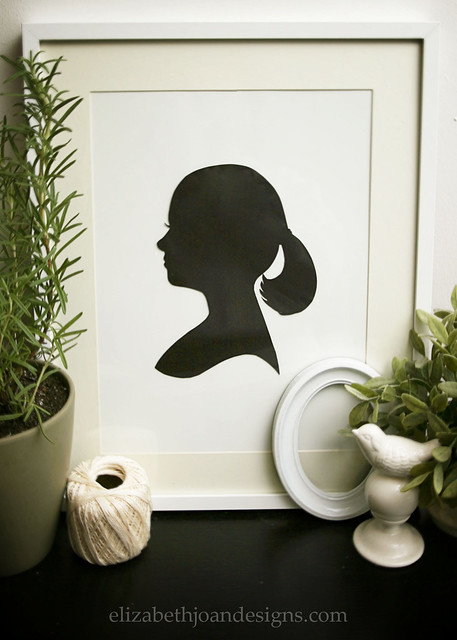
I love the classic and timeless look of silhouettes. They are so fun to decorate with and also make great gifts. And the only supplies you need to make one are a camera, a printer, white card stock to print on, scissors, a pencil, colored card stock (I chose black card stock to keep to the with the traditional look, but I think using other colors would also work great), and a few extra minutes.
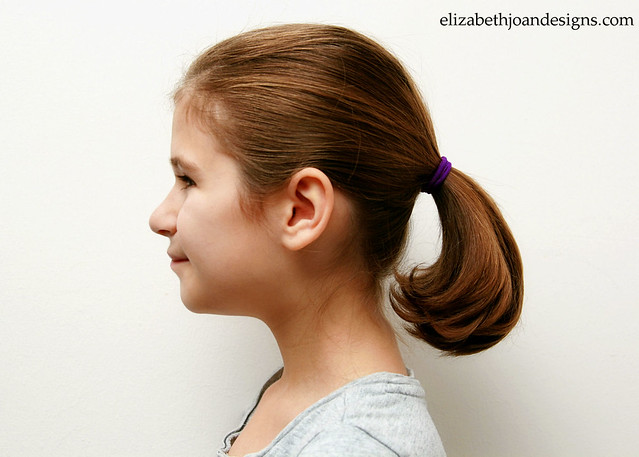
First, take a side view photo of your subject, preferably in front of a solid background. It doesn’t need to be good quality; any image will work, as long as you can make out the perimeter of your image. I used my daughter, Pinky, who likes to intentionally make funky faces when I take her picture. Goofball.
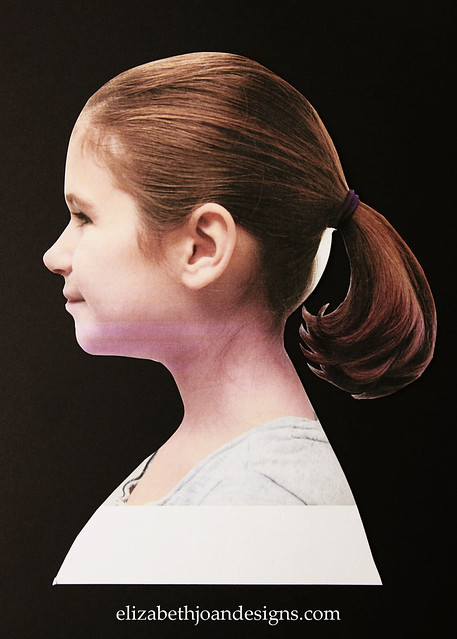
Next, print out the photo on to white card stock (this was an 8″X10″ print) and cut around the outside of your subject. I left some extra white space on the bottom and added a little extra roundness on the lower back of her head to balance out the poof above her pony tail. Excuse my freaky looking print out. My printer is super low on colored ink.
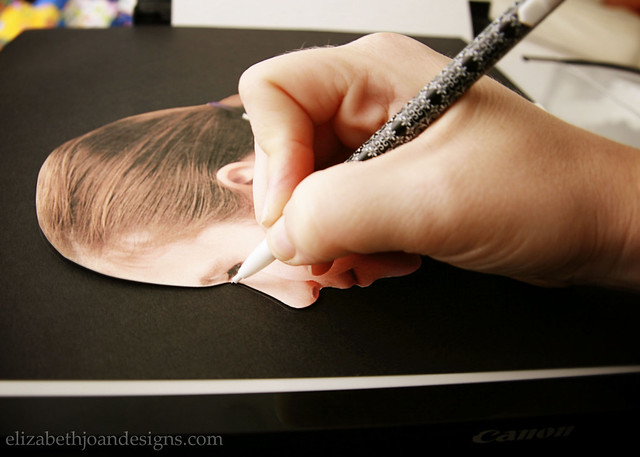
Then, trace the template on to the colored card stock, add embellishments, like longer eyelashes and a curved bottom if you like, and cut out your silhouette.
And there you have it!

I framed my silhouette by centering and taping it to a piece of white poster board, which was cut to fit the size of my frame.
-
Lunch Notes
I can’t believe that it is already August! And that means that the new school year will soon be upon us. Last year, I found some really neat little cards at Michael’s craft store that had funny jokes and motivational sayings on them, so I sent them to school with Pinky in her lunch box for a little midday pick-me-up. Unfortunately, they ran out not long after I opened the package, leaving me empty handed.
Not that there is anything wrong with writing a little something on a torn piece of paper and throwing it in with the peanut butter and jelly, (I love you is I love you no matter what you write it on,) but I tend to like my notes to be cute and fun, so I decided to whip up some of my own.

I chose a few cute literary quotes from my favorite children’s book authors that are both fun and motivational.

I also used the same designs to create some fill-in-the blank cards, so I can tell my sweeties how much I love them or wish them good luck on a test. Or a big work project. My husband loves jacks and bicycles. *wink*

And guess what? You can snag these fun lunch notes for yourself too! Click the images below for the free PDF link. Please download the file to ensure proper print sizing. When printing, make sure that Page Scaling is set to “Fit Printable Area” and Borderless Printing is selected.

