-
Five Minute Friday: Pumpkin Pie Dip

Welcome to 5 Minute Friday. This is a weekly post where we share quick tips, projects, and recipes that can all be completed in 5 minutes or less! The topic this week is Pumpkin Pie Dip.
Pumpkin season is upon us. This quick dip will fulfill all of your pumpkin cravings in just a few minutes.

Ingredients
2 Cups – Canned Pumpkin
1 – 3.5 oz. Pkg. – Vanilla Instant Pudding
1 Tbs. – Pumpkin Pie Spice
1 tsp. – Cinnamon
1 – 8 oz. Container – Cool Whip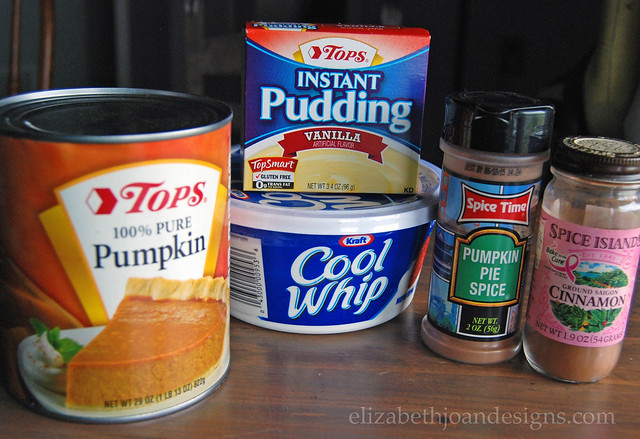
Kitchen Tools
Can Opener
Large Mixing Bowl
Wooden Spoon
Measuring Spoons
Measuring Cups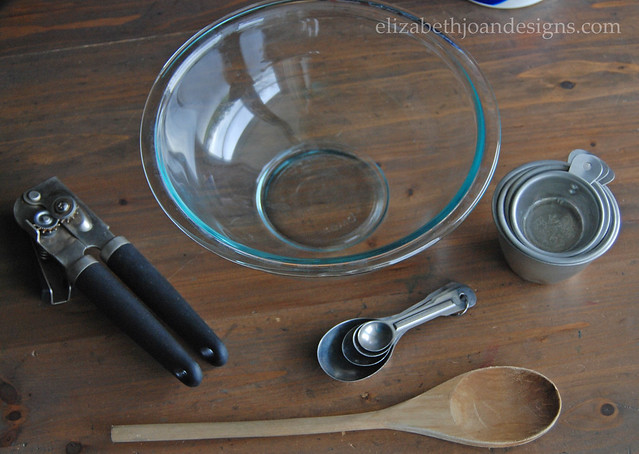
First, add the pumpkin, pudding, and spices to a large mixing bowl. Mix until well combined.
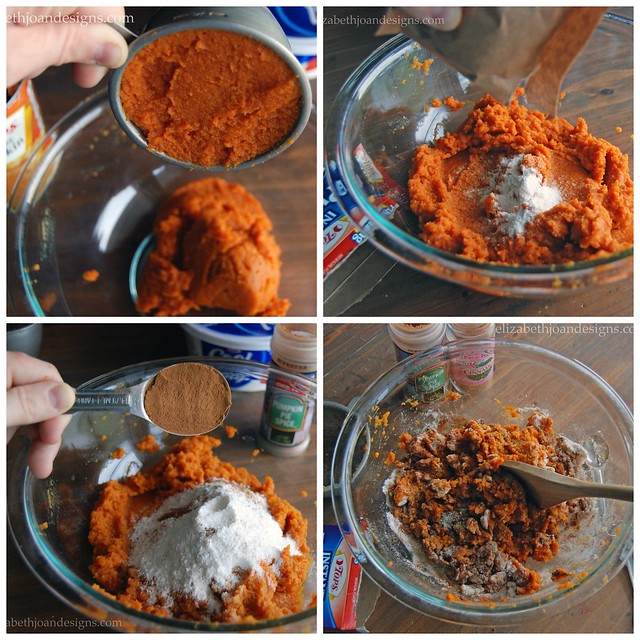

Next, fold in the cool whip.

Mix until smooth and creamy. Pop the dip into the refrigerator until ready to serve. Enjoy this delicious dessert with apples and graham crackers.

My little guys love eating dip with teddy bear grahams. Yummy!

Pumpkin Pie Dip from Elizabeth Joan Designs
Ingredients
2 Cups – Canned Pumpkin
1 – 3.5 oz. Pkg. – Vanilla Instant Pudding
1 Tbs. – Pumpkin Pie Spice
1 tsp. – Cinnamon
1 – 8 oz. Container – Cool WhipPreparation
Combine pumpkin, pudding, and spices in a bowl and mix together thoroughly. Fold in the cool whip and mix until smooth and creamy. Refrigerate until ready to serve. Enjoy with apples and graham crackers.______________________________________________
You may also like:
Mediterranean Chicken Packets 
S’mores Bars -
Entryway Update
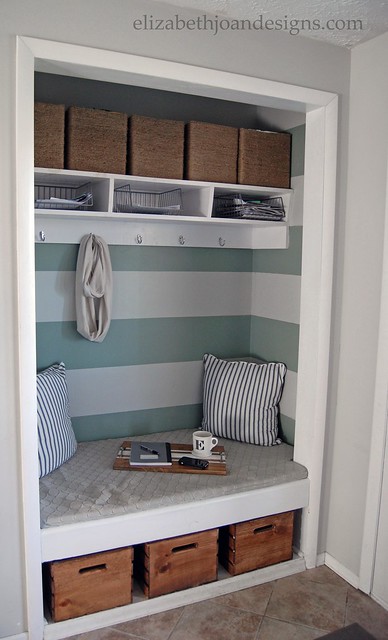
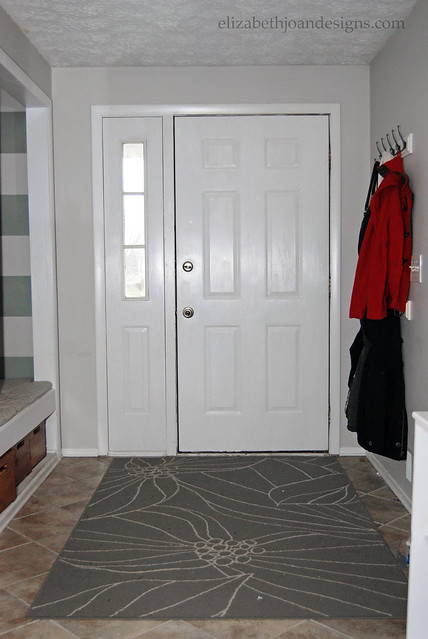
It’s been a while since I shared an Entryway Update. I have been working on few little things here and there, nothing major, but enough I wanted to give you a looksie on the happenings. You can take a peak at the entryway remodel to see what it looked like before these updates.
This post contains affiliate links. Because extra mulah isn’t always easy to come by when it comes to beautifying hallways, I decided to utilize our favorite tip for decorating when you are pretty much broke. Painting. I applied several coats of white paint our front door. What a difference that made. Buh-bye dingy, non-matching, off-white colored door, and hello clean, bright-white entrance!
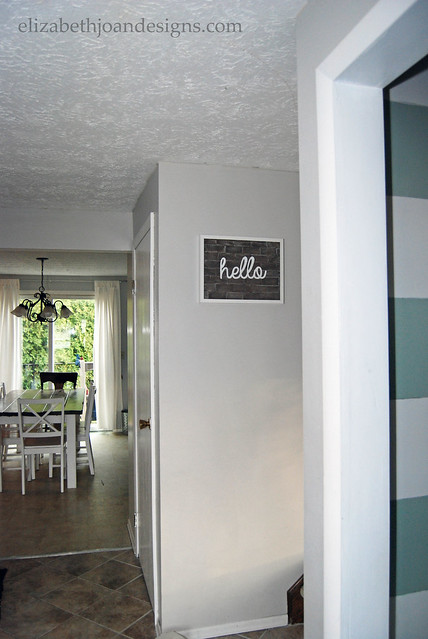
For our April Home Depot Monthly Gift Challenge, I created this lovely “hello” welcome sign using a 2×4. It has found it’s home right here in our entryway. Silently greeting everyone as they come in.
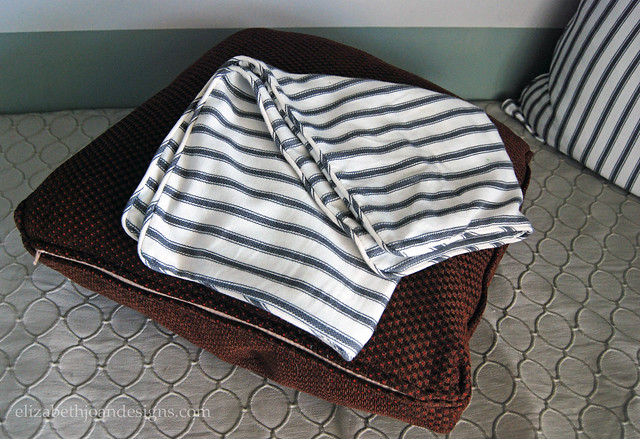
When we turned our coat closet into a bench, my vision for this space was to act as a comfy nook to read in, put shoes on, or a place to cozy up with the laptop and get some work done. It really has been just that, but the throw pillows are truly essential in making these ideas a reality. I already had the perfect pillows. They just didn’t match the space very well, but thanks to these gray and white striped cases I purchased from H&M, now they do! Yay!
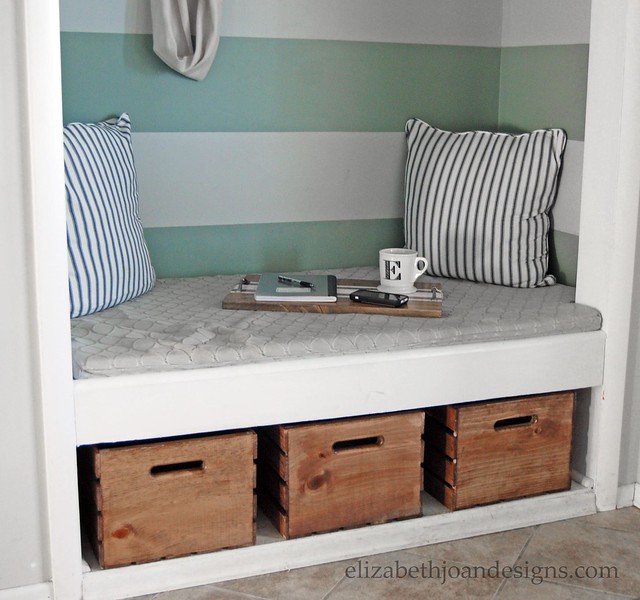
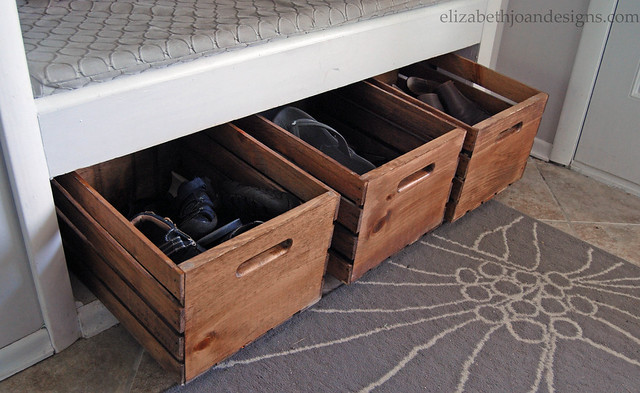
Since the addition of the bench, we also added three wooden crates for shoe storage. I purchased the boxes from Walmart unstained. Then I updated them a with my favorite stain, Minwax Special Walnut.
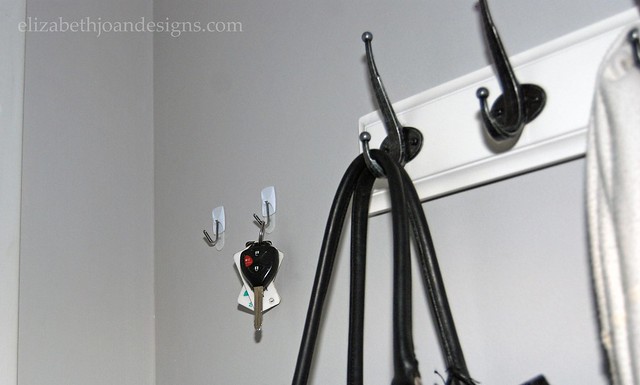
I am totally that person that can never find their keys. I am always miss placing them. I usually find them in the door lock, but that’s not something I can always count on. So to help remedy this situation, I added a few Command Hooks behind our front door to hand hang our keys on.
One of my favorite decor items I own is displayed here in the hallway: a faux succulent terrarium I purchased from the grocery store of all places. Doesn’t it look cute on my entryway bookshelf?

Well, that’s all I have for you today. We just LOVE how everything has turned out. Hope you enjoyed seeing the new changes around here.
You may also like:

Heriloom Dresser Makeover 
Painting Laminate Countertops 
Grain Sack Stripe Stool 
10 Minute Curtain Tie Backs -
We Dig It: Advent Calendar Ideas
This week for We Dig It we wanted to share some cool and creative advent calendar ideas. It’s always fun counting down to Christmas and the visual display is especially fun for kids. And if you aren’t into the whole idea of opening little gifts each day, you can always take it the other way and include cards that share small (or big) acts of kindness for you and your family to carry out! Here are 11 of our favorite pretty and functional advent calendar ideas.


Knock Off Pottery Barn Advent Calendar

Shoe Organizer Advent Calendar

Toilet Paper Roll Christmas Calendar

Clothes Hanger Advent Calendar

Brown Paper Bag Advent Calendar


Muslin Spice Bags & Ornaments Advent Calendar


Wool Felt Reindeer Advent Calendar

We hope you liked this week’s round up and would love if you shared your favorites with us in the comments below!
___________________________________________
You may also like:

Fun Holiday Tags 
Festive Paper Stars 
Pinecone Fire Starters 
Dollar Store Scarf Wreath -
Do You Want To Build a Snowman?
Do you want a Build a Snowman? I do! It’s time for another exciting chapter in The Home Depot Monthly Gift Challenge. In the past, we’ve shared How To Build A Wine Bottle Bird Feeder, 10 Minute Rope Curtain Ties, 2×4 Artwork, a Pegboard Luminary, Wood Box Caddy, and an Industrial Book Rack. Here’s how the challenge works: a different item is chosen from The Home Depot by one of our group members and then we each make a gift to be given to a different recipient each month. October’s item was a furniture leg or bun foot and the lucky recipient is my in-laws. Today, I am sharing a cute project you can make just in time for the holiday season.


This challenge is in no way associated with The Home Depot. We just love their stuff!
Supplies
– Foam-board
– 3 Lids, plates, or other items in various circular sizes to use as patterns for the head, middle and bottom of the snowman
– X-ACTO knife
– Scissors
– White yarn
– Twigs/sticks
– Buttons
– Craft Glue
– Hot Glue Gun and glue sticks
– Furniture leg – you may need additional tools to shape it the way you would like. I used a miter saw, sander, hammer, and a chisel.First, I traced three different sized circular lids onto a piece of white foam board. The smallest circle is for the head, the middle sized for the body, and largest for the bottom of the snowman.
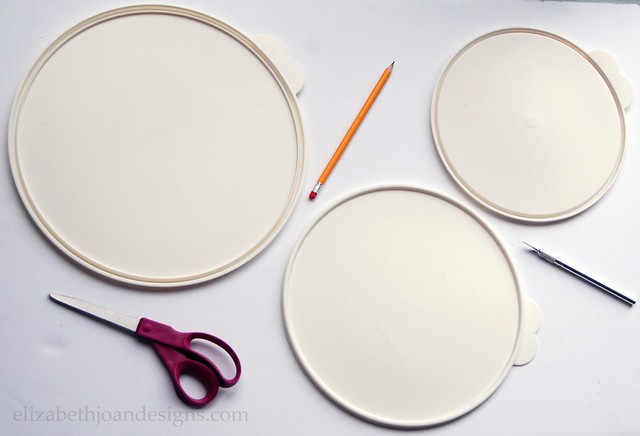
Next, the three circles were cut from the foam board using a X-ACTO knife and scissors.

Then starting from the center working my way to the edges, I wrapped all three foam circles with some of the softest yarn I could find, Bernat Baby in white. I wanted him to be extra fluffy looking. Using craft glue every so often, I secure the yarn in place.
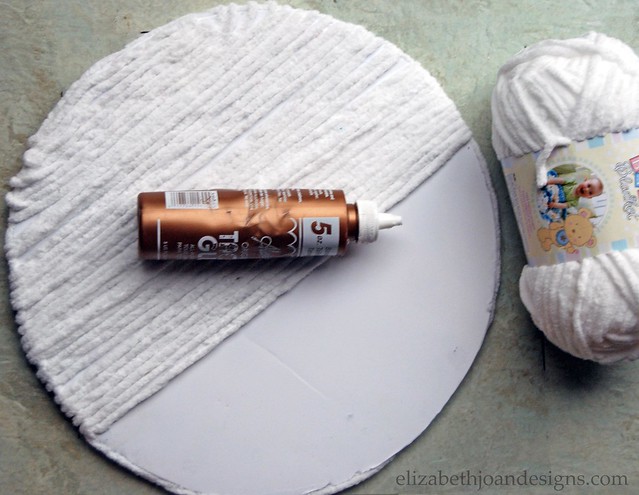
This part took a little longer than I thought it would, but the end result makes the extra time put into it totally worth it.

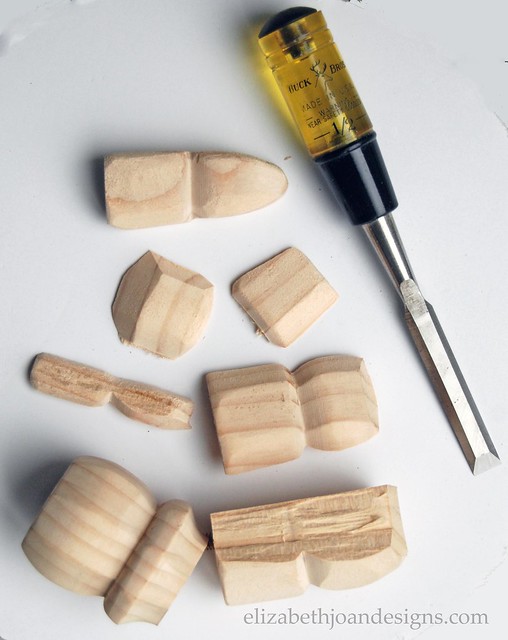
After that came the challenging part: the furniture leg.
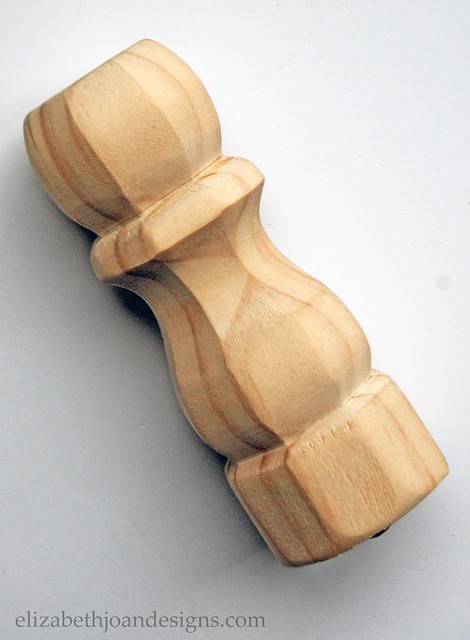
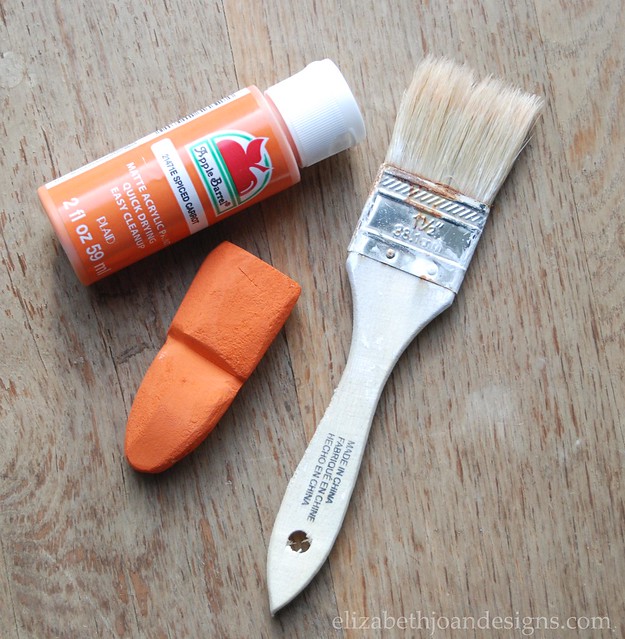
It took a few tools to turn this bad boy into a snowman’s carrot nose. I cut the leg with the miter saw, split one half of the leg with a hammer and chisel, shaped a piece of the wood with a sander, and painted it carrot orange with acrylic paint and a brush.
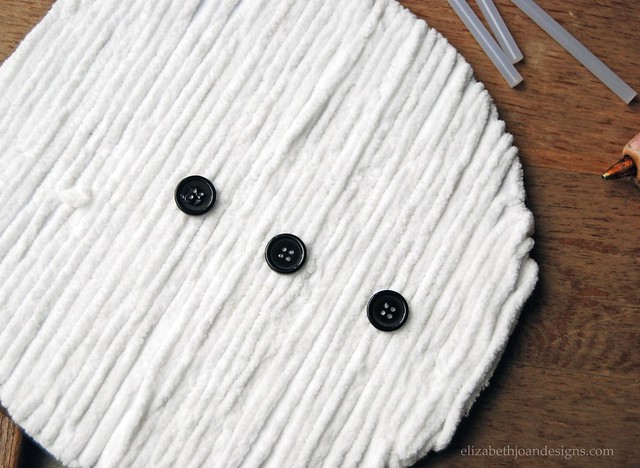
Then, it was time to bring out the hot glue gun. Two buttons for eyes, eight baby buttons for the grin, and one re-sized and re-shaped piece of a furniture leg were all glued to the smallest yarn covered foam board to make the adorable face.

I also hot glued three black buttons to the middle section.
Finally, I attached the three snowball pieces together with more hot glue and added the arms to the back as a final touch.

The sticks don’t have to be the same length. They just have to appear the same length from the front.
Isn’t he cute?
I love him! I gave him to my mother-in-law last weekend and she really likes him. Yay!
Please hop around and check out all of the other amazing projects for this month’s challenge.
You may also like:

Easy Pom Pom Wreath 
Stocking Hanger 
Last Minute Silhouette Ornament
Festive Paper Stars