-
Upcycled Tripod Table
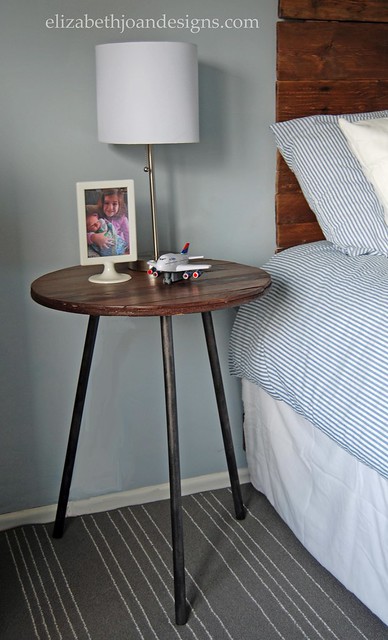
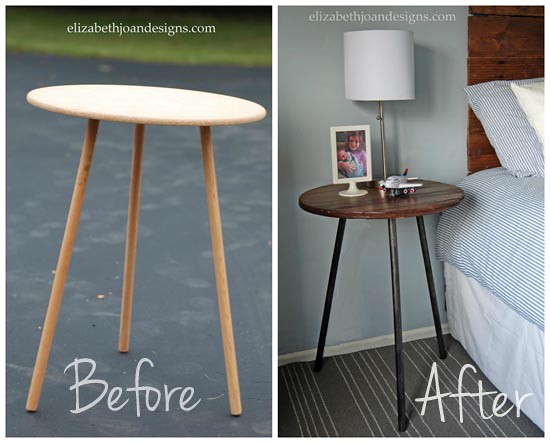
I had been searching everywhere for the perfect table to use as a nightstand in my son’s room. (And by everywhere, I really mean the side of the road and garage sales.) I was looking for something narrow, tall, and with an interesting shape when I came across a basic tripod table. The asking price was a whopping $1 at a yard-sale. I decided it was a fair price, skipped the negotiation step, and went straight for the purchase. I was so excited to have found something so cheap.
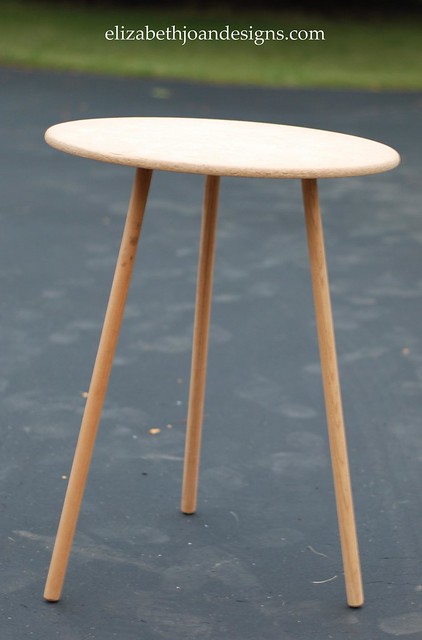
When I got home, the first thing I did was check to make sure it fit in it’s previously picked out place. Yay, it did! It was time to get to work! But then life got in the way. Honestly, the table just sat in his room looking kinda sad for a couple of months. We all know how that goes, right?
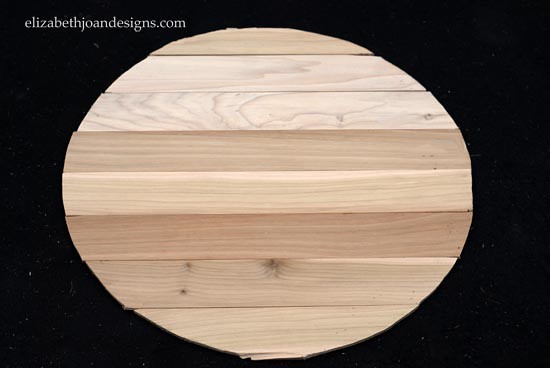
Once things in my personal life mellowed out a bit, or as much as they could, my vision for this table was pretty clear. I really wanted to give it a plank top.
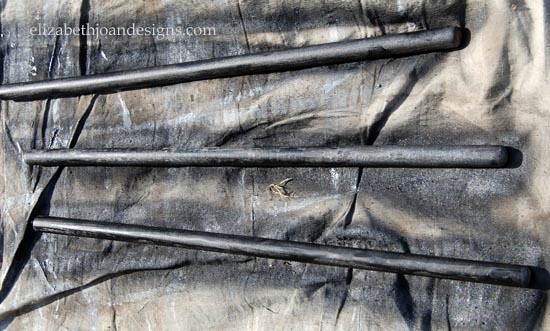
To achieve the round shape I wanted, I removed the legs from the table. Next, I layed the table face down on the wood planks and traced it with a pencil.
Lucky for me, my sis had been visiting and accidentally left her jigsaw here. I used this fun power tool to cut each piece of wood. You are probably wondering who travels with a jigsaw? Answer: Someone with a DIY blog, that’s who. Or a power tool salesman.
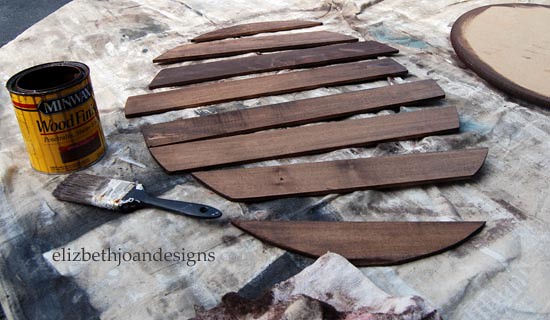
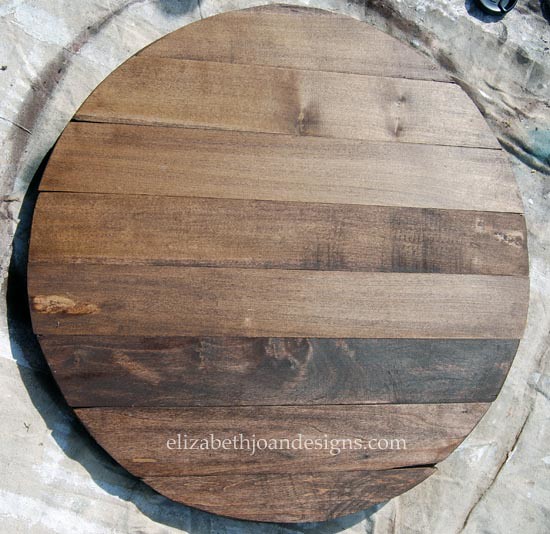
Then, I sanded each plank and stained them with my favorite wood stain, Minwax Special Walnut. Love the color! I applied a couple coats of Minwax Polycrylic to give the table top a little extra durability.
While the planks were drying, the three legs were sprayed with Rust-Oleum’s Oil Rubbed Bronze Paint and Primer in One to give them a slight metallic look. At this point in the process, I was already lovin’ the look and excited to see it finished.
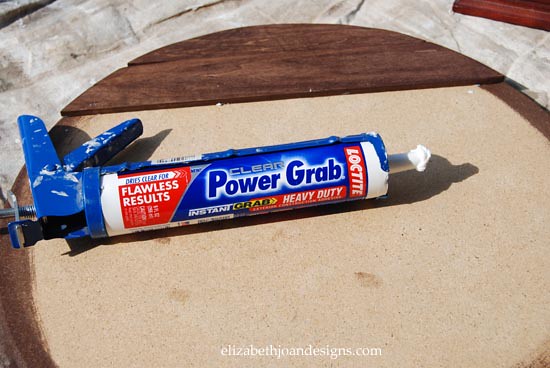
For the final step, I used adhesive to adhere the planks to the top. The processes was pretty quick and I left the table over night to dry. In the morning I reattached the legs and the table was ready for use.
I am in love with how this basic tripod table turned out. Much better than how it started.
What do you think?
____________________________________________________________________ You may also like:
Numbered Counter Stools 
Wire Mesh Pin Board 
Kid’s Table Makeover 
Lazy Upholstering -
15 Furniture Transformations
Don’t you just love a good makeover? There is something completely satisfying to us about taking furniture that’s old, unwanted, or just in bad shape and creating a beautiful piece from it that can be enjoyed again. That’s why we wanted to re-share some of our favorite furniture transformations from the blog.


Vanity Makeover


Wow, all of these photos really have me motivated to work on something. Catch ya later! I’m off to grab my paint brush.
-
Halloween Tissue Box Monster Art
Every year at this time, many companies slap Halloween designs on just about anything. Cereal, fruit snacks, underwear, all the way to tissue boxes. People will buy those items just for the festive looks. I know I do.
I purchased these adorable boxes of tissues last year to add a touch of silly fall fun to our bathrooms. These little monsters were so stinkin’ cute that I couldn’t just throw them away after the boxes were emptied. So, I turned them into Halloween Art.

Supplies
3 Empty tissue boxes
1 Empty Melissa and Doug toy tray
Mod Podge
Foam paint brush
Black spray paint
Scissors
First, I spray painted the toy tray black. This gave it more of a Hallo-weenie look.
Next, I sliced open the tissue boxes with scissors and carved out the monsters along with some of the cute background.
Finally, I Mod Podged the cardboard sections into the Melissa and Doug storage piece.

Tada!

____________________________________________________________________ You may also like:
Freezer Paper Stenciled Treat Bag 
Last Minute Pumpkin Decorating 
Octonauts Costumes 
Spooky Fall Decor There you have it. Fun, free, easy, adorable Halloween art! I love how it turned out, and you just can’t be that price.
-
The Man Cave Makeover
Neither Emily nor I have man caves in our homes. Sure, our husbands would probably love a space to call their own, but I would like a dance studio and craft room and that’s probably not happening anytime soon. So, I bet you are wondering what this post is actually about then. We were selected by a new company called Man Crates Gifts for Men to highlight what we would gift a guy looking to decorate his new man cave for their “Man Cave Makeover” campaign.
First of all, we just wanted to say that Man Crates creates and ships awesome actual wooden crates filled with goodies that your man will need to open with a crowbar. Just the perfect way to get the testosterone flowing. The point is to try and eliminate some of the troubles that come with figuring out which gifts to buy for men. We’ve all been there, contemplating another bland neck tie or stinky cologne, just so you have something to wrap up and give.
Anyway, as far as man caves go, we decided to give everything an overhaul and get away from the typical dark and dingy spaces, sprucing things up a bit with neutral textures and industrial touches. No micro-fridges or neon signs allowed.

Our chosen items (starting on the left side and working our way around clockwise):
1. This industrial Emerson Shelving unit will make a great addition to the man cave because it can moonlight as many different characters. Is it a drink station, snack bar, bookshelf, or game holder? Maybe it could be all of the above. And everything can be kept organized in these great Byholma baskets.
2. Curtains are probably an item that easily get ignored when
decoratingthrowing together a man cave, but they look much better than mini blinds and can help keep the glare off of the television during the big game. These Parlbuske Beige Curtains paired with Threshold™ Hammered Ball Drapery Rod would work great.3. Bring a little life in with some greenery, like the Ficus Pandurata Bush in the Potatis plant pot. My husband wanted to make sure we mentioned that he thought we should only be including faux plants, since live ones would actually require work.
4. Cast Resin Deer Antlers add a great outdoorsy feel to the room.
5. Adding a large Old World Map poster print is a great way to save some money on art. And building your own frame for it is the perfect reason to break out the power tools.
6. This Bronze Pendant Light also has a wonderful industrial feel that fits the space well.
7. A comfy place to sit is a must, but we decided to forgo the traditional recliner and opt for the Burnham Leather Sofa.
8. The Hermine Throw will help keep him cozy.
9. These Natural Tree Stump Side Tables are also great for many uses. Pull one up in front of the couch as a footstool. Move it to the side and set your drink down. They can even work as extra seating in a pinch.
10. Scotch Tumblers – Do these really need an explanation?
So that pretty much sums it up! What do you think? Emily and I also thought a nice, soft, light colored rug would really pull the space together, but both of our husbands nixed the idea, claiming that it would require more work for the room, i.e. vacuuming and stain removal. Boys can be such party poopers, but you got to love ’em! Some day our husbands will hopefully have man caves of their own that we can decorate, but for now, this is the vision they will have to live with.