-
18 Easter Decorating Ideas

Today we have a wonderful round-up of Easter ideas for you. All of these amazing ideas come from really talented bloggers. Hop (Easter pun intended) on over and check out their fun projects.
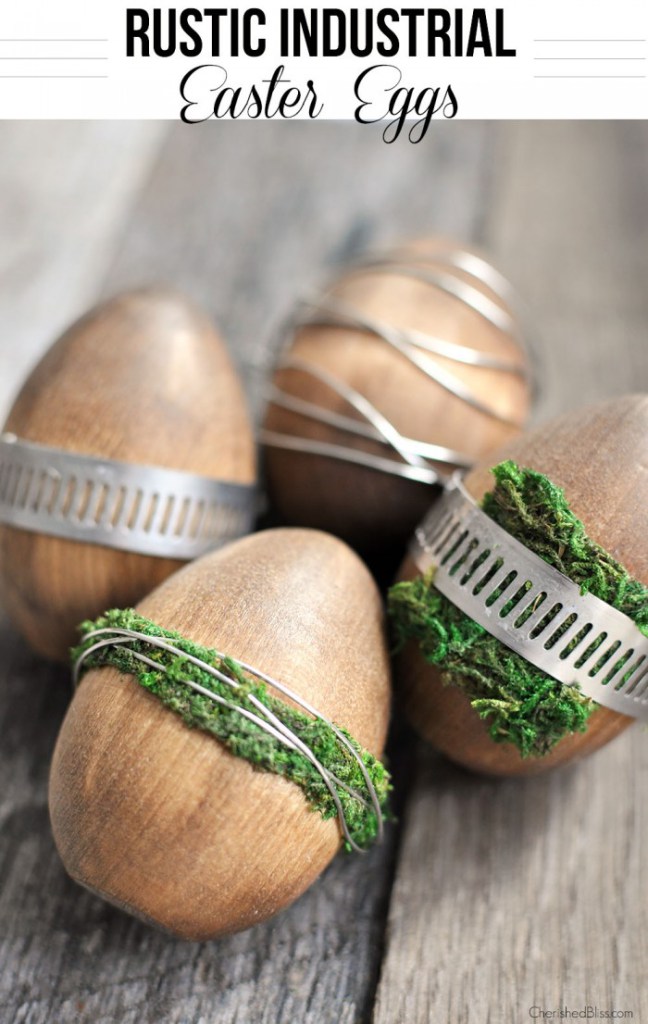
Rustic Industrial Easter Eggs from Cherished Bliss.
Tattoo Easter Eggs from
Uncommon Designs < Easter Bunny Banner from Like The Cheese.
Spring Runner: Burlap and Chevron from
Domestically Speaking.
Burlap Bunny Ear Napkin Ring from Little House of Four.

Easy to Make Plastic-ware Easter Carrots from Crafts by Courtney.

3 Different Ways to Color Easter Eggs from My Big Fat Happy Life.

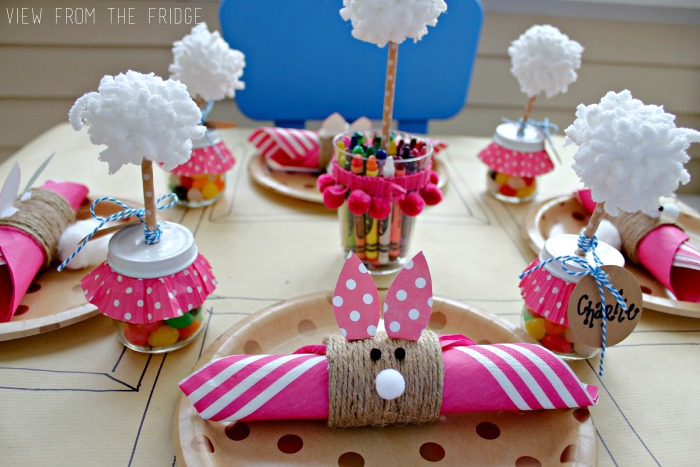
Easter Kids Table Setting from View From The Fridge.
Easter Party Printables from Kristen Duke Photography.

Easy Easter Wreath from Love, Pasta and a Toolbelt.

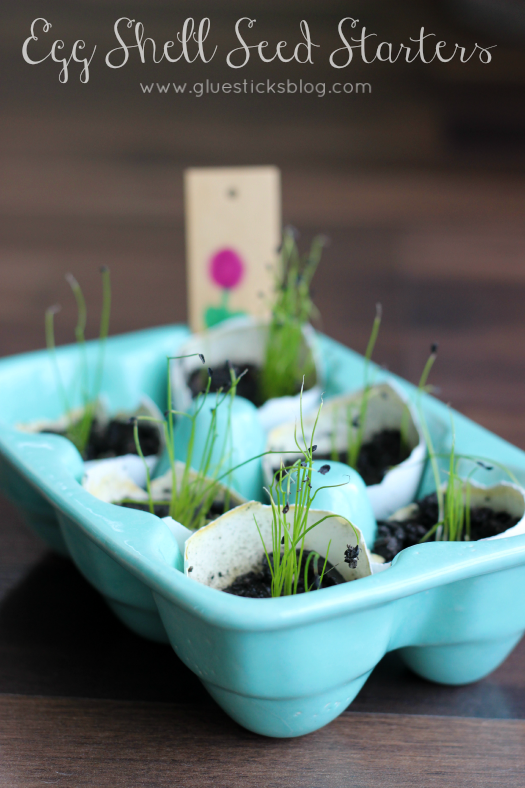
Egg Shell Seed Starters from Gluesticks.
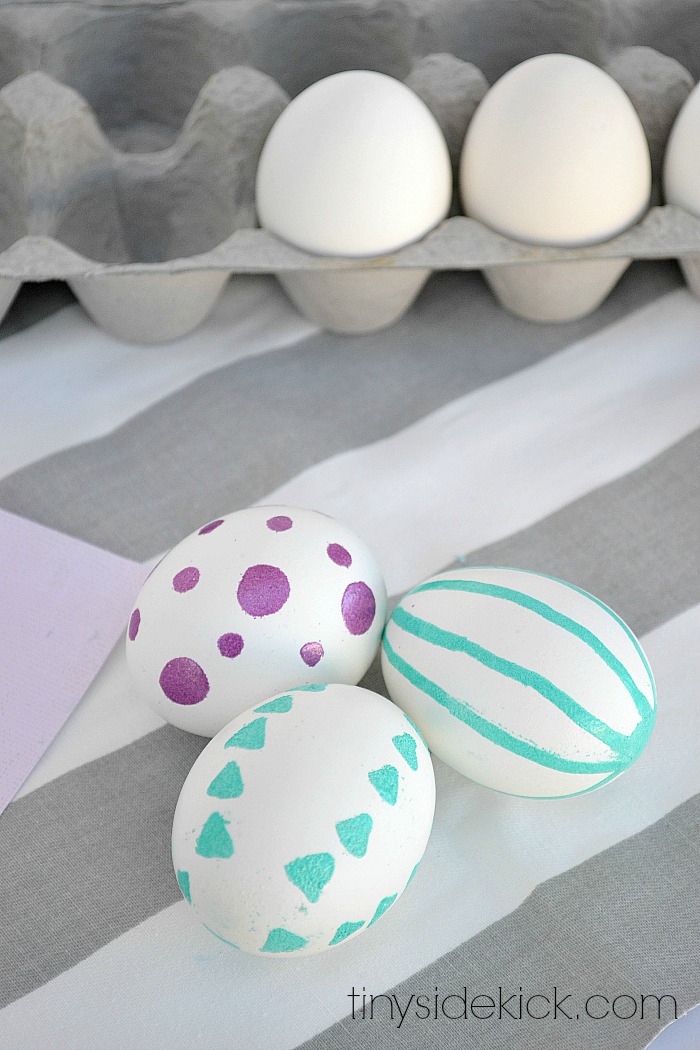
Embossed Easter Eggs from Tiny Sidekick.
Spring Bunny Footprint Art from One Krieger chick.

Chalkboard Place Cards with DIY Wire Easter Eggs from Design, Dining and Diapers.

Moss Bunny Topiaries from Average but Inspired.

Rock Troll Easter Eggs from The Frugal Foodie Mama.

Watercolor Egg Place Setting from A Pumpkin and a Princess.

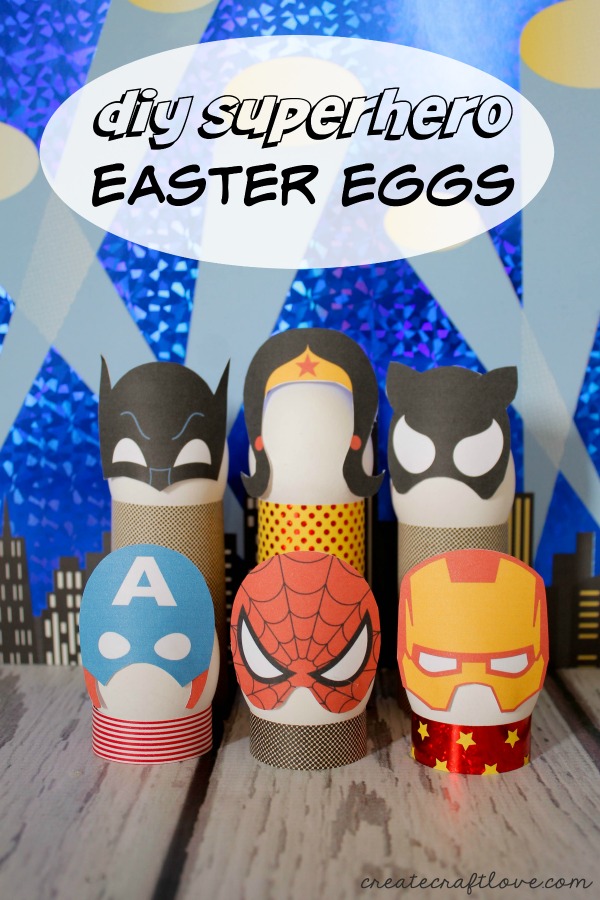
Superhero Easter Eggs from Create Craft Love.
________________________________________________________________ You may also like:

Wood Box Caddy 
Easy Easter Basket 
Gardening Gift Basket 
Eye Shadow Easter Eggs -
Chevron Pattern to Herringbone
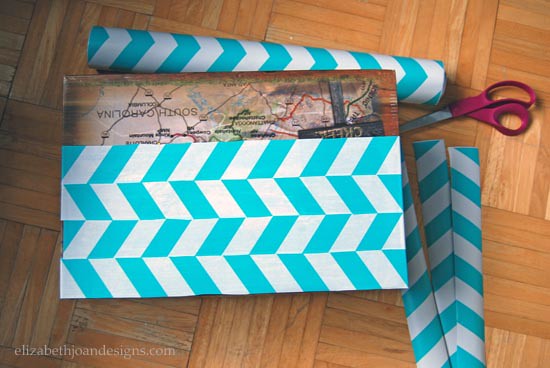
Do you remember my Garbage Picking Kit? No? You should really check it out, it’s a pretty funny post. Well, when I was working on that project, I needed something to store all of my tools in so they didn’t just rattle around in the trunk of my car. My solution was an old shoe box. The box I found wasn’t exactly pretty. I decided it needed a little beautifying, so I grabbed some chevron patterned shelf liner to cover the box lid. As I was measuring the paper out, I was struck by a lightning. Okay, not a real lightning. Just a great idea kind of light bulb, but you get my point. Anyways, that’s when I thought it would be fun to change my chevron pattern into herringbone. Here’s how I did it.

Fist, I cut the shelf liner into strips using scissors. I did not do this haphazardly. The method to my madness was cutting straight lines directly through the points of each zigzag.

Next, I removed the backing of each contact paper strip to reveal the sticky side. With sticky side down, I placed each strip making sure to alternate colors with each piece. This is what created the herringbone pattern. Seriously, this project was so ridiculously simple. I feel a bit embarrassed and like I am cheating using this as a blog post.
Because of the size of the shoe box I was using, hubby’s giant feet not mine, I had to add some small pieces of the contact paper to the ends of the box lid to complete it. It took a little finagling (technical term) to get them to look right. But once I had finished, I loved how this turned out! What do you think? So simple, right?

________________________________________________________________ You may also like:

Garbage Picking Kit 
Removing Oil Based Paint & Primer 
Hardware Change-A-Roo 
Faux Roman Shade -
DIY Split Pea Wreath
Who is ready for spring? Probably everyone who is reading this, including me. I am so tired of all of snow and freezing temperatures. To invite and welcome spring to this part of Earth, I am sharing a Spring DIY Split Pea Wreath. Last year, I had made a spring moss wreath. So this year, I decided I would make one with food. Sometimes we need just a little green in our lives to help break up all that white snow.

To make this wonderful wreath, I used a straw wreath form, a paint brush, Mod Podge, a large plastic container, and a whole lot of bagged split peas.
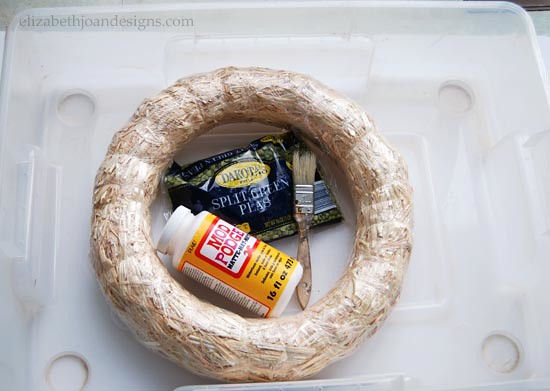
First, I placed the wreath form in the plastic container and painted the front and sides of it with a thick layer of Mod Podge.

Here is my lovely assistant. Do you like his duct tape arm band? He thought it was cool.
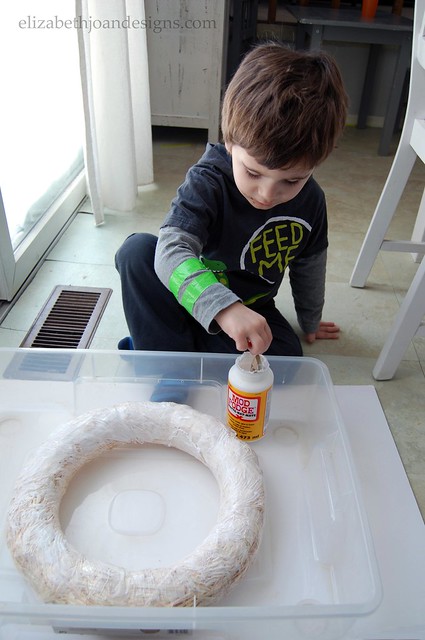
Next, we coated the glue covered circle with the small vibrant colored greens and let it dry.

The little helping hands and I continued this process until every space was filled with peas.

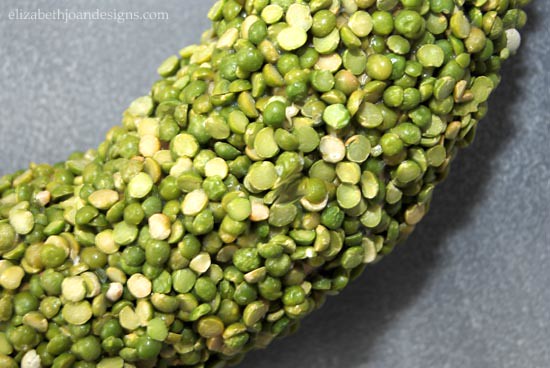
Finally, we were finished and it looked great!

My original plan was to work on this project alone, but I am so glad this was something my three year old and I could do together. It was such a great sensory activity for him. I love how beautiful and simple this wreath turned out too. Okay spring, now it is time to arrive!
________________________________________________________________ You may also like:
Eye Shadow Easter Eggs 
Faux Topiaries
Gardening Gift Basket 
Spring Moss Wreath -
Garbage Picking Kit
It’s no secret that Erin and I drive around on garbage day hoping to snatch up some wonderful treasures. With spring cleaning season approaching, it is time to prepare. There have been many times that I have found something curbside that I just can’t resist, but don’t have the tools I need to bring it home. That’s when it hit me, I need a garbage picking kit to keep in my car. This project may not be for your “Average Joe”, but if you are a garbage picker, dumpster diver, Craigslist purchaser, garage sale hunter or storage locker auction goer, then this kit would be right for you.
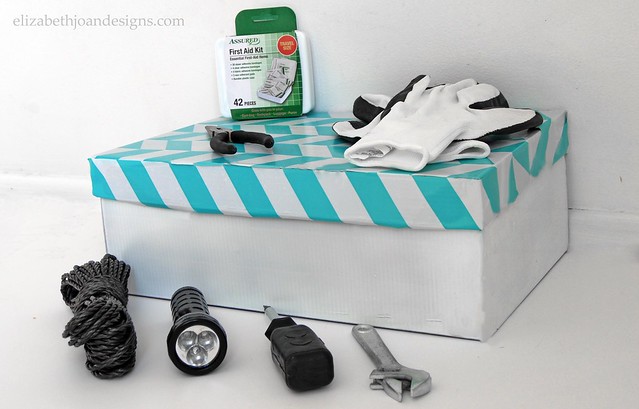
Since I am out searching the side of the roads for discarded items, I obviously don’t have tons of money to throw away on a garbage picking kit. That’s why I jazzed up an old shoe box and shopped at the dollar store and found everything I needed to assemble the perfect pack.
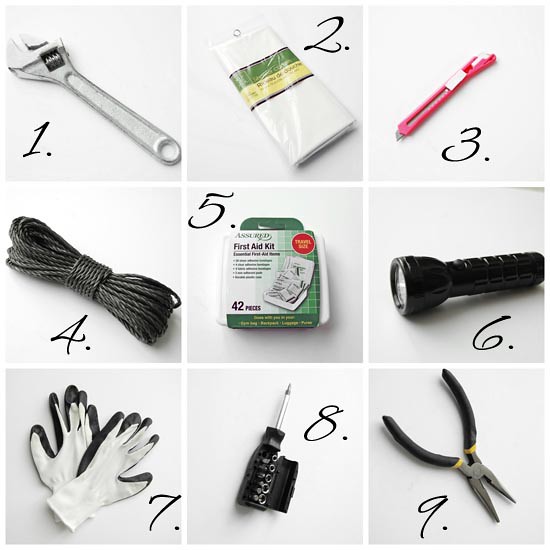
1. Wrench – Loosen up any of those tight nuts and bolts with a wrench to help even the largest items fit in your vehicle.
2. Shower Curtain – A shower curtain may seem like a silly thing to include in this kit, but I assure you it makes a great back seat protection cover for those items that just don’t fit in your trunk.
3. Box Cutter – This box cutter comes in real handy when someone else tries to make off with your treasure. (Only kidding.)
4. Rope – Rather than have your friend half hang out of the car to hold onto an unwanted desk (true story), secure it in your car with rope. This way you can drive safely back to your home.
5. First Aid Kit – Fix up any of those cuts and scratches that come with the job.
6. Flashlight – Use a flashlight to shine a little light on the subject. Erin and I probably should have had one of these bad boys along that time we found that old couch with mouse dropping under the cushions. Eww!
7. Gloves – Let’s face it, you are picking up someone else’s trash. Gloves just make sense.
8. Screwdriver – For all of your screwdriver needs, this 10 piece multi-tool will do the trick.
9. Pliers – Use pliers to pull out those sharp staples or nails before you resuce that “well-loved” furniture. This will save the interior of your car from needing that first aid kit.
10. Hardware Storage Box – After removing the screws, nuts and bolts from your find, store them in a hardware box (not pictured above) so you don’t have to search your entire car for them later.
After writing this post, I started to think maybe this sounds like a joke. Well my friends, it is not. I will be keeping my kit in my car all year-round so I am always prepared.
*Before going garbage picking, be sure to check you town’s ordinances. You don’t want to do anything illegal and have the cherries and berries after you.
________________________________________________________________ You may also like:

Vintage School Desk Makeover 
Pinky’s Painted Desk 
Reclaimed Wood Fence Headboard 
Cable Spool Clock