-
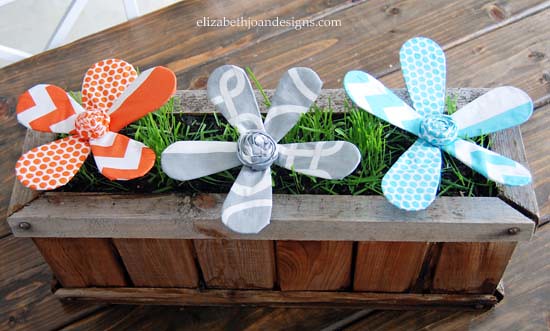
DIY Whisk Flowers
We shared this fun DIY Whisk Flower tutorial last May on It’s Overflowing. Aimee was so kind by inviting us to guest post for her. Just in case you missed it, we wanted to share these little beauties with you again.
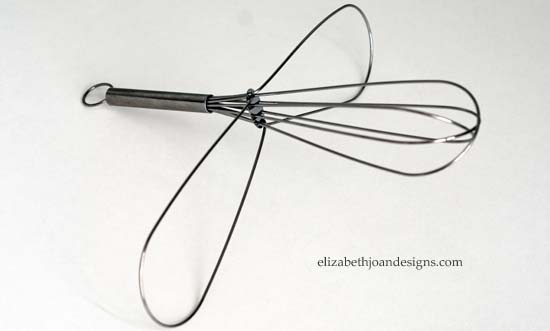
A few weeks ago, I was getting ready to donate a box of old cooking utensils when my four year old son saw a wire hand whisk we were about to part with and asked if he could keep it. I said “sure.” A few minutes later, he asked if I could turn it into a butterfly for him. As I started to pull it apart, I realized that this was an impossible task and it looked more like a flower than a butterfly. At this point he was no longer interested in the whisk, but now I was. There were endless possibilities here!
Whenever any type of creative idea hits me, I always call my sister, Erin. Her and I talked, hashing out the details for this whisk flower, deciding that wrapping it in fabric was my best bet. She recommended the magic number of three and I agreed. So, off to the store I went to buy a couple more wire whisks and make my fabric selections.

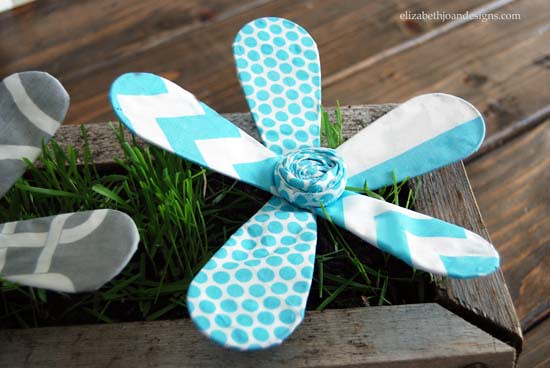
First, I started by pulling each wire loop apart from the grouping to create the petals.

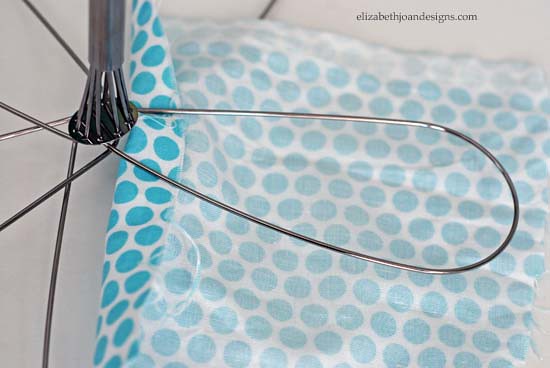
Next, I cut small strips of fabric and wrapped one around each petal, attaching it with liquid stitch glue. (I noticed when I was making my first flower, that I could see through the white parts of fabric a little bit. So for each additional flower I made, I first wrapped the petals with plain white muslin, then with the patterned fabric. Problem solved! This made them look much better.)

Once I completed the whole flower, I got back on the phone with my loving sister and we started brainstorming ideas for the center.
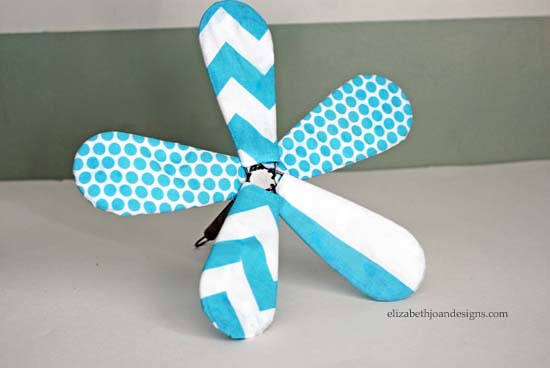
After a few text messages and several minutes of talking, Erin suggested that I make fabric flowers to be the centers, and I did just that.
Long strips of fabric were rolled up and glued to the middle of my whisk.

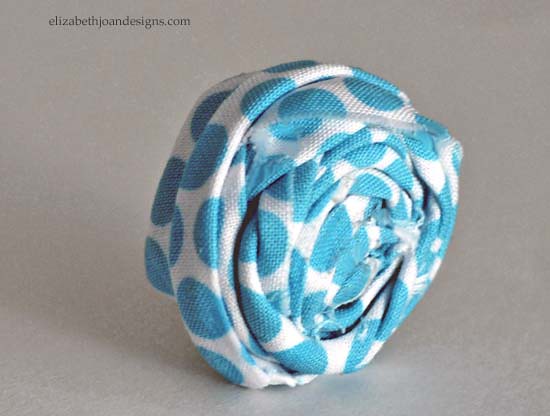
Finally, I repeated all of the above steps until I had three beautiful blossoms.

Aren’t they adorable? They make the ideal spring/summer decor. These would also be so cute for a party, or a mother’s day gift. Like I said before, the possibilities are endless.
_____________________________________________________________________________ You may also like:

Chalkboard Succulent Planter 
Ruler Succulent Planter 
Faux Topiaries 
Toilet Paper Roll Plant Starters -
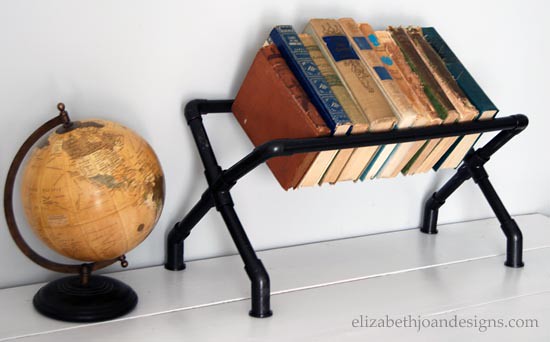
Industrial Book Rack
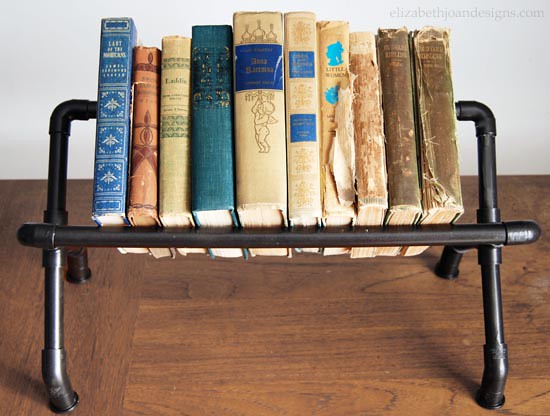
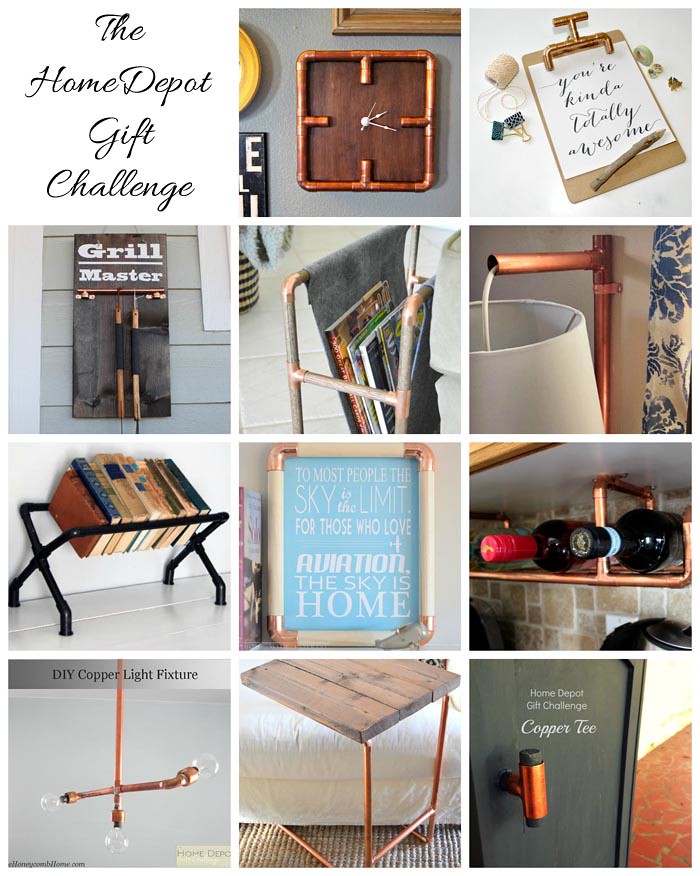
We have been invited to join a talented group of bloggers in a DIY monthly gift challenge. Each month a different item from The Home Depot will be chosen and each blog will share a fun tutorial using that item. This month’s pick was a copper fitting. I decided I was up for the challenge, purchased several copper elbows and other parts, and got to work making my hubby a Restoration Hardware inspired Industrial Book Rack.

This challenge is in no way associated with The Home Depot. We just love their stuff!
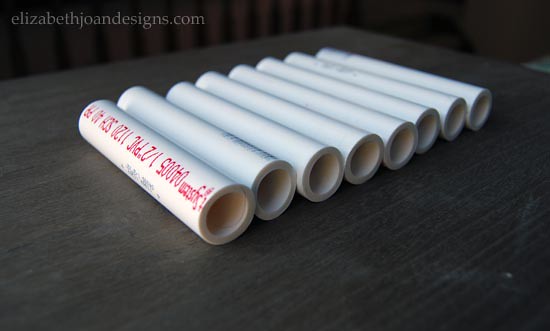
My shopping list from The Home Depot consisted of:– (4) 1/2″ x 2′ PVC pipes
– (4) 3/4″ copper elbows – 90 degree
– (2) 1/2″ PVC crosses
– (4) 1/2″ PVC elbows – 45 degree
– (4) 1/2″ PVC reducers (I found these in the electrical aisle.)
– Can of Rustoleum Spray Paint and Primer- Oil Rubbed Bronze
– PVC Pipe Cutters
– Twine (I used it for a gift wrapping embellishment.)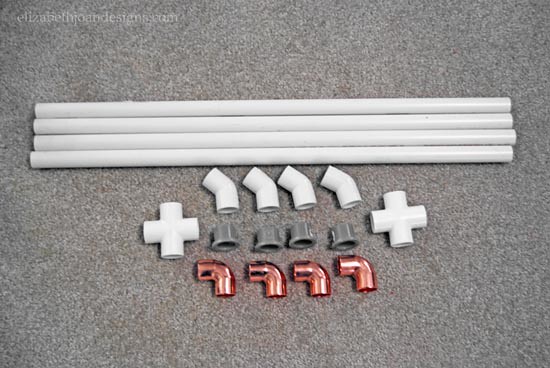
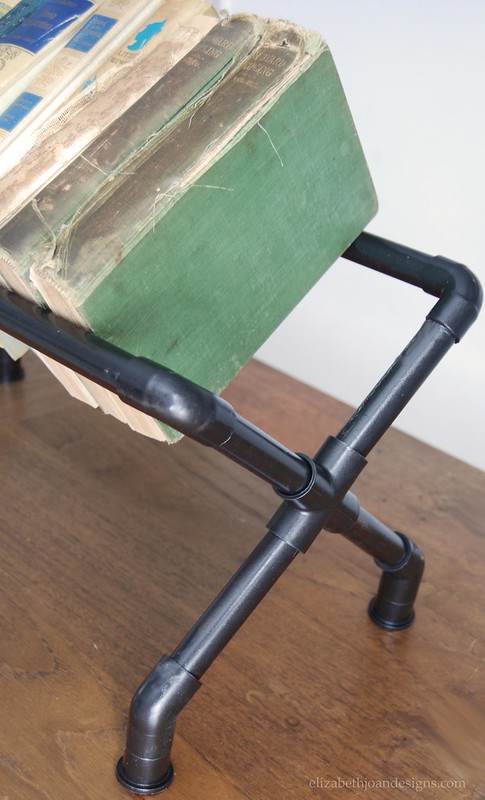
I decided to start with this book stand’s feet.

1. I measured out four 1 1/4″ sections and marked one of the 2′ PVC pipes with a pen.
2. I cut each marked section with the PVC cutters. I paid $10 for the pair of cutters I used, but they cut with ease and were totally worth it.
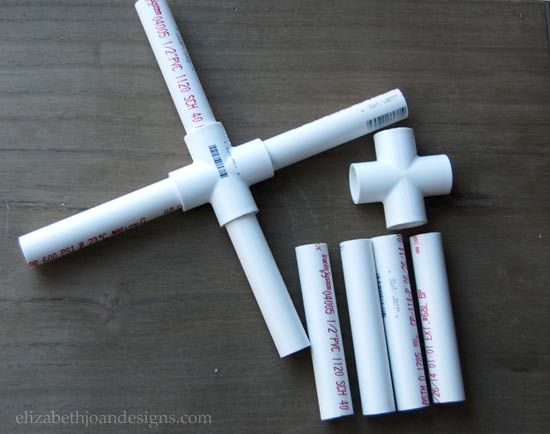
3. Each cut PVC piece was placed between a reducer and a 45 degree elbow and connected together.
4. At this point I could no longer see that 1 1/4″ piece, as it was completely inside the other two,
and now I had completed all four of the book racks feet. Yay!* Tip: Use a hammer to make sure the pipes are completely in the fittings for each step. *
Next, I cut the remaining 2′ PVC pipes so I had eight 4 1/2″ long pieces that will be used for the legs and two 19″ long pieces (not pictured below) for the book supports. After the cuts were all made, there was still a little extra pipe remaining. But I am sure there will be a future project I can use it on.
* Tip: At this point in the process, you can paint all of the parts. For tutorial purposes, I did mine later. This way in the pictures you better differentiate the pieces from one another. *
Then, I inserted four 4 1/2″ pipes into each of the PVC crosses. This created two wonderful “X” shapes for the sides.
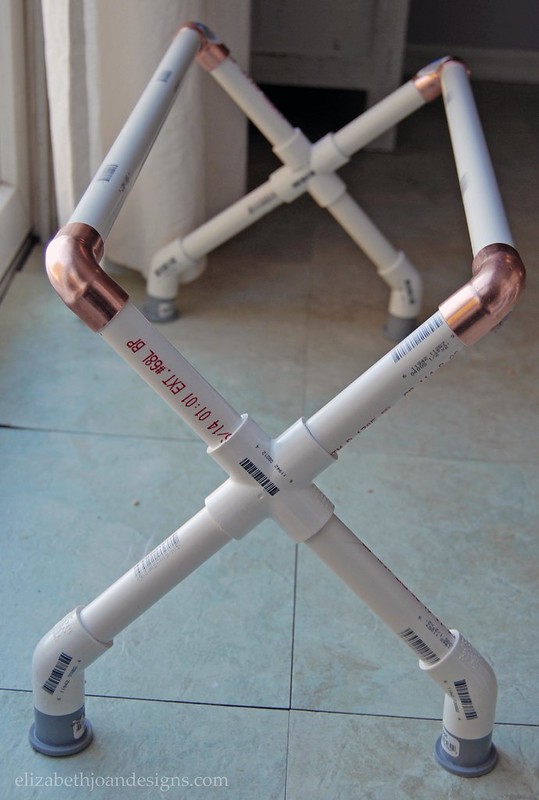
After that, I placed two feet on each “X” shape. Making sure the feet were on adjacent pipes. The remaining two pipes of each “X” were fitted with the copper elbows. The long 19″ support pieces connected the entire thing together. (See photo below.)
Finally, the parts received several coats of Rustoleum Spray Paint and Primer in Oil Rubbed Bronze and the book rack was reassembled.
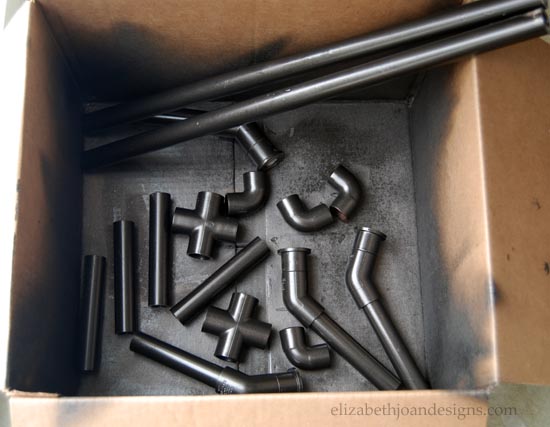
I chose this color because it stays a little more true to my husband’s taste and our decor than the copper would. Because this is a gift for him, I suppose I should take his likes and dislikes into consideration. Right?

I love it! Hope hubby likes it as much as I do.
The Restoration Hardware look for the price I like paying. Perfect!
So, I am absolutely horrible at wrapping gifts. (You can read more about that in this gift wrapping post.) Typically when I have gift wrapping needs, I enlist my husband’s help. Because this was a present for him, I had to seek help elsewhere. My three year old son was the only one around at the time so I turned to him for assistance. He was a willing participant, but as it turns out, I think maybe he got his gift wrapping gene from me. Good thing he’s cute!

Now it’s time to hop on over and check out all of the amazing copper fitting projects. Make sure you come back next month to see a whole new challenge.
________________________________________________________________ You may also like:

30 Projects under $10 
Upcycled Tripod Table 
File Cabinet Garage Storage 
French Lettered Milking Stool -
6 Free Organizational Printables
It’s time to take control of your life and get yourself organized with these amazing free organizational printables!

Plan out the rest of your year with these fun monthly calendar pages.

What’s for dinner? This weekly menu planner and grocery list page will get you organized and help keep you on budget by preventing impulse pizza deliveries.

Does your family have a hectic schedule? This weekly calendar offers an area to write down each member of your family’s itinerary into the corresponding spaces with the days of the week.

Spring cleaning is right around the corner. Use this checklist as a helpful guide to complete all of this season’s chores.

Keep your house clean with this easy-to-use weekly cleaning schedule.

For your busiest days, fill out this chart and stay on track.

________________________________________________________________ You may also like:

Toy Organization 
15 Furniture Transformations 
20 DIY Gift Ideas 
Toy Rotation -
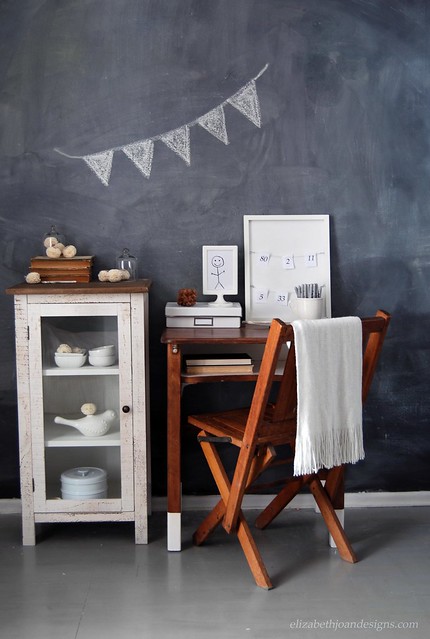
Vintage School Desk Gets Modern Makeover
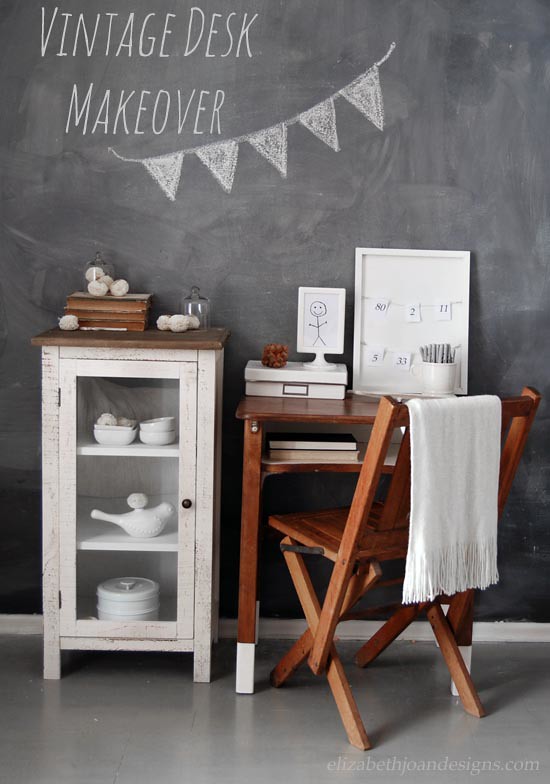
During one of my trash picking adventures last summer, I discovered this amazing vintage school desk sitting road side. I absolutely loved the shape of it and could not resist shoving it into my car to take home for a future project.
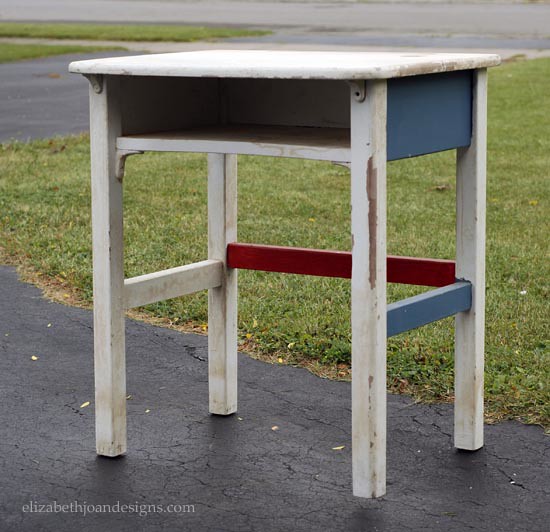
When I had time to work on this guy, I started by sanding down the entire surface. The miss-matched paint colors where just not doing it for me. The ultimate goal of this project was to give it some modern paint dipped legs, so I didn’t spend too much time removing all of the old paint off of the bottoms.
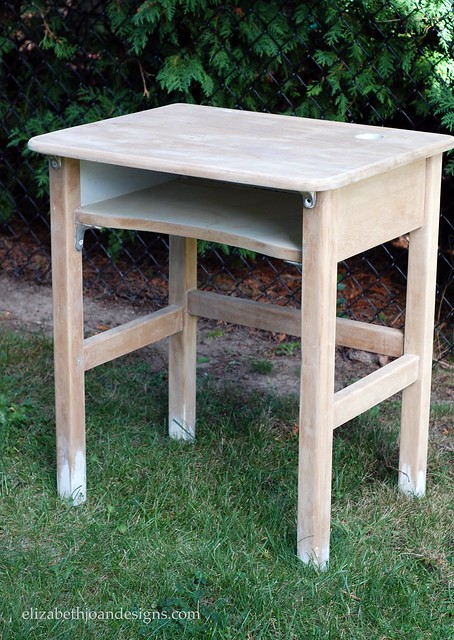
Next, the desk was stained with Minwax Special Walnut. Once it was dry, I started sectioning off the portions of the legs I wanted to paint with painter’s tape. I have always admired paint dipped furniture, but never attempted it before. So, I was pretty excited to see how this was going to end up.

Then, I brushed two coats of white paint onto the leg sections and in the desk cubby hole.

Finally, the desk received 3 coats of Minwax Polycrylic. This will protect the surface and also prevent the paint from chipping.
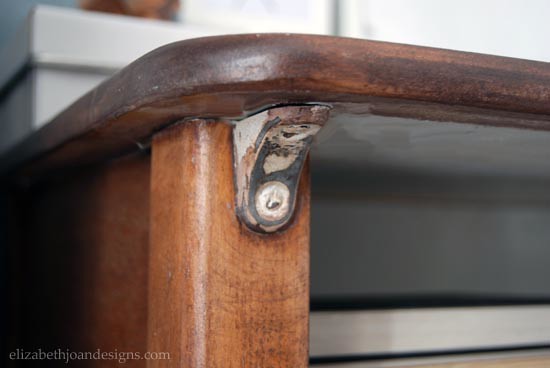
The original hardware I left untouched. I love the beautifully aged look it already possessed.
Tada! What do you think? I love the way this turned out!
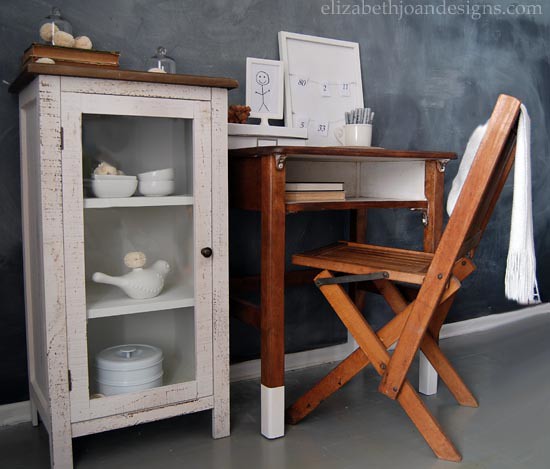
For such a fun makeover, I am very sad to report that currently this guy doesn’t have a spot in our home. I was hoping to use him in my youngest son’s room, but that just didn’t work out space wise. Unfortunately, for now, he will be hanging out (looking good of course,) in my basement until further notice.
________________________________________________________________ You may also like:

Reclaimed Wood Fence Headboard 
Easy Gallery Wall
Upcycled Tripod Table 
Pinky’s Painted Desk