-
Loaded Red Potato Soup
During cold and flu season, I strictly crave comfort food. This year is no different. My family has been sick for a couple weeks and a few of us still are. I am finally feeling a little better and ready to get back in the kitchen and cook. This loaded red potato soup is one of my favorites this time of year.

Here are the ingredients I used (plus water, not pictured.)

First, I used sharp shears to cut the bacon into small pieces which was then cooked in a skillet and set aside. Mmmm bacon!

Next, I fried the onions and garlic in olive oil until tender.

Then, the potatoes were cubed and boiled in a large pot until soft.

After that, I drained the potatoes and added the cooked onions, garlic, half the amount of crispy bacon, milk, water and spices to the pot. It was all brought to a boil and then I turned the burner to simmer for 20 minutes. I mashed the potatoes a couple times to break up the chunks a bit. This helped thicken the soup.
Finally, I stirred in 2 cups of shredded cheddar until melted. The soup was dished up and garnished with cheese and bacon. As my husband always says, “Everything is better with bacon!” I know a lot of people in my family would tend to agree with him.

We would love to hear about your favorite comfort foods that get you through this time of year. Hope everyone is staying well.
Loaded Red Potato Soup from Elizabeth Joan Designs
Yield 4 servingsIngredients
– 14 small to medium red potatoes – cubed
– 1 onion – chopped
– 2 cloves garlic – minced
– 6 strips of bacon
– 1 cup of water
– 3 cups of milk
– 2 1/2 cups of shredded cheddar cheese
– 1/4 teaspoon salt
– 1/2 teaspoon pepper
– 1 teaspoon parsley
– 1 Tablespoon olive oilPreparation
1. Cut the bacon into small pieces and brown in a skillet.
2. Fry the onions and garlic in olive oil until tender.
3. Cube potatoes and boil in a large pot until soft.
4. Drain the potatoes and add the cooked onions, garlic, half the amount of crispy bacon, milk, water and spices to the pot and bring to a boil.
5. Simmer for 20 minutes.
6. Stir in cheese.
7. Garnish with bacon and cheese. -
Entryway Remodel Part 2
Our hallway closet was a space in our home that we didn’t utilize to it’s fullest potential. We stored our vacuum cleaner on one side, a few coats on the other and tossed our shoes on the floor. This way may have been easy, but it wasn’t really working out so great. I was inspired by this entryway makeover to build a bench in that area and shelves for storage. I thought this would be more pragmatic and inviting.

First things first. I painted the entryway and closet gray. That’s right, more gray walls in this house!
Next, my husband, Adam, built a grid like structure on the floor to create a base for a platform I was wanting to store shoes and what not. No more shoes on this floor! Right?


Then, he screwed plywood to the base.
After that, a second grid like structure was constructed at bench level.

To add a little pop of color in our home, I decided to paint horizontal stripes in the nook. The process of taping and painting in a relatively small area was kind of a pain in the tush, but well worth it. The greenish color was mixed by yours truly and was also applied to the walls in our half bathroom.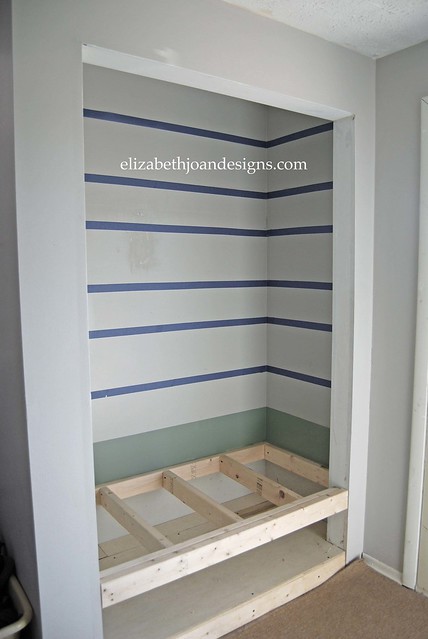
Before we were finished, Adam manufactured and installed a beautiful shelf above the bench.
Finally, we completed the bench with another piece of plywood.

Now, we just need to attach some trim, paint, add a bench cushion and probably a few more details I am forgetting.
Check back soon to see more work on this remodel and the final reveal!
-
Entryway Remodel Part 1
One year ago, to almost the day, Adam and I started remolding our entryway. There were these unsightly 8 x 8 orange-red tiles that covered the floor and a 1980’s light fixture that welcomed all of our guest. They both needed to go.

Adam and I had just taken our two little boys on a week long vacation to California to celebrate our 5 year wedding anniversary. We had discussed the remodel of this entryway for quite some time and decided to wait until we returned home to start.With less than 24 hours home, and before our bags were even unpacked, I started demo on those hideous tiles. I used a crowbar and a hammer to pry up every single one of those bad boys.

Once the plywood was clear of all things red-orange and ugly, I had to get to work on removing the leftover mortar. This proved to be quit difficult, and I had to smash each piece with a hammer to get it to budge. Luckily, my boys were both able to nap during the enormous amount of noise the hammering was causing.
Next, It was time to lay the backer-board. I used roofing nails to secure it to the plywood. A little extra strength was given to the seams by spreading mortar on them.
I love the look of placing tiles on an diagonal, but this meant a lot more cutting work. I was a bit intimidated by the wet saw and didn’t want to loose any limbs, so I enlisted Adam for the tile cutting.
Then, we used a trowel to apply the mortar to the backs of the tiles before placing them onto the backer-board. I placed quarter inch spacers between the tiles.
I love duct tape and it’s endless amount of uses! You can see below how neon green duct tape helped secure our carpet during the tiling process.

With a trowel, we smeared grout between the tiles and leveled it out.

Finally, we finished the new floor! Hip hip hooray!
More to come on this remodel soon!
-
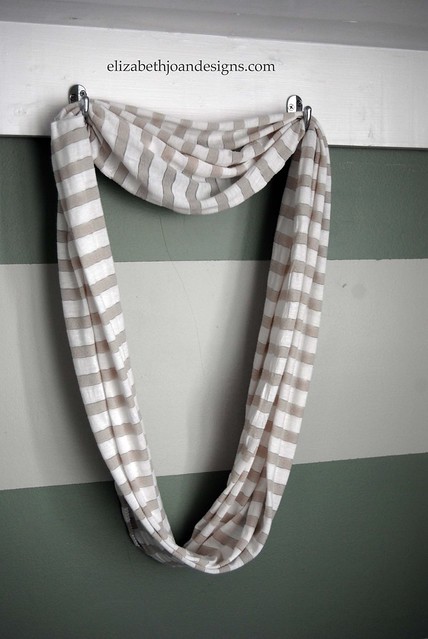
10 Minute DIY Infinity Scarf
It is COLD outside. Brrrr! With such cool temperatures, it is very important to stay warm when venturing out. I decided to make an infinity scarf to keep myself toasty and looking adorable while doing it.
To make your own in 10 minutes or less, follow along with what I did.
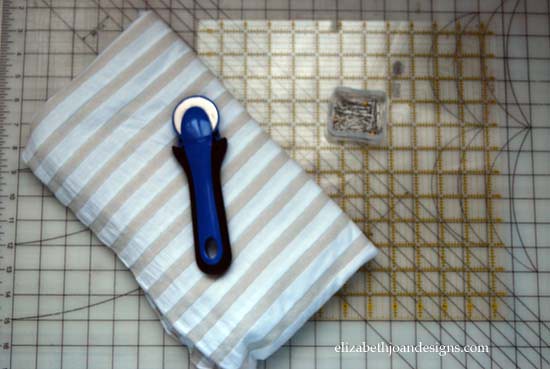
Supplies Needed
1 1/2 yards of fabric
Rotary Cutter
Cutting Mat
Fabric Ruler/ Straight Edge
Straight Pins
Sewing Machine
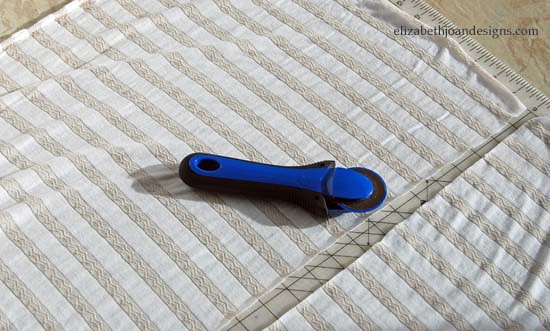
First, I spread the fabric out on my cutting mat and used the rotary cutter and straight edge ruler to cut a strip of fabric that was 54″ long by 20″ wide.
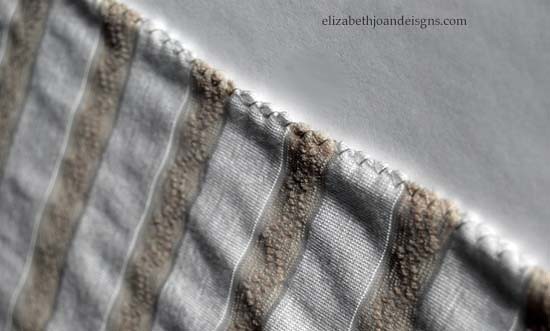
Next, I sewed a zigzag stitch down both sides of the fabric measuring 54″. This will help so my scarf doesn’t unravel on me while I’m wearing it. That could be almost as embarrassing as showing up for school naked and nobody wants that.
The two edges measuring 20″ were lined up, right sides facing each other and pinned together. This is especially important if you are using a stretchy fabric like I did, as the stretchiness can make it more difficult to sew.
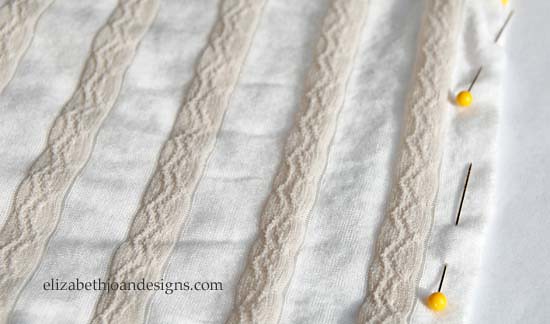
With a straight stitch and a 1/4″ seam allowance, I sewed the ends together. Then, I flipped it right side out and was finished.
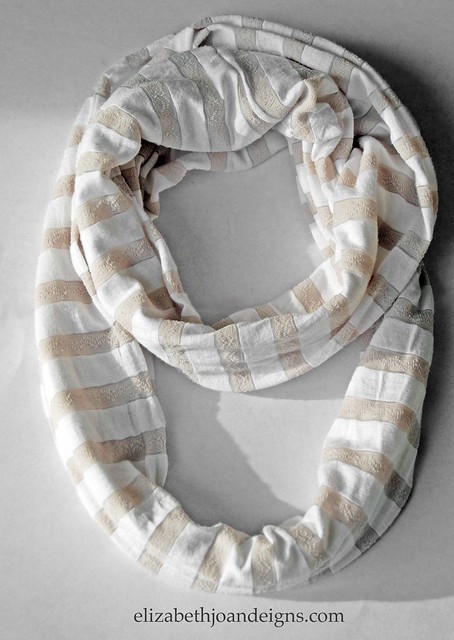
This took what seemed like no time at all and it is super cute. I am now ready to brave the negative temps. Well, maybe I’m not that brave.