-
We Dig It January 2014
Each month we will be sharing some of our favorite finds from around the web. Enjoy!1. We love the contrasting colors of this black cabinet in the all white bathroom.

2. An unused closet is a great place to put an office.
3. This peg board takes garage organization up a few notches to absolutely gorgeous.

4. We would love to snuggle up in this cozy bed nook.
5. This clean and simple entryway looks so inviting.

6. Our mouths are watering… Blue Cheese Stuffed Turkey Meatballs with Raspberry Balsamic Glaze? Yes, please!

-
Entryway Remodel Part 2
Our hallway closet was a space in our home that we didn’t utilize to it’s fullest potential. We stored our vacuum cleaner on one side, a few coats on the other and tossed our shoes on the floor. This way may have been easy, but it wasn’t really working out so great. I was inspired by this entryway makeover to build a bench in that area and shelves for storage. I thought this would be more pragmatic and inviting.

First things first. I painted the entryway and closet gray. That’s right, more gray walls in this house!
Next, my husband, Adam, built a grid like structure on the floor to create a base for a platform I was wanting to store shoes and what not. No more shoes on this floor! Right?


Then, he screwed plywood to the base.
After that, a second grid like structure was constructed at bench level.

To add a little pop of color in our home, I decided to paint horizontal stripes in the nook. The process of taping and painting in a relatively small area was kind of a pain in the tush, but well worth it. The greenish color was mixed by yours truly and was also applied to the walls in our half bathroom.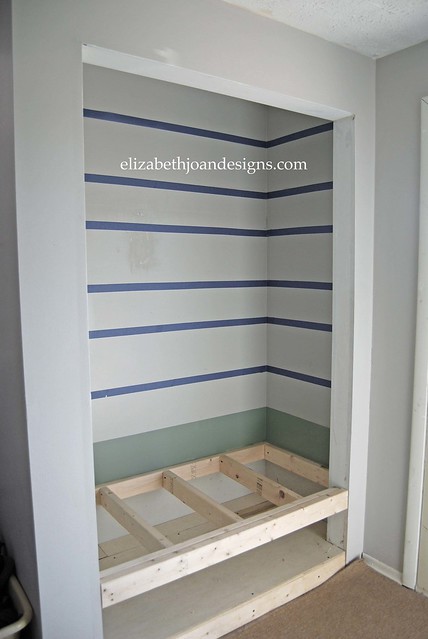
Before we were finished, Adam manufactured and installed a beautiful shelf above the bench.
Finally, we completed the bench with another piece of plywood.

Now, we just need to attach some trim, paint, add a bench cushion and probably a few more details I am forgetting.
Check back soon to see more work on this remodel and the final reveal!
-
Toy Rotation
We have a 9 year old daughter and 2 year old son. When our daughter was younger, I remember her having soooooo many toys and feeling overwhelmed with the amount we were continually adding to. My way of coping was to buy more shelves, boxes and baskets to hold all of the loot so that she could still have access to it. As nice as that sounds, it didn’t really work because she just had too much and it completely overwhelmed her. She wouldn’t really play with stuff for more than a few minutes and it seemed more fun to dump it out and move onto the next basket. Honestly, that’s not very fun to clean up.
Last year, when our son also started to accumulated a hoard of toys, which he wasn’t really playing with, I knew that we needed some sort of system to keep things interesting. And that is when I came across Kim’s post and we started our own toy rotation.
Basically, we rotate all of the toys on a schedule. (Every 2 weeks works best for us!) This seems to keep our son interested in the toys he has and he plays with everything! Woohoo!
To start, we culled all of the toys that were missing parts, broken, or from fast food joints. Then everything else was sorted into groups. Thinking, Moving, and Pretending. Here are some examples of our toys in each of the groups:
Thinking Toys – Latch boards, wooden blocks, puzzles, mega blocks, shape sorters, and stacking toys.
Moving Toys – Ride-on toys, a slide, balls, musical instruments, and a tunnel.
Pretending Toys – Grilling set, train set, food toys, dress up clothes, a tool set, stuffed animals.
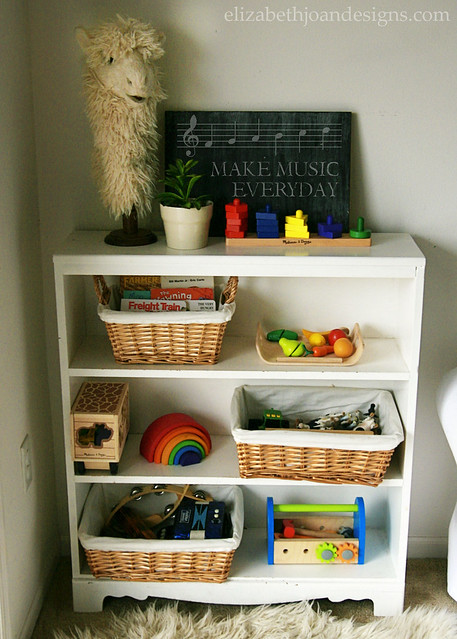
We have a few baskets we keep on a shelf in the corner of our living room that hold toys with multiple pieces and parts, as well as books, which we also rotate.


Then, the shelf is filled with other toys. I typically try to have 3 toys, from each of the groups listed above, out for him to play with.


As you can see, a lot of the moving type toys and dress up clothes won’t fit on the shelf, so we have those in another corner of the room. In addition to these, there are a few items that are always out and not rotated which include balls (you can see our DIY ball basket here,) a grill, a doll house and a chalkboard. We also have a few items that come out more sporadically, such as art supplies, play dough, a marble game, and a tent. The rest of the toys are stored away, out of sight, until it is their turn for rotation.

Using a toy rotation has been absolutely wonderful for us. EVERYTHING gets played with and we have found that all of the toys are used for longer periods of time. Plus, clean up is a breeze! And when you have a busy toddler, having something go smoothly is always welcome.
Do you implement a toy rotation or know someone who does? Are their methods similar to ours or do they do something entirely different? If you are struggling with a surplus of toys that don’t get played with, give the toy rotation a try and let us know how it works out for you!
-
Entryway Remodel Part 1
One year ago, to almost the day, Adam and I started remolding our entryway. There were these unsightly 8 x 8 orange-red tiles that covered the floor and a 1980’s light fixture that welcomed all of our guest. They both needed to go.

Adam and I had just taken our two little boys on a week long vacation to California to celebrate our 5 year wedding anniversary. We had discussed the remodel of this entryway for quite some time and decided to wait until we returned home to start.With less than 24 hours home, and before our bags were even unpacked, I started demo on those hideous tiles. I used a crowbar and a hammer to pry up every single one of those bad boys.

Once the plywood was clear of all things red-orange and ugly, I had to get to work on removing the leftover mortar. This proved to be quit difficult, and I had to smash each piece with a hammer to get it to budge. Luckily, my boys were both able to nap during the enormous amount of noise the hammering was causing.
Next, It was time to lay the backer-board. I used roofing nails to secure it to the plywood. A little extra strength was given to the seams by spreading mortar on them.
I love the look of placing tiles on an diagonal, but this meant a lot more cutting work. I was a bit intimidated by the wet saw and didn’t want to loose any limbs, so I enlisted Adam for the tile cutting.
Then, we used a trowel to apply the mortar to the backs of the tiles before placing them onto the backer-board. I placed quarter inch spacers between the tiles.
I love duct tape and it’s endless amount of uses! You can see below how neon green duct tape helped secure our carpet during the tiling process.

With a trowel, we smeared grout between the tiles and leveled it out.

Finally, we finished the new floor! Hip hip hooray!
More to come on this remodel soon!