-
Your Designs This Time – No. 29

Welcome to Your Designs This Time – No. 29. If you are new here, we’re so happy you stopped by and to our old friends who have been here before, we are glad you are back! We love seeing all of projects that are shared each week. It is so inspiring! Also this week here at EJD, we are giving you each a chance to enter a giveaway for a $10 Michaels Gift Card and Craft Bundle. Good luck!
$10 Michaels Gift Card and Craft Bundle Giveaway 
All items are brand new (total value over $60!) and personally picked out by us.
This Craft Bundle consists of:
– (2) Studio Decor 4 x 6 pedestal picture frames
– (2) Mini chalkboards
– (1) Package of 6 trims -1 yd. each
– (1) Amaco Rub’n Buff metallic wax finish
– (1) Scotch Expressions Tape
– (1) Martha Stewart Crafts utility brush set
– (1) Package of 48 Mod Podge tracing templates
– (2) Wooden rubber stamps
– (1) 6 fl oz. Martha Stewart Crafts wood stain
– (1) 2 fl. oz. Martha Stewart Crafts glitter acrylic craft paint
– (1) Recollections ribbon- 5/8in. x 5ft.
– (1) Roll paper tape
– (1) Loew Cornell 1? spong roller
– (1) Package Ook thumb tacks – 20pc.
– (1) K & C Company Smash captions – 42pc.
– (4) “handmade with love” clothes pins
– (1) Decorative tin with chalkboard lid.Just Enter the Giveaway below for a chance to win. Good Luck!
a Rafflecopter giveaway
This contest is open to United States of America residents only. All entrants must be 18 years of age or older. We will contact the randomly selected winner within 48 hours of the contest close. Void where prohibited or restricted by law. This giveaway is in no way sponsored, endorsed or administered by, Amaco, K & C Company, Loew Cornell, Martha Stewart Crafts, Michaels, Mod Podge, Ook, Recollections, Scotch, and Studio Decor or associated with, Facebook, Instgram, Pinterest, or Twitter.
We’d love for you to follow your hosts is some way!
Elizabeth Joan Designs 
Blog – Pinterest – Facebook – Google + – Twitter
Little House Of Four

Blog – Pinterest – Facebook – Google +
Restless Arrow

Blog – Pinterest – Facebook – Google +
Brepurposed


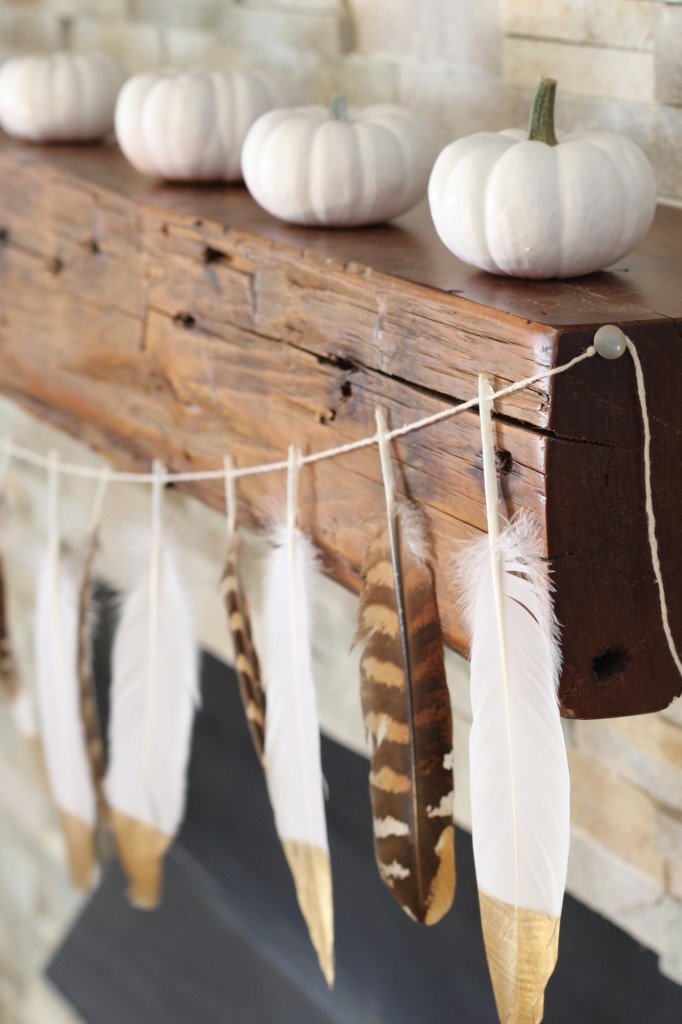
How amazing is this DIY Gold Tip Feather Garland from Simple Stylings? If I had a mantel, I know what would be going on it!
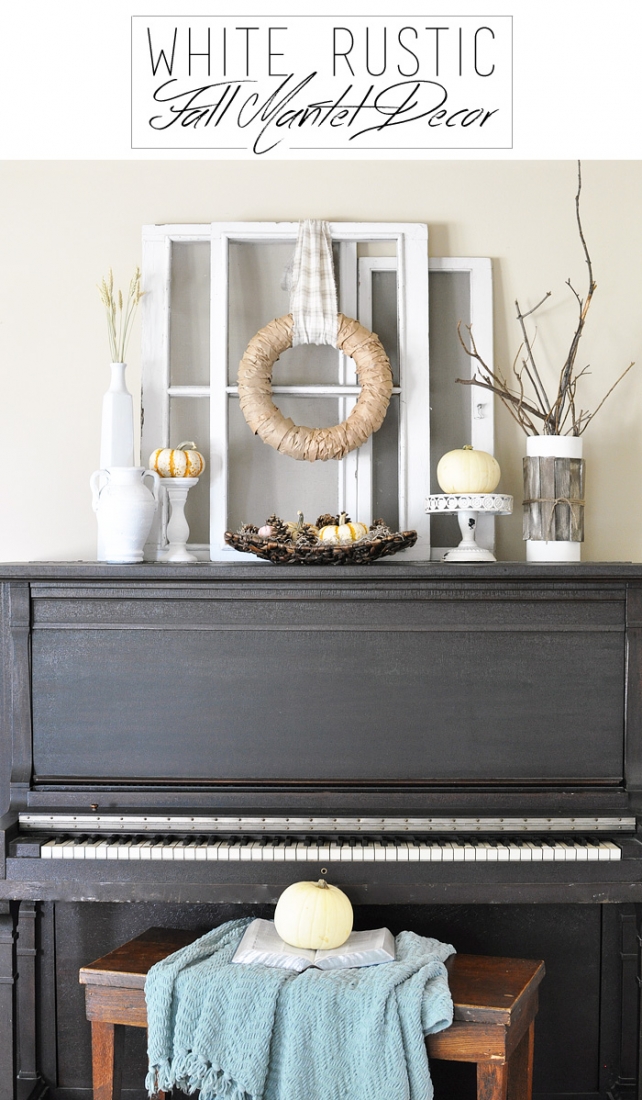
And can we talk about this White Rustic Fall Mantel from Cherished Bliss? I’m in love!
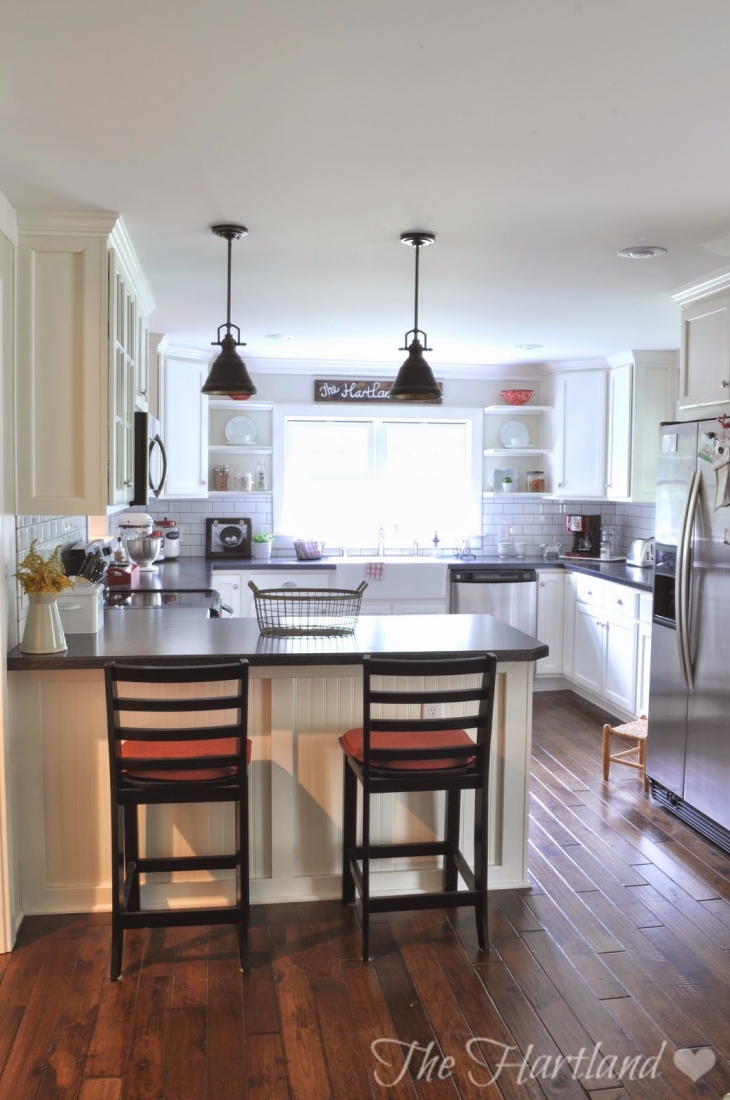
This kitchen makeover from The Hartland blew my mind! Seriously, go check out the before!
How delicious do these Sweet Fall Treats from Cupcakes & Crowbars look? I need them in my belly now!

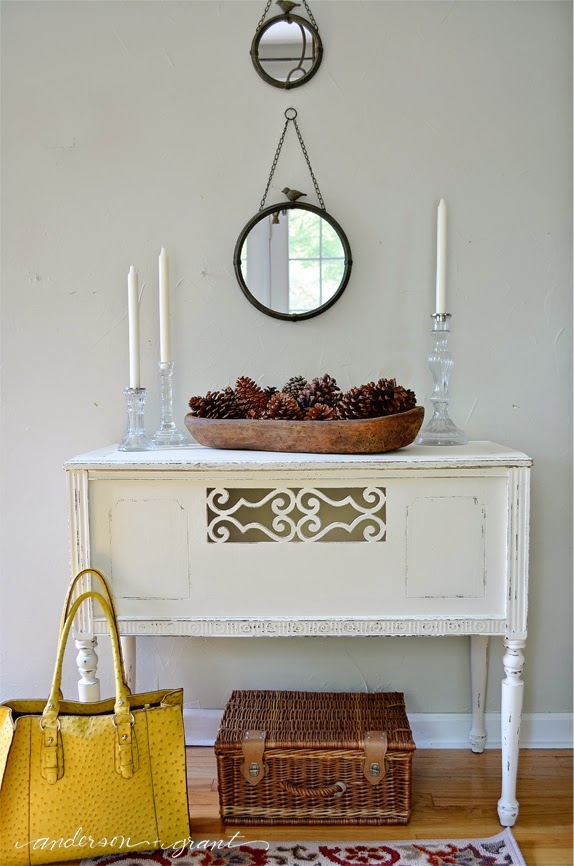
And lastly, this Vintage Radio Stand makeover from Anderson and Grant is just perfection.
If you were featured, be sure to grab a button and thanks again for sharing your projects! It’s always so hard to choose because SO many projects are fabulous! 

– Each week, a few of our favorites will be featured on all of our blogs. By submitting a link, you authorize Brepurposed, Elizabeth Joan Designs, Little House Of Four, and Restless Arrow to feature your project on our blogs and social media. (This includes a photo from your project’s post and a link back to your blog.)
– Link up only YOUR OWN new designs, projects, or ideas.
– No Etsy stores, giveaways, or link parties please.
– We love seeing your latest projects, and by linking up you are giving authorization to be sent a weekly invitation to Your Designs This Time.
– Please feel free to add our button to your blog or a visible link back to the this post, so others can join in.

-
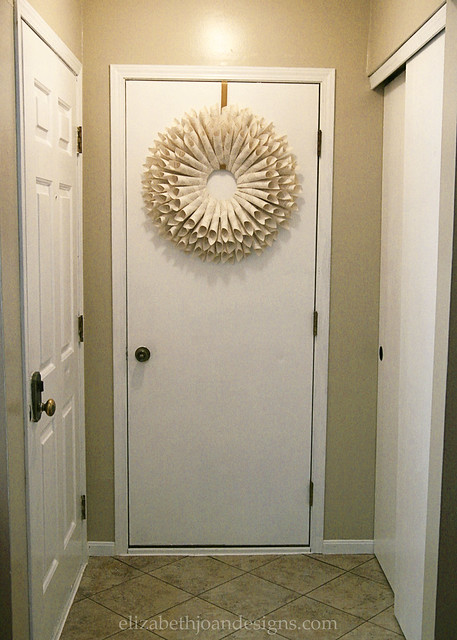
Updating the Foyer, Again
I know. I know. I should leave well enough alone. But I just couldn’t. There was just something off with our foyer, so I decided to paint the door going to the garage. Again.

You can see in the before photo below the difference that a little paint and lighting (natural vs. artificial) can make. Obviously, it was a lot better than the previous state it was in, but I just felt it still needed a little something more.
As far as paint goes, I kind of went back and forth on what I wanted to do. I had been researching chalk paint (which is technically not the same as chalkboard paint) and thought it might be something I wanted to try on a few furniture pieces. I honestly had no idea that chalkboard paint and chalk paint were two different things until a month or two ago. Chalk paint is a paint with a chalky type matte texture that is great for furniture, especially when antiquing pieces. You typically apply either a clear or dark wax over the top of it to finish it off. Chalkboard paint is made to be used specifically for writing on with chalk, a la classic school house chalkboards.
However, after reading a great post about chalk paint by Diane from In My Own Style, I was eager to try out chalk paint since it appeared that it could possibly pull double duty as a great furniture paint (with wax) and another option for chalking on (without wax.)
So, after receiving several 50% off coupons in the mail from JoAnn’s, I decided to head to the store where I found these.

I decided that for the door, I wanted the option of being able to write on it with chalk, since it is the last thing anyone really sees on their way out. Being able to remind the fam of things like “don’t forget to take lunch,” or “soccer tonight at 6” would come in really handy. So, I started in on the first coat of paint.

It seemed to adhere really well to the semi-gloss paint that was already on the door and I didn’t have to sand or use any primer. Woo to the Hoo! I ended up putting on 2 coats and the coverage was amazing.

After it had cured, I attempted to write with chalk on the door. Success! I started in a small, inconspicuous area and found that I didn’t need to prime the door with chalk and that all evidence of script-y chalk writing easily wiped off with a dry cloth. Of course, then I had to get a little more creative…
Stripes are nice.

And this lovely trellis pattern mixed with the scribbles of a 3 year old is the perfect blend of business on the top and party on the bottom. Kind of like a mullet.

I love the way that the gray cools the space and that the door is now a focal point. What are your experiences with chalk paint? Were you as oblivious as I was about the differences of chalk paint vs. chalkboard paint? I swear that I’m not that ditzy. My blonde hair is from a bottle. Just ask my
stylistsister. -
$10 Michaels Gift Card and Craft Bundle Giveaway
Are you feeling lucky?
A few weeks ago I entered a giveaway on our friend Katie’s blog, Little House Of Four, and I won. My winnings consisted of Katie’s favorite craft supplies. We thought this was such a fun way to thank her readers, that Erin and I were inspired to hold a very similar giveaway to show all of you our appreciation for your loyalty. (Thanks for the idea Katie!)
All items are brand new (total value over $60!) and personally picked out by us.
This Craft Bundle consists of:
– (2) Studio Decor 4 x 6 pedestal picture frames
– (2) Mini chalkboards
– (1) Package of 6 trims -1 yd. each
– (1) Amaco Rub’n Buff metallic wax finish
– (1) Scotch Expressions Tape
– (1) Martha Stewart Crafts utility brush set
– (1) Package of 48 Mod Podge tracing templates
– (2) Wooden rubber stamps
– (1) 6 fl oz. Martha Stewart Crafts wood stain
– (1) 2 fl. oz. Martha Stewart Crafts glitter acrylic craft paint
– (1) Recollections ribbon- 5/8in. x 5ft.
– (1) Roll paper tape
– (1) Loew Cornell 1″ spong roller
– (1) Package Ook thumb tacks – 20pc.
– (1) K & C Company Smash captions – 42pc.
– (4) “handmade with love” clothes pins
– (1) Decorative tin with chalkboard lid.
To enter for a chance to win a $10 Michael’s Gift Card and Craft Bundle, follow the instructions on the Rafflecopter ballot below.
We will be announcing the winner of the $10 Michaels Gift Card and Craft Bundle Monday, October 6, 2014 at Your Designs This Time – No. 30. Good Luck!
This contest is open to United States of America residents only. All entrants must be 18 years of age or older. We will contact the randomly selected winner within 48 hours of the contest close. Void where prohibited or restricted by law. This giveaway is in no way sponsored, endorsed or administered by, Amaco, K & C Company, Loew Cornell, Martha Stewart Crafts, Michaels, Mod Podge, Ook, Recollections, Scotch, and Studio Decor or associated with, Facebook, Instgram, Pinterest, or Twitter.
_____________________________________________________________________ You may also like:
Closet To Office Part 3 
Chalk Cloth Map 
DIY Dining Table 
Ruler Drum Shade -
Trashed Corkboard Gets Makeover
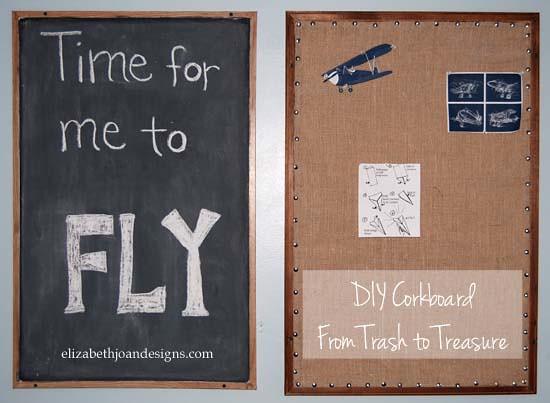
Back in April when Erin was visiting, you might have caught a glimpse of this garbage picking photo from this post or on Instagram (@erinejd and @emilyejd1.)
Well, in this photo I am rescuing a corkboard. As soon as I saw this baby, I knew with the right makeover she would be perfect for my oldest son’s bedroom.

Without too much of a plan in mind, I got to work.
Materials
Discarded corkboard
220 grit sand paper
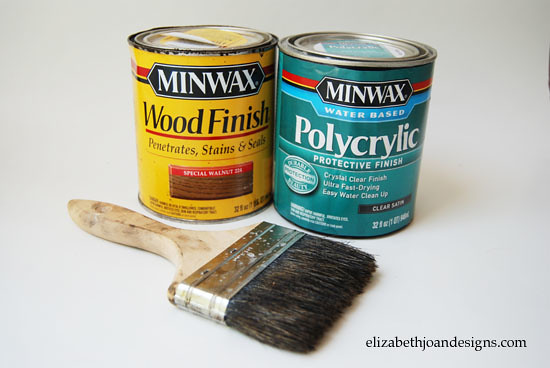
Minwax English Walnut Stain
Burlap – I had a large piece left over from another project
Push pins- I picked up a pack at Lowes for $1.34
First, I sanded down the frame of the bulletin board with 120 grit sandpaper and wiped it clean.
Next, I brushed on Minwax English Walnut Stain with a natural bristle brush, making sure to wipe off any excess with a rag. Once it was dry, I applied a coat of Minwax Polycrylic.
After the frame was dry, I cut out a piece of burlap that was just slightly larger than the cork area of the board.
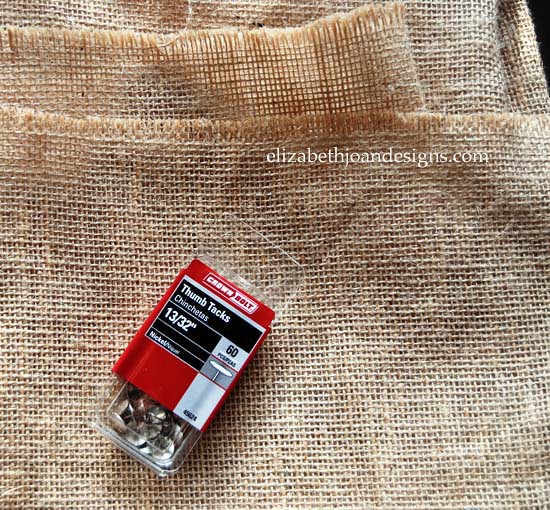
Then, I folded the edges of the burlap under itself and secured it to the cork with push pins. I continued placing the pins about ½ inch apart all around the boarder, being sure to tuck the burlap along the way.
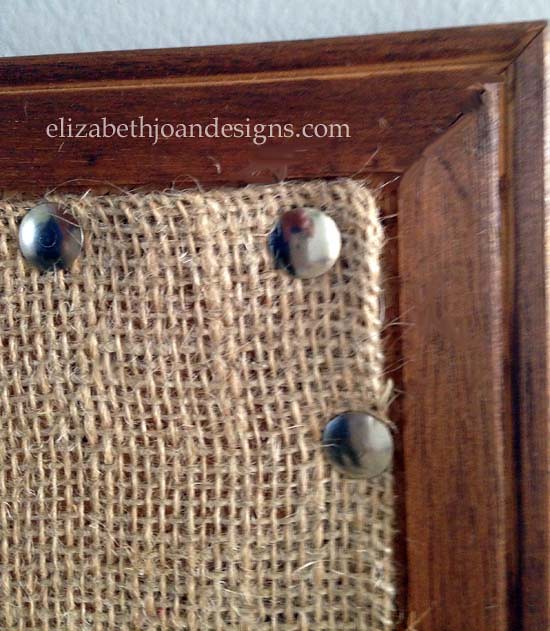
Finally, it was complete and ready for use.

I am in love! It fits the style of my son’s vintage airplane bedroom so well. Stay tuned to see more updates for this room soon!

What room/rooms are you working on in your home?
_____________________________________________________________________ You may also like:
Wire Mesh Pin Board 
Personalized Utensil Crock 
Boxes Into Baskets 
Dry Erase To Chalkboard