-
Curbside Dresser Gets A New Look
There are some days I go out looking for treasures discarded on the side of the road. Then, there are other days where I am driving somewhere with a purpose and decide I am going to have to be late to that destination so I can pick up a gem. (My dentist will understand, right?) The latter is exactly what was happening when I stopped to claim a bright yellow dresser. It was perfect for my youngest son’s room, except it was yellow (not the look we were going for.) After sitting in my basement for several months, it’s time this curbside dresser gets a new look.

The first step to this makeover was to give the bright yellow exterior a good coat of primer.

Next, the dresser received two coats of gray paint. I had the hardware store color match the paint to Restoration Hardware’s paint color, Charcoal. It’s mostly grey with a hint of blue. I love this color! You may recognize this color from our
how to mix your own chalkboard paint post.
Then, using a bowl as my guide, I painted a large circle white. This spot will mimic a race cars numbering.
After that, it was time to give this baby a few details to go with my son’s vintage car themed bedroom. Using painters tape, I sectioned off racing stripes that I painted white and red.


I love the look of the number 5, so I printed the digit out on regular ol’ computer paper. Then, I traced it onto freezer paper to make a stencil. I used the exact technique Erin did on her Halloween Trick or Treat Bags.

This method worked perfectly! I taped my homemade stencil to the dresser and used a spouncer and a little red paint add the numeral.


Finally, I exchanged the cheap plastic hardware for these beautiful antique bronze ones.

My son LOVES his new to him dresser! This dresser has come a long way from it’s golden days.

_____________________________________________ You may also like:

Childhood Dresser Makeover 
Entertainment Stand Dresser 
2×4 Art 
Hardware Change-A-Roo
-
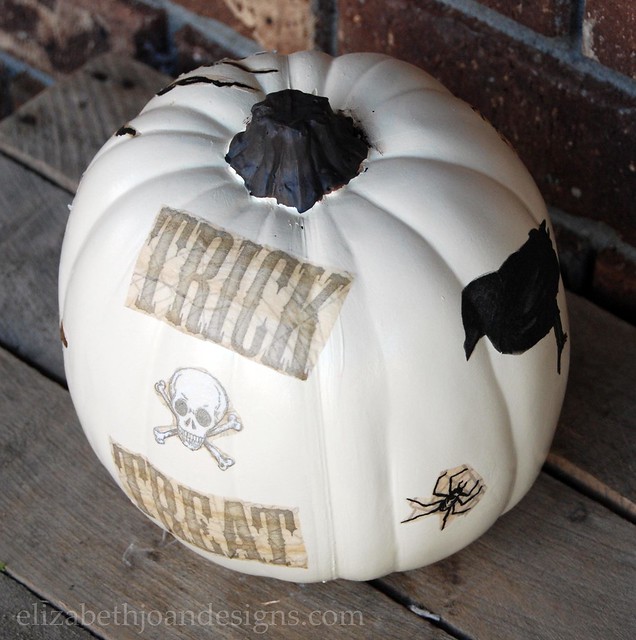
Decoupage Pumpkin
Last weekend while visiting my in-laws, my mother-in-law shared a project that she had been working on with my husband’s aunt. They had taken pretty, floral patterned, paper napkins and mod-podged them onto artificial pumpkins. They were so beautiful! I was inspired to do the same, except I really wanted to see what Halloween napkins would look like. Without further ado, here is how I made my decoupage pumpkin.

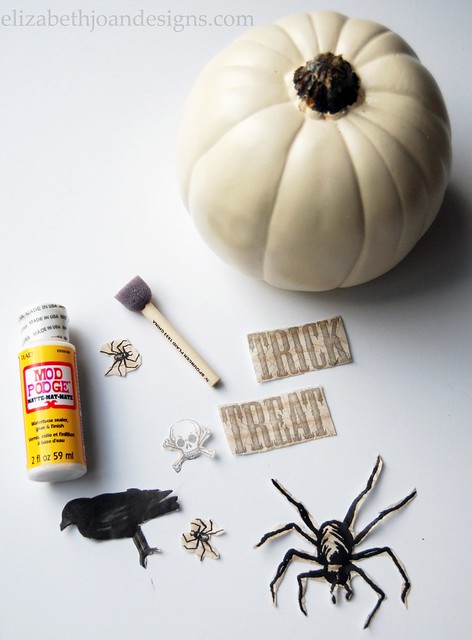
Supplies1 Artificial Pumpkin
Mod-Podge
Paint Brush or Spouncer
Paper Napkins in Assorted Designs
Scissors
Acrylic Paint- Brown or Black (optional)
1st – With scissors, I cut out a few fun Halloween shapes from the paper napkins. (I really like that big spider.)
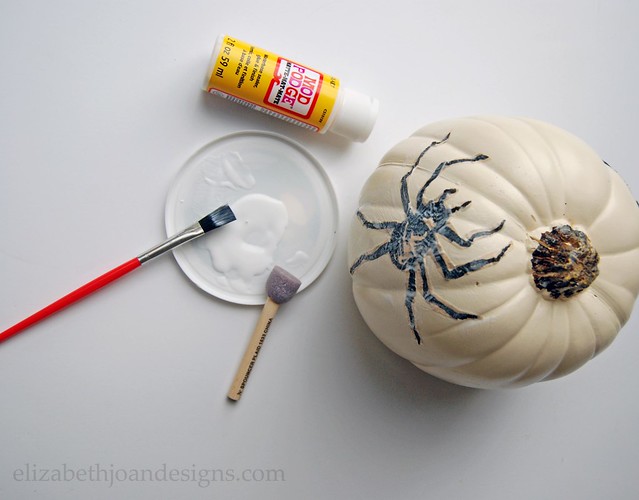
2nd – I painted the backs of the fall shapes with mod-podge and stuck them to the pumpkin and applied more mod-podge on top.
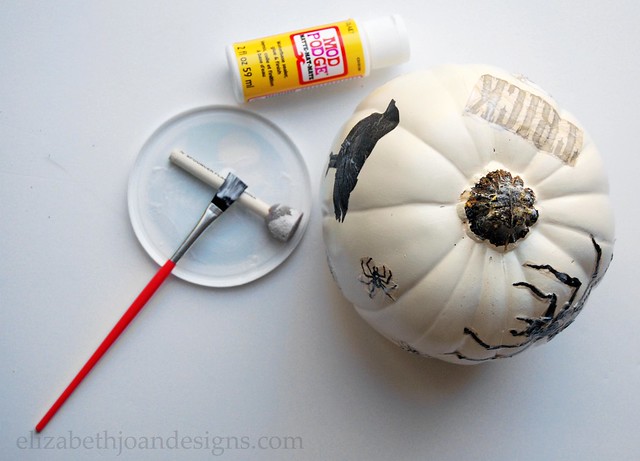
3rd – To add the finishing touches, I mixed up a variety of acrylic paints (I didn’t have straight-up brown or black.) and painted the stem of the pumpkin to darken it a little. My mixture possessed a brown/black swirly look.
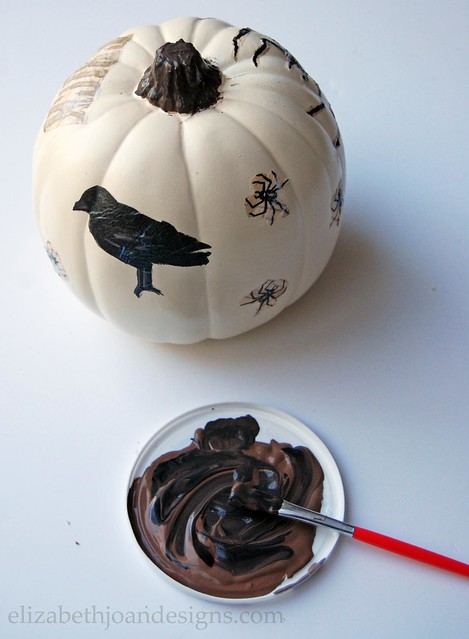
What do you think? Simple, right? I love how it turned out. The perfect fall/ Halloween decor.
Your possibilities are pretty endless here. So grab some of your favorite patterned paper napkins and a couple artificial pumpkins and get to work! We’d love to see your designs!
-
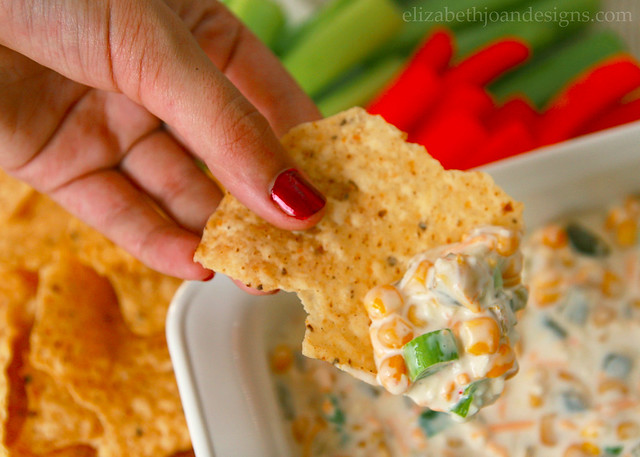
The Best Jalapeno Corn Dip Recipe
Around here, the air is getting crisp and we are well on our way into football season. We love to host get-togethers for the games and I’m always looking for a good dip recipe (I may be a dip-aholic). One of our favorites is Jalapeno Corn Dip.

It’s cool and creamy and spicy and perfect. Whenever I make it, it is always completely gobbled up in no time. Plus, it is super quick and easy to whip up before heading to a tailgate party.

Obviously, the dip contains jalapenos and corn. Those flavors are then combined with green onions, cheese, mayonnaise, and Greek yogurt (I prefer to use FAGE) to make the most mouth watering appetizer when paired with tortilla chips. Or corn chips, crackers, veggies, etc.

This recipe for Jalapeno Corn Dip is also gluten free and vegetarian, so it is very group friendly. Bonus! And you can tweak the amount of jalapenos used to either turn up or down the spiciness factor.
Jalapeno Corn Dip from Elizabeth Joan Designs
Ingredients
2 11oz. cans of fiesta corn, drained (contains red and green peppers)
1-2 4oz. cans of diced jalapenos, drained
1 bunch of green onions, diced
8 oz. shredded Colby Jack cheese
1 C mayonnaise
1 C Greek yogurtPreparation
Combine all ingredients in a bowl and mix together thoroughly. Refrigerate covered for at least one hour.
We would love to know if you try out this amazing Jalapeno Corn Dip! Let us know what you think!
______________________________________________________________ You may also like:

Grilled Bread Salad 
Slow Cooker Taco Soup 
Baked Jalapeno Cream Cheese Wontons 
Buffalo Chicken Meatballs -
Last Minute Pumpkin Decorating
(This is a re-post from Oct. 25, 2013.)
This is a post for all of you procrastinators out there. You know who you are. In fact, you and I are not so different. I save most things for the last minute. This is something about myself I am working on, but I can always do that later. Right?
This past weekend, my family and I made an 8 hour journey to Ohio where Erin and I grew up. This was the first time, since starting our blog, that Erin and I had a chance to see each other. (More on that later.) While we were there, we visited our uncle’s farm and picked out a few pumpkins to decorate.
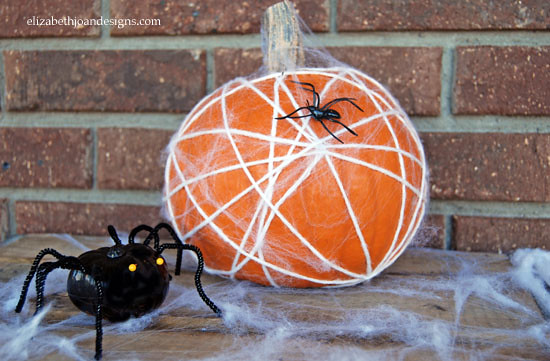
Here are a few of our favorite, no-carve, last minute pumpkin decorating ideas:
1. This pumpkin has a black mesh covering. We love the look and better yet, it took all of two minutes.
<

2. All dressed up and no place to go; this pretty little package was decoupaged with wrapping paper and tied with a bow. Popcorn anyone?

3. Tangled in a web of yarn, this pumpkin is the victim. Beware of mini spider pumpkins!
4. Change things up and instead of spooky, try a nautical theme! This pumpkin was painted white. Then we traced a starfish on it, applied glue with a paint brush, and added sand to finish the look. Ahoy!

5. Boo! I know, scary right? (Okay, not really.) Using yarn and dressmaker pins, we created this 3D work of art.

We love our simple no-carve pumpkins. How do you decorate yours?