-
Toy Rotation
We have a 9 year old daughter and 2 year old son. When our daughter was younger, I remember her having soooooo many toys and feeling overwhelmed with the amount we were continually adding to. My way of coping was to buy more shelves, boxes and baskets to hold all of the loot so that she could still have access to it. As nice as that sounds, it didn’t really work because she just had too much and it completely overwhelmed her. She wouldn’t really play with stuff for more than a few minutes and it seemed more fun to dump it out and move onto the next basket. Honestly, that’s not very fun to clean up.
Last year, when our son also started to accumulated a hoard of toys, which he wasn’t really playing with, I knew that we needed some sort of system to keep things interesting. And that is when I came across Kim’s post and we started our own toy rotation.
Basically, we rotate all of the toys on a schedule. (Every 2 weeks works best for us!) This seems to keep our son interested in the toys he has and he plays with everything! Woohoo!
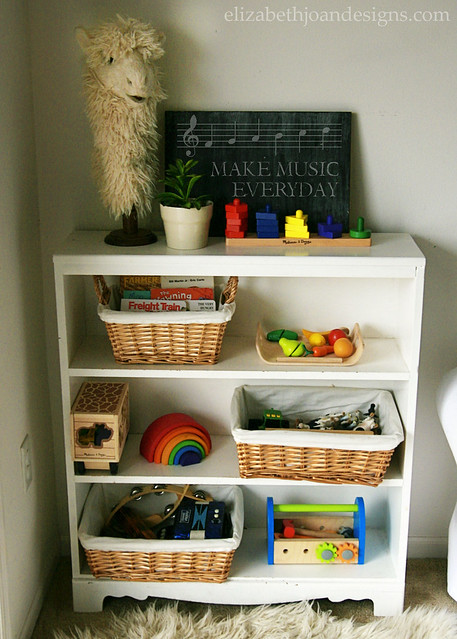
To start, we culled all of the toys that were missing parts, broken, or from fast food joints. Then everything else was sorted into groups. Thinking, Moving, and Pretending. Here are some examples of our toys in each of the groups:
Thinking Toys – Latch boards, wooden blocks, puzzles, mega blocks, shape sorters, and stacking toys.
Moving Toys – Ride-on toys, a slide, balls, musical instruments, and a tunnel.
Pretending Toys – Grilling set, train set, food toys, dress up clothes, a tool set, stuffed animals.
We have a few baskets we keep on a shelf in the corner of our living room that hold toys with multiple pieces and parts, as well as books, which we also rotate.


Then, the shelf is filled with other toys. I typically try to have 3 toys, from each of the groups listed above, out for him to play with.


As you can see, a lot of the moving type toys and dress up clothes won’t fit on the shelf, so we have those in another corner of the room. In addition to these, there are a few items that are always out and not rotated which include balls (you can see our DIY ball basket here,) a grill, a doll house and a chalkboard. We also have a few items that come out more sporadically, such as art supplies, play dough, a marble game, and a tent. The rest of the toys are stored away, out of sight, until it is their turn for rotation.

Using a toy rotation has been absolutely wonderful for us. EVERYTHING gets played with and we have found that all of the toys are used for longer periods of time. Plus, clean up is a breeze! And when you have a busy toddler, having something go smoothly is always welcome.
Do you implement a toy rotation or know someone who does? Are their methods similar to ours or do they do something entirely different? If you are struggling with a surplus of toys that don’t get played with, give the toy rotation a try and let us know how it works out for you!
-
Pocket Hand Warmers
The weather outside is frightful. Like -35 wind chill. Yikes. And with the blustery weather we’ve had lately, it just seemed like a no brainer that I should whip up some toasty hand warmers to keep our family warm when we step outside.

I’ve seen a bunch of different tutorials and ideas for hand warmers similar to these on Pinterest (love this look from Armommy,) but I wanted to share the way I made them, just in case your hands need a little warming as well.
Warning: This project requires a sewing machine, that is, unless you have copious amounts of time to hand sew. Unfortunately, my sewing machine hates fabric thicker than tissue paper. (Thanks to my parents for trying to fix it!) After way too much time spent messing with that dinosaur of a machine, I stole my daughter’s brand new one and finished these off.
To start out, I cut out two 3″x3″ pieces of fabric and placed the wrong sides together, pinning them so they wouldn’t slip apart while I was sewing.

Next, I sewed along each side…

But left a small opening so I could add some rice filler.

Then, with some pinking shears, the edges were trimmed to prevent fraying.

Using a funnel made from paper, I poured 1.5 tablespoons of brown rice into each hand warmer and sewed the opening shut.


To warm these little guys up, just pop a pair of them into the microwave for 10-20 seconds (times may vary) and put them in your coat pockets. No more chilly winter hands!

-
Book Page Wreath
It is super cold here right now. A thick layer of snow is covering the ground and the wind is blowing like a banshee. And apparently it is only supposed to get colder in the coming days. Like frost bite cold. So what do you do when it is freezing outside and your eyelashes freeze from the tears being blown out of your ducts by the wind? You DIY a book page wreath, of course. All you need are a few supplies and a couple of hours. Yes, I said hours, because these things take time. So grab your favorite movies and start a marathon.
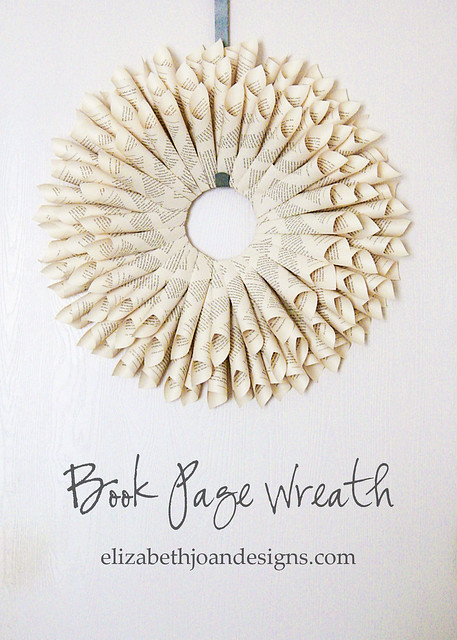
Book page wreaths are nothing new. I’ve made a few over the years and Emily just shared a cool way to decorate a gift with one. There are a million different ways to do it, but my favorite way is to roll the pages into a cone shape.
My supplies for this wreath include:
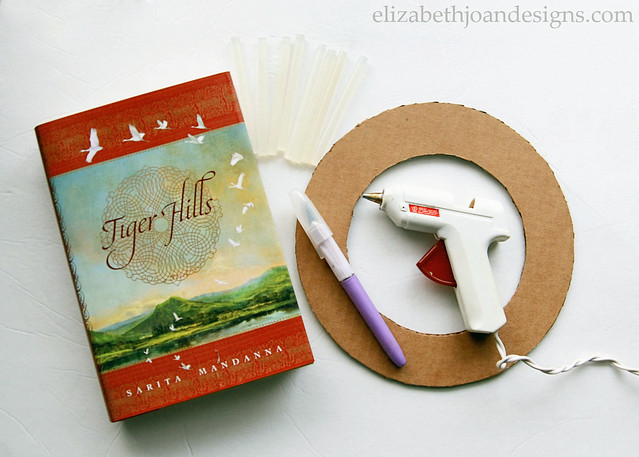
– Book from the dollar store
– Wreath form of some sort
– Craft knife or scissors
– Glue gun
– Glue sticks, lots of themI may have felt a little bit bad that I had to murder a book for this project, especially since is had such good reviews on Amazon, but it only cost a buck, so it was worth it.
To start out, I used my craft knife to cut out a bunch of pages from the book and then ripped a few of them into strips.
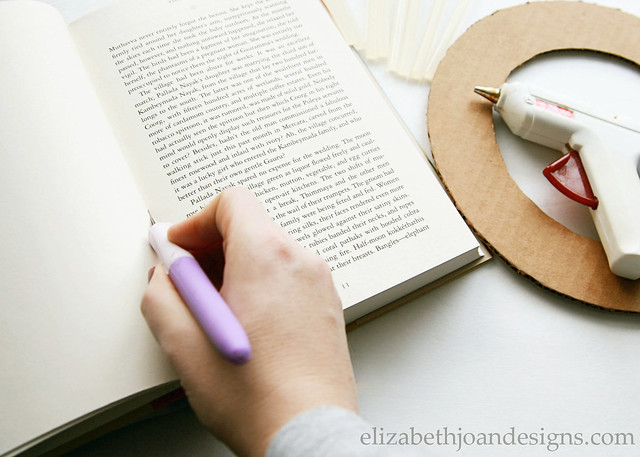
The strips were then wrapped around a homemade cardboard wreath form. I usually buy wreath forms from the dollar store, but they were sold out, so I had to improvise.
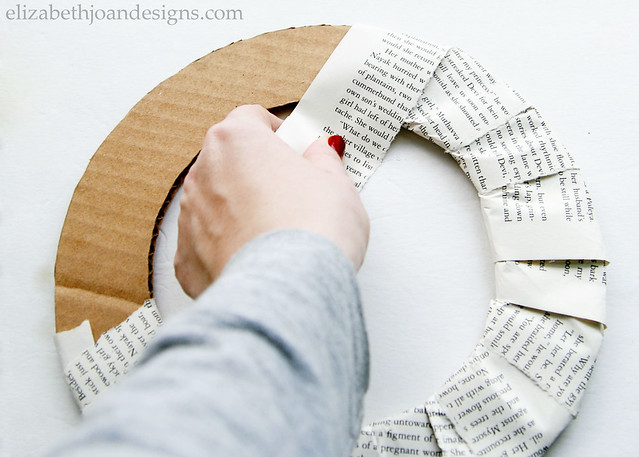
Next, I started rolling papers. That sounds a little weird, huh? I rolled individual book pages into a cone type shape and added a spot of glue on the side to secure them.

Working on one side of the covered wreath form, I attached the rolled pages, one by one, all the way around the circle.
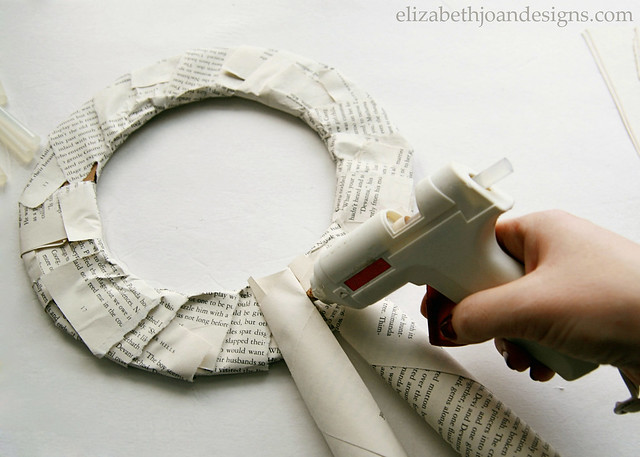
Aren’t glue guns wonderful? My blistered fingers are telling another story, but I quite enjoy the ease of attachment that the handy little
phalanges burnerglue gun provides.
Once I was finished with the first side, I flipped it over and started gluing more pages onto the second side, kind of staggering them between the ones behind them.

The rest of the wreath is completed by adding more layers on top of the previous ones and gradually moving everything in towards the middle until desired fullness is achieved. For this wreath, I used only fours layers of rolled book pages, but I’ve done up to seven in the past. It all depends on how much time and how many fingers you are willing to sacrifice.
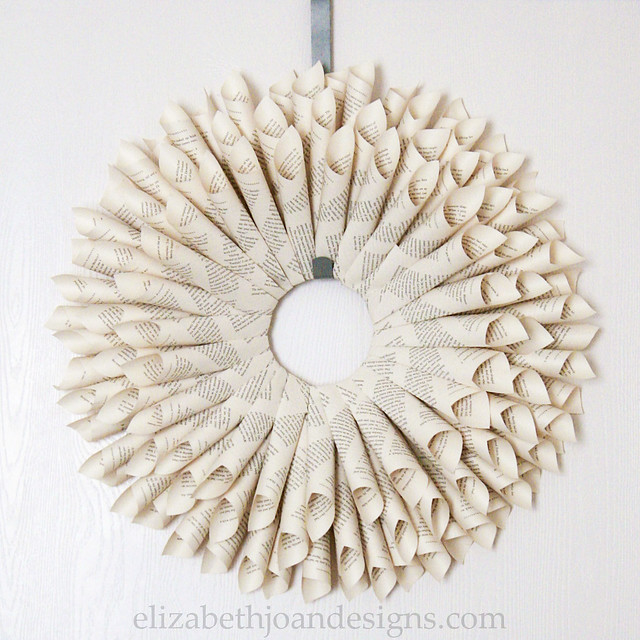
When you are finished, you can hang your wreath up on a door hanger or over a mirror. Both look quite lovely. Oh, and try not to glare too hard at anyone who comes within a few feet of it, threatening the hard work and long hours you put into your beautiful literary work.
-
January 2014 Printables
The new year is almost here, so I knew that I needed to whip up some new printables to help keep you organized and get a fresh start on 2014. I always love to include a calendar with space to fill in those important dates to remember. For me, it just makes life a little easier to be able to glance up at the month and see what we have coming up!


Download this printable from THE GALLERY.

