-
Kid’s Tool Belt
My 3 year old son has recently been playing a lot with his toy tools. Apparently, carrying them in his tool box was too difficult so he started just stuffing them down his shorts and letting the elastic hold them up. He would take two steps, and the tools would hit the floor with a loud bang. I decided to remedy this situation by making him his very own kid’s tool belt.
To make for a special child in your life, cut one 13″ x 4 1/4″ piece of canvas (or any fabric you choose) for the base, one 7 3/4″ x 3 1/4″ piece for the pocket, two 14″ x 1 1/2 ” pieces for the ties, and two 3 1/2″ x 1 1/2″ pieces for the tool loops.

Then, fold and sew the tie and loop pieces to make straps.
1. Using a clothes iron, press in half.
2. Unfold. Then, fold and iron edges to the center crease line.
3. Fold and press in half again.
4. Sew along the edges.

Take your base section, fold and pin sides under to hide raw edges. Tuck your tie pieces in and sew around the rectangle.

To hide rough edges, fold and sew around your pocket portion.

Place the pocket on top of the base and attach leaving the top side open.

Sew a straight line down the pocket piece to make separate sections.

To attach the tool loops sew one edge down. Then loop it around to make a circle.


Repeat for the second loop, add some tools and you are finished!


-
Buffalo Chicken Meatballs
There are few foods (bacon, shrimp and lobster) that I love more than boneless buffalo chicken wings. So, when our family decided to reduce the amount of gluten that we consume, a small part of me died, knowing that I wouldn’t be able to enjoy my favorite wing joint in the same way.

Last week, I had a random craving for meatballs and unfortunately, we didn’t have any ground beef. I did have ground chicken in my freezer though, so I decided to use that instead. While gathering my other ingredients, I spotted some wing sauce, and that’s when it hit me. Buffalo. Chicken. Meatballs. I whipped up my own concoction to make these mouthwatering bites. Here is what you will need:

Note: We used crushed gluten free crackers in place of bread crumbs.
First, preheat your oven to 400°F. Melt the butter and whisk it together with the wing sauce.

Next, using your hands, combine the sauce combo with the rest of your ingredients in a medium sized bowl. You may get a little messy. Just sayin’.

Then, roll the mixture into balls and place them on an oiled cooking sheet. (I ended up with about 28 meatballs.) Bake for 25-30 minutes or until centers reach 165°F.

Serve with celery and your favorite dipping sauce. These buffalo chicken meatballs are AMAZEBALLS! My family gobbled them right up. They are so delicious and totally hit the spot when craving some yummy wings. We actually made this recipe 3 times in one week!

Buffalo Chicken Meatballs from Elizabeth Joan Designs
Yield
4 servings (serving size: 6 meatballs)Ingredients
– 1 lb. ground chicken
– 1/2 cup Frank’s Red Hot Wing Sauce
– 3 tbsp. butter or margarine
– 3/4 cup bread crumbs
– 1 large egg
– 1/2 tsp. sea salt
– 1/4 garlic powderPreparation
1. Preheat oven to 400°F.
2. Melt butter and whisk together with wing sauce.
3. Combine all ingredients with the sauce mixture in a medium bowl.
4. Roll mixture into balls and place on an oiled cooking sheet.
5. Bake for 25-30 minutes (or until centers reach 160°F.)
6. Serve with celery and blue cheese dip.
-
Lavender Wreath
A few years back, my sweet and loving parents purchased a small lavender plant at a flea market for me. When I got it home, we carefully picked out the perfect place to plant it. One year later, we decided that spot wasn’t as perfect as we thought, so we move it. We transplanted it again, that fall. This year, it proved it’s hardiness and finally bloomed. Our backyard smells amazing. I decided to make a lavender wreath to bring some of my favorite scents into our home.
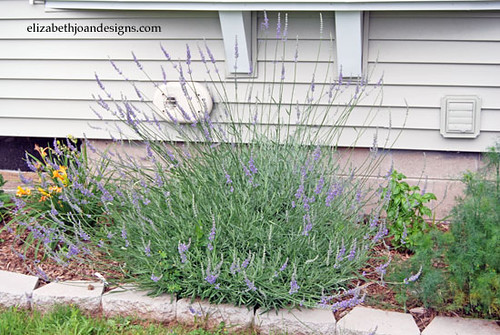
Recently, I purchased this grapevine wreath at a garage sale for $0.25. Sweet!
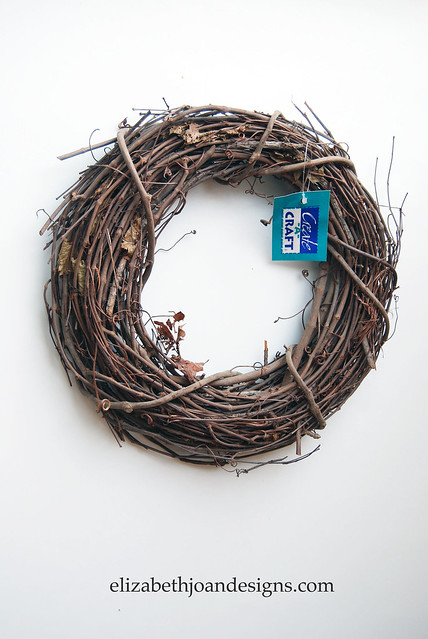
I started by sticking the lavender stems in between the grapevine. I continued around the entire circle.

Finally, I hung it on my front door. Some may say that decision was based solely on laziness, because there was an existing hook, but I like to think it is in a place visible to the whole wide world.

I love the way the grape vine and lavender look together, so I didn’t make it very thick. Plus, now there is still plenty left in my backyard to keep it smelling awesome.
What natural items do you use in wreaths?
-
Chalkboard Lettering
Back when I shared my dry erase board turned chalk board, several people had pondered about the process I used to create the lettering. It really is quite simple and probably any creature with opposable thumbs could do it.

Here is what you will need:
-Chalkboard
-Chalk
-Print Out (I whipped this puppy up in Photoshop, but you could easily create something in a word document, or physically cut out words with fonts you like.)
-Tape
-Pencil
Make sure your chalkboard is {primed.} Then start out by using the side of a piece of chalk and completely color over the backside of your print or words. This chalk dust is what will transfer onto the chalkboard later on in the process.

Turn the print over, carefully place it on the chalkboard, and tape it down. I just kind of eyeballed it to make sure it was centered. It doesn’t have to be perfect.

Using the pencil, trace around the outside edges of each letter and image. The pressure from the pencil tip will transfer the chalk.

Here, I lifted up a couple pieces of tape to check and see how things were looking. I decided that I wanted the letters filled in, so I went back and did that too.

Once you are finished, remove the print and you should have awesomeness on your chalkboard. That’s it! Easy peasy lemon squeezy.
