-
We Are Grateful
Where has the year gone? I can’t believe that it is already November, the month of gratitude, but I’m excited for all of the family time we will be getting in the upcoming month. Emily and I are both thankful for all of our amazing readers who’ve welcomed us on this blogging journey. Your support keeps us going and we thank you for that!
I’ve seen friends on Facebook posting things that they are thankful for each day and know that there are gazillion crafts out there in the blog-o-sphere relating to gratitude, so I figured that I would share how our family is expressing our thankfulness this year for all of the wonderful things in our lives.

Let’s call it the Grateful Frame. It’s basically just a cheap, white Ikea frame with the glass removed. I put in a piece of Kraft paper and then added the letters, which I printed on cardstock and then cut out. Also, some decorative washi tape makes the edges of the frame pop a little.

The concept is really pretty simple. When one of us thinks of something we are grateful for, we can write it on the paper, creating a fun, interactive family art piece. There is no time limit on when we need to write something. It can be every ten minutes or every other day, whenever we feel like it. I like that there aren’t any restrictions (besides maybe not writing on the frame itself) and even our two year old can add his grateful little doodles.
(Our daughter writing “family” below.)
Right now it is pretty bare, but I plan on sharing it all filled up once the month is over on Instagram. (Follow me @erinejd.)

How are you showing your gratitude this month??
-
Halloween Mantel and Decor
Halloween is always a fun holiday to decorate for. Spooky skeletons, creepy spiders and black roses. What’s not to love?
For my mantel, I put down a layer of Spanish moss that I has snagged at the dollar store. I love the eerie look it gives the entire mantel. The skull, roses, spiders and ravens are also dollar store purchases.

I recently became the proud new owner of a mountain of yarn. Amongst the pile, was this black yarn that reminded me of spiders and I thought it would be perfect for Halloween decorating. Wrapping it around a white vase gave a look that resembles a parade of marching spiders.

My “Happy Halloween” sign was so easy to make. If you would like to duplicate my sign, here are the supplies you’ll need.
Burlap
Scissors
Twine
Stencils
Paint brush
Black acrylic paint
Pencil
Sewing machine/ Hot glue gun

First, cut 14 burlap rectangles 6″ wide x 12″ high.
Next, fold over the top 1″ and sew. Leave a pocket big enough to thread the twine through.

Then, paint one letter on each rectangle and let dry.

Jetspencil, thread the twine through each piece.
Now you have a cute greeting!

Holiday decor would be nothing without a little kitchen decorating. I found these fun little owls at the dollar store. Not sure if you can tell, but I love, love, love the dollar store! Awesome finds for a buck!
The bats were printed out, traced onto black card stock and cut out. You can find Erin’s bat design here, in this post. They are a great way to embellish a blank wall, a mirror or kitchen cabinets.

Well, there you have it. Simple, spooky, budget friendly decor. How do you decorate your home for Halloween?
-
Trick-Or-Treat, Smell My Feet
Trick-Or-Treat, Smell My Feet. That phrase is so weird, right? Who the heck even thought of it? Feet totally creep me out, but I absolutely love Halloween and trick-or-treating. So, let’s not talk about my fears and focus on the things that I adore.
It is so much fun to embellish everything with creepy décor and pumpkins in the fall. And I love to come up with costumes for Trick-or-Treating each year and watch as my kids go from door to door collecting goodies. Instead of going with the whole plastic pumpkin buckets and/or plastic bags this year, I decided to take the classic pillow case candy bag and vamp it up a bit for a cool candy carrier that any kid would be proud to sport.

I love that these treat bags can be so versatile and hold a ton of loot for my kids (which I will kindly raid of all chocolate and caramel items post October 31st.)
These are the supplies I used for this project:
– 1 king sized pillowcase (a standard size will work as well)
– Printed Template
– Freezer Paper
– Acrylic Paint
– Fabric Medium
– Sponge or Spouncer
– Pencil
– Scissors/Craft Knife
– Iron
– Ribbon
– Sewing Machine (Optional)
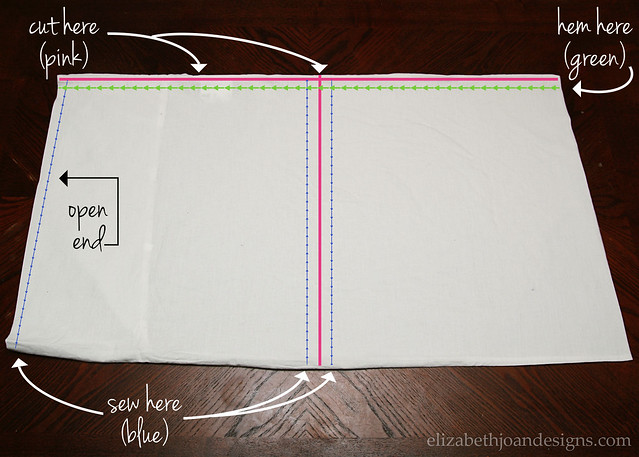
Since I had an extra unused king sized pillowcase in storage, I opted to use that, although any size will work. My huge pillowcase would have been too big for either of my kids to lug around by itself, so I decided to cut it into two pieces, sewed up the sides and hemmed the tops, which created 2 separate bags. You could also do this with a standard pillowcase, but the bags will end up being just a bit smaller than mine. Or you can skip all of the cutting, if you prefer a bigger sack, and proceed onto the part with the freezer paper. Below is a photo with all of my cutting, sewing and hemming lines. The left side of the pillowcase is the open end where the pillow would be inserted.
Does this make sense? Because Emily didn’t get it at first, but that isn’t all that uncommon. *wink*
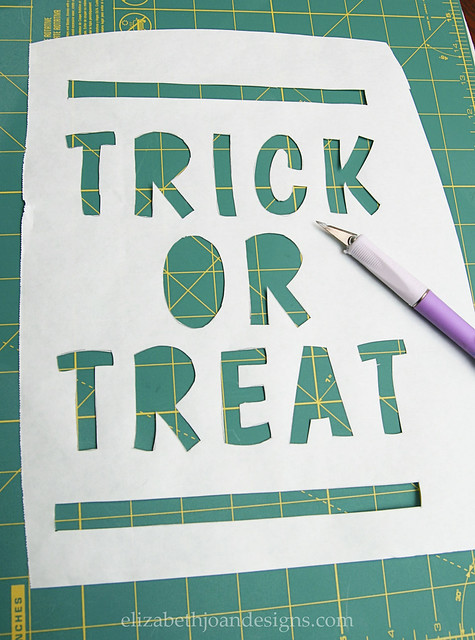
After my bags were ready, I tore off some freezer paper just a bit bigger than my prints. (I had two different simple prints which I made in Photoshop, but anyone could easily whip up the same thing in a Word document. I used the font Boogaloo, found {here} and my own bat design, which you can download {here}.) Each print was taped to the waxy side of the freezer paper (facing up) and then I traced the letters and image on the matte side with a pencil.

Once everything was traced, I used a craft knife to cut it all out.
Next, I centered and ironed the freezer paper, waxy side down, onto the bag. You can see here that the middles of the R’s, O and A were also cut out and ironed on to complete the letters.

Then, using a small cup, I mixed black acrylic paint and fabric medium in a 1:1 ratio and applied it on top of the freezer paper stencil using a spouncer.

After waiting eons for everything to dry, I peeled the freezer paper off of the pillowcase bags to reveal my finished stencils. This is where you hear the angels singing. Ahhhhhhhh.

Then, all that was left was to add a couple of ribbon shoulder straps to each bag. I attempted to use the sewing machine to attach them, but after a few hiccups with that whole process (my sewing machine hates me,) I opted to hand sew the rest of them on. Pain. In. The. Butt. However, totally doable for those of you without sewing machines.

Besides a few little leaks on the letter “K” of the word Trick, I think that they turned out pretty great. They are super sturdy and can easily hold 5 lbs. of Jolly Ranchers, so I think they will be good to go when my kids drag them around the neighborhood in a few weeks.
