-
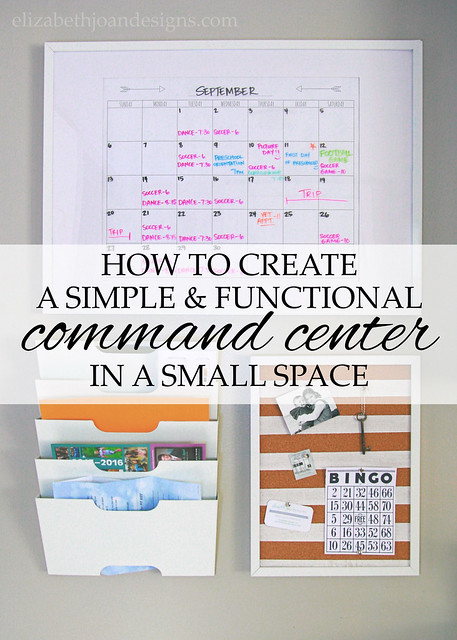
Create a Simple and Functional Command Center
With both of my kids in school this year, it was time to figure out an organizational system for our paperwork. Not that we aren’t organized normally. However, with two rugrats bringing home enough paper to equal half of a rain forest worth of trees, we needed something that would keep everything in check. Enter the command center!
This post contains affiliate links for convenience. Click here to read my full disclosure.
Over the years, I have seen some pretty amazing command centers.
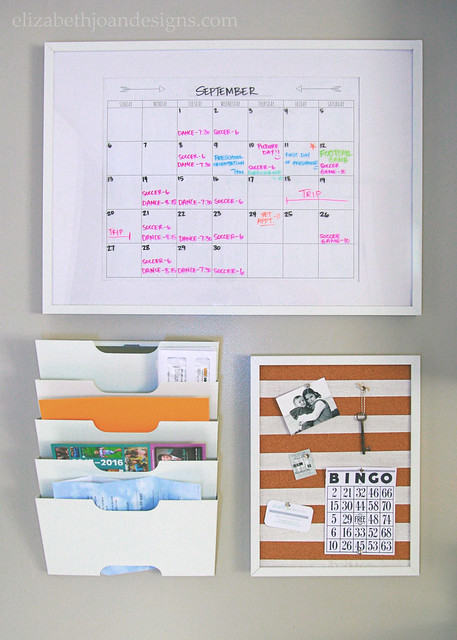
These spaces are usually centrally located in the home. They contain everything needed to keep the household running smoothly. Stuff like calendars, clocks, chalkboards, bulletin boards, binders, folders, files, menu planners, and the list goes on. I knew that I didn’t have room for all of that business (just a tiny wall in our kitchen). So, I had to figure out how to create a simple and functional command center in a small space.
To cover the basics, I ordered all of our main command center pieces from Ikea. (Ikea didn’t compensate us for any of this; we just really liked the price and how the pieces came together.)
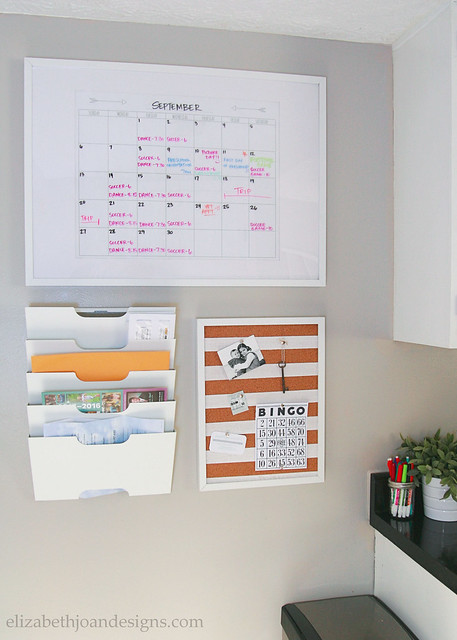
Our calendar is something I whipped up and had printed as an engineering print (18″x24″) at our local print shop. I placed it in a large Ribba frame (19 3/4 x 27 1/2) with the mat. We can write the important stuff on the front of the plexiglass and erase it easily. Hopefully, this will keep us from forgetting dance/soccer practice and anything we need to be available for.

This printable is free of charge and for personal use only. Download this printable from THE GALLERY.

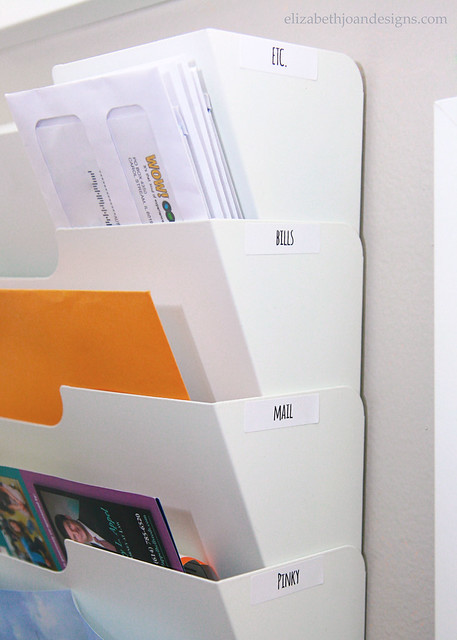
To organize all of our papers and bills, I ordered the Kvissle Wall Magazine Rack. Each of the kids gets one slot for important school papers. The rest are designated for bills and other mail. And the Etc. slot holds blank paper for note taking and a weekly calendar for menu planning.
I placed a striped painted cork board in another smaller Ribba frame for little bits of fun or info.

All of the colored dry erase markers are corralled in a small canning jar, along with a few extra pencils, and placed on the counter for easy access.

Because of this little wall in our kitchen our family organization is not up to par! And I am feeling a lot less anxiety with this system in place.
 Do you have a family command center? How do you keep organized during the school year? We would love to hear from you. Let us know in the comments below!
________________________________________________________________ You may also like:
Buffet Table 
5×7 Letters and Numbers 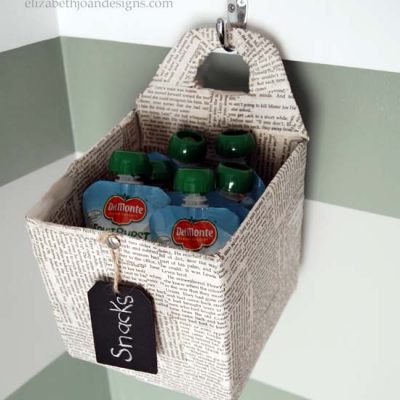
Hanging Snack Basket 
Revamped Mini Folding Table &Chairs -
Slow Cooker Taco Soup
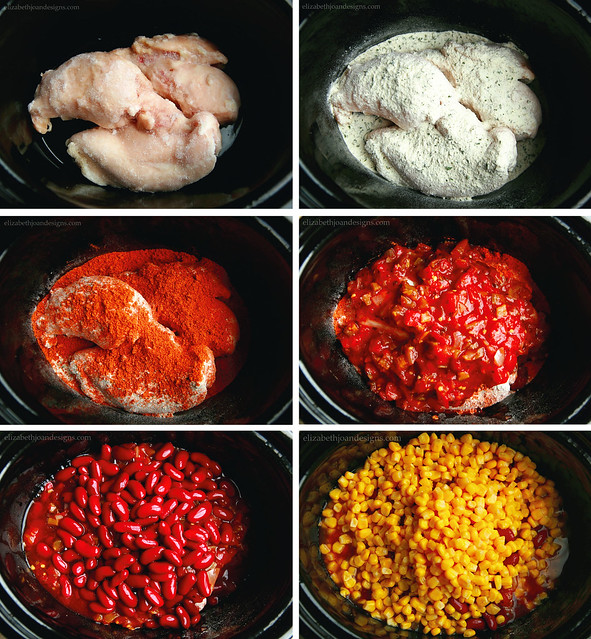
Since my daughter has started back to school, we have found ourselves super busy and I have little time in the evenings to slave over the stove trying to cook a healthy meal for the fam. Luckily, my slow cooker is there to save me! Yesterday, I whipped up this slow cooker taco soup and the meal basically prepared itself while we finished everything else on the to-do list.

This is one of my go-to slow cooker recipes because it is so simple and easy to put together. Basically, you just layer the ingredients inside and a few hours later you have a hearty meal that is super delicious. And even though I call it a soup, it is thick like a stew. I suppose you could always add a little extra water if you wanted it thinned out more.
I started with 3 frozen chicken breasts and added ranch mix, taco seasoning, salsa, kidney beans and corn on top, in that order. (That seriously takes less than 5 minutes.) Then, I set the slow cooker on high and let it cook for several hours. Before serving, I shredded the chicken with a fork and stirred everything up.
Doesn’t it look yummy?

We like to garnish our
stewsoup with fresh cilantro, cheese and greek yogurt (instead of sour cream), but it would also taste great with some diced avocado, olives or jalepenos on top. Oh my goodness! It is so amazingly delicious and easy to make. Plus, you can vary the taste, depending on the spiciness of the salsa you use or by throwing in more taco-y ingredients. Try it out and let us know what you think!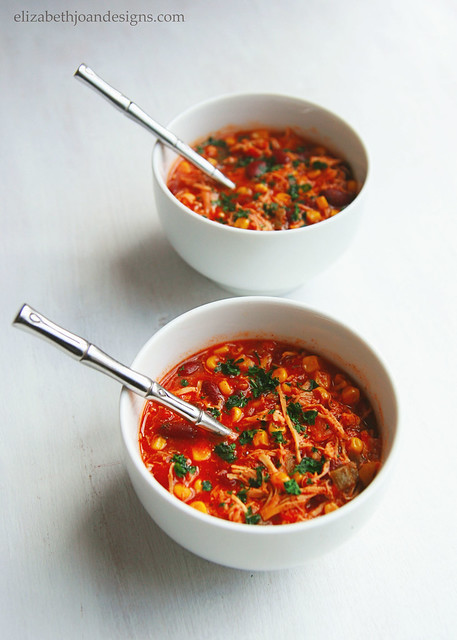
Slow Cooker Taco Soup from Elizabeth Joan Designs
Yield
8 servings (serving size: 1 cup)Ingredients
3 Frozen Boneless Skinless Chicken Breasts
Ranch Mix
Taco Seasoning
Jar of Salsa
Kidney Beans (Canned, not drained)
Corn (Cannded, not drained)Preparation
1. Layer all ingredients in slow cooker in order. (Chicken, Ranch Mix, Taco Seasoning, Salsa, Kidney Beans, Corn.)
2. Cook on high, 3-4 hours or until chicken is fully cooked. Shred chicken with a fork.
3. Serve with with your favorite toppings. -
Easy Drop Cloth Dog Bed (Washable Too!)
I’ve been kind of slacking when it comes to blogging and social media lately. To be honest, I’ve just felt overwhelmed with school and extracurricular activities starting for the kids. Plus, we decided to add a puppy to our family and that has been keeping us hopping. Trying to work in the time to get projects finished (or even started) has been difficult. Luckily, I found some time to whip up this easy drop cloth dog bed that is also washable!
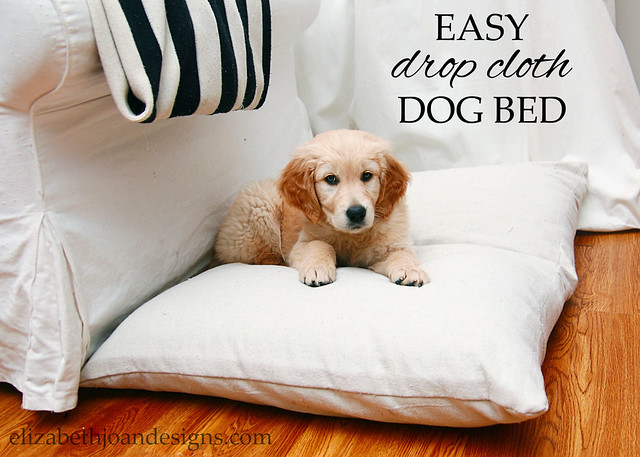
That cutie up above is our sweet little golden retriever pup, Harper. I knew when we brought her home that in addition to her crate, I wanted a special place for her to lounge and nap when we were just hanging out. Dog beds from pet stores seem to be ridiculously over priced and there aren’t really many neutral options, which is what we wanted. So I decided to make this one from a couple of cheap pillows and some drop cloth, which brought the total cost of this puppy bed to around $13.

To start, I removed the drop cloth from the package and ran it through the washer and dryer. (I like to bleach my drop clothes to neutralize the small colored threads in them and washing the fabric helps to soften it some.)

While I waited for the dryer to finish, I hand stitched the two pillows together, overlapping the corners just a bit and also stitching in the middle to really secure them together.

Once the drop cloth was dry, I cut it in half length wise and ironed it. Next, I placed the joined pillows together on top and wrapped the fabric around to figure out the approximate size the cover would need to be. I wanted an envelope closure (here’s a really good tutorial), so that the pillows could easily be removed and the fabric washed if it got dirty. After I lined everything up, I trimmed off more excess fabric.

Then it was time to sew. Since one edge was already finished, I only had to hem one side.

After that, I turned the fabric inside out, lined everything up, and stitched along the top and bottom seams.

Finally, I inserted the pillows and the bed was finished!

Harper loves her new bed! I’ve found her lounging on top and chewing on a toy a couple of times and she has even fallen asleep there several times.

Now if we could just get this potty training thing figured out!

_____________________________________________________________
You may also like:

Apple Candle Holders 
Adventures In Upholstery 
Fish Bowl Cover 
Freezer Paper Stenciled Treat Bag -
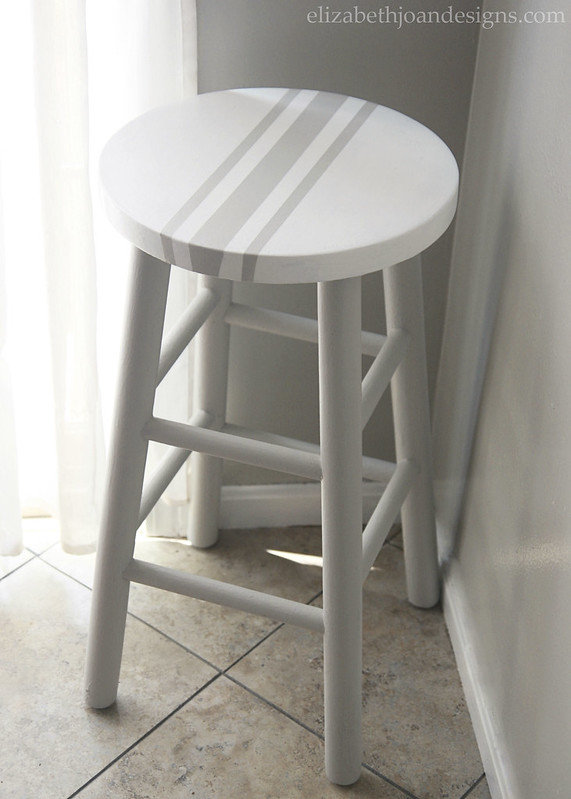
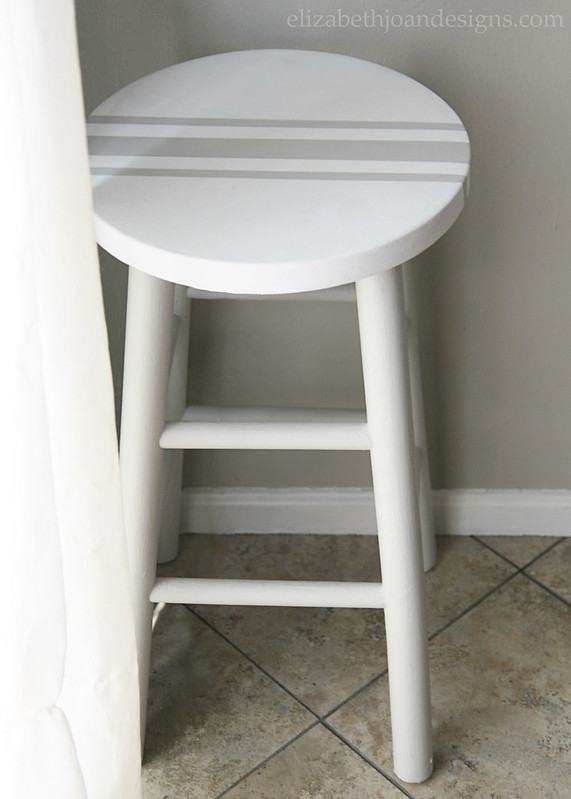
Painted Grain Sack Stripe Bar Stool
We’ve had quite a few projects that we’ve done in the past which started out as side of the road finds. So, when Emily brought me an ugly old stool, I could have just told her to take it back to where it came from, but we could both see that it had potential. And after a little brainstorming, I decided to gussy it up as a painted grain sack stripe bar stool.
As you can see below, this little seat was pretty freaky looking. I’m not quite sure what the previous owner had planned for it, but it had obviously gone terribly wrong, hence it’s curbside location.

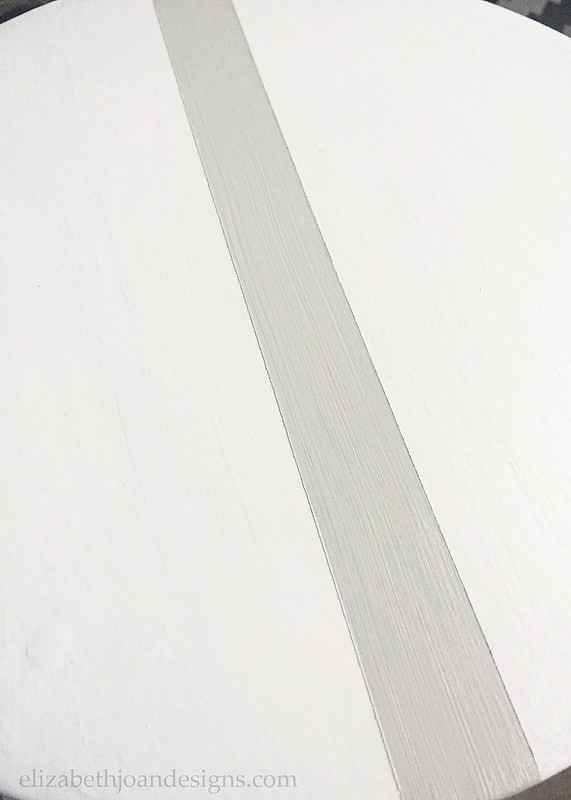
So, I grabbed some paint and got to work. For the legs, rungs and stripes, I used the color Stonington Gray by Benjamin Moore and the top got a couple of coats of Super White.

To make the stripes, I used Frog Tape. I started with the middle stripe, sort of eyeballing the width that I wanted, and taped it off. (TIP: To get uber clean lines, run a damp paper towel over the edges of the tape before painting. Remove the tape after painting, but before the paint dries.) Once the middle stripe was dry, I spaced and taped the outer stripes and painted those as well.
Behold: The power of paint! Doesn’t it look a million times better??
Since we do not have any sort of bar type counters in our kitchen, I needed to figure out another use for this cute stool. I contemplated using it as a plant stand or cutting the legs some to create a small end table, but then another need came to mind. If you’ve been following along on Instagram (Erin’s Instagram/Emily’s Instagram), you’ve probably met our sweet kitty Rowan. He has been a wonderful addition to our family, but he has gained a few habits that I’m not totally crazy about.
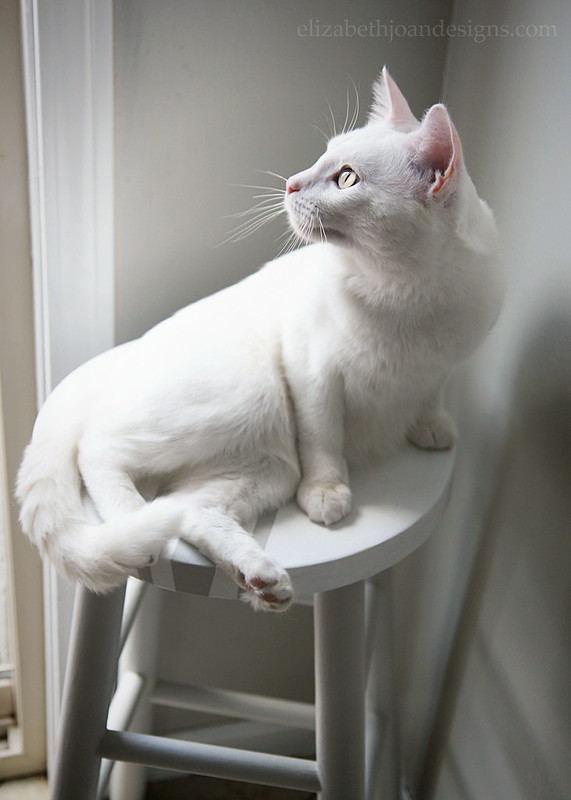
Like most cats, he loves to be up high so that he can see out of the windows and watch the birds and squirrels and one of his favorite places to do this is on our breakfast nook table. Eww. To say that I’m not a fan of his table preferences is an understatement. So I decided to add this stool to the corner of our breakfast nook and try to train him to use it instead of the table for his aviary observances. And it worked! His table time has been dramatically cut down and he loves to sit (and sleep!) on his little perch.

Doesn’t he look cute up there on his little stool? This was such a fun before and after transformation because it was quick, drastic and helpful for our kitty situation. Plus, having some cat furniture in the house that isn’t a complete eyesore is always a win. What do you think? Do you have any furniture transformations that also function as something for your pets? Let us know in the comments below!